 Today's post comes from the book Christopher Grey's Studio Lighting Techniques for Photography. It is available from Amazon.com and other fine retailers.
Some time ago, I was involved in a conversation between photographers who believed that digital cameras simply could not record an adequate contrast range. Horror stories flew about the difficulties of shooting blacksuited executives with white shirts, tuxedoed groomsmen and whitegowned brides, and interracial couples. The problem, as they saw it, was that one side of the contrast range had to be slighted in favor of the other. The ultimate dilemma, of course, was deciding which side would take the hit. Most decided it would be best to shoot for the bright side and fix the rest in Photoshop.
Though that approach works in theory, it’s misguided in reality by assuming that exposure deficiencies can always be adjusted to “normal” by using Levels or Curves adjustments. They cannot. After a certain point (1/3 stop of overexposure or 2/3 stop of underexposure), straight Photoshop adjustments will not look the same as a perfectly exposed counterpart. The second flaw in the argument is the tremendous amount of extra work a photographer would have to do just to make the proofs presentable. In other words, one would have to do major, time-consuming retouching on each and every image before making a single dime on prints. Such an investment of time is simply not acceptable in a successful digital workflow environment, even if you go through the trouble of shooting RAW files.
In truth, a little more planning on the front end would mean no work at all on the back end—no masking, no adjustments, no RAW processing—just a quick trip to the printer for terrific proofs (cosmetic retouching optional). We can accomplish this task in the studio by controlling the
strength and direction of the light.
The models for this chapter are friends of mine, Sandra and Keith, who are very much in love and engaged to be married. He is African American, she is Latina. To make this exercise more difficult (and to prove how easy this actually is), I requested that Keith wear white clothing and Sandra wear black. Because I want substantial modeling of the planes of their faces, I will use only one light for my main light, plus two kickers and a background light.
Given enough distance and a large enough light source, such as a large softbox or umbrella, it’s quite possible that you could keep your source far enough away from the subjects so that the light spread will be constant over both (or more) of them.
But what if you don’t have that option? Many photographers work in relatively small spaces and have to make the most of them. Also, many, if not most, do not have the luxury of working with large (4x6-foot) softboxes or umbrellas with a diameter larger than 36 inches.
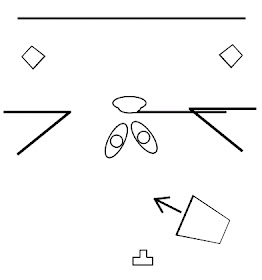
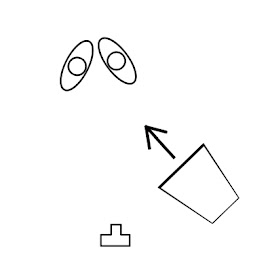 After my friends arrived, I placed two tape marks on the floor to indicate their positions and began to tweak my previously roughed-in lighting scenario. My main light was a strobe in a 3x4-foot softbox, set at the optimum distance (in my opinion) of 7 feet from the two subjects. At that distance, when the main light is aimed to the center of the two people (which is the logical place to aim it), the difference in exposure from his right shoulder to her left shoulder was 4/10 of a stop, 2/10 on each side of my target aperture of f/5.6 and too wide a range to properly expose everything. I decided I’d fix it after the other lights were set (diagram above).
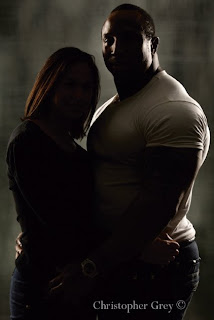
To separate the subjects from the background and add visual interest, I added two strobes in strip light softboxes, one on each side behind the couple and camera-blocked with black bookends. As a twist to what’s usually done, I powered the two lights down to 1/3 stop less than the main light. I knew I would still have a highlight along the edges because the angle of incidence of those two lights bounced light straight back to the camera along the lens axis, which, by itself, looked like this (image below).
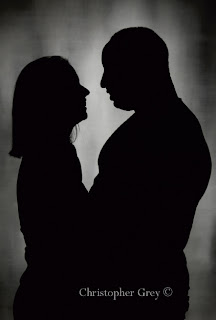
To add depth, I mounted a strobe with a beauty bowl and a 25 degree grid (a favorite combo) on a boom arm. From directly above the couple the light was aimed behind and below shoulder height. This background light was powered 1/3 stop less than the target value for the main light, as measured at the hot spot (image below).
Once the secondary lights were in place, I angled the main light softbox significantly to the left, actually aiming it past her left shoulder. At first blush this doesn’t make sense because logic dictates that he will not get enough light. In truth, however, that’s exactly what we want.
Good softboxes are designed to spray light evenly, but not necessarily with the same intensity, in all directions at it exits the box. What I did was feather the light, by angling the box, until the strength of the light on the right side equaled the strength on the left. From there it was a simple matter to power up the generator to get my target f-stop of f/5.6. I know it looks and sounds odd, but if you try it, I guarantee you it will work (diagram below).
The shoot began with Keith. If he would be overexposed, it would most likely be from this side, as it’s closest to the light. Note that there is detail in even the brightest parts of his shirt as well as in her black outfit. Note also that both faces are represented perfectly, even though no other lights are in play (image below, top). (By the way, all of these images are JPEGs straight out of the camera. A little cropping, but no Curves or Levels adjustments at all [image below, bottom].)
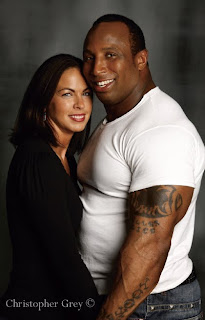
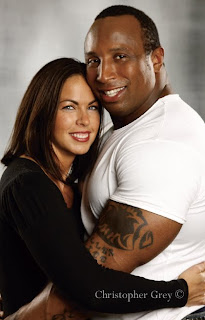
When all lights are up, the true beauty of feathered light becomes obvious. The exposure is even across the board, the kicker lights add contour and visually separate the couple from the background, and the background light provides dimension. The feathered light is so constant and perfectly controlled that their positions make no difference at all, as long as they stay on their marks (image below).

A Bonus
As we were wrapping up this shoot, it occurred to me that this scenario would be very romantic without the main light. I turned it off but maintained the camera’s aperture at f/5.6. The background light does wonderful things, adding a sense of mystery to the image, while the side lights contour my friends and give them some dimension (image below). The ability of light to feather itself across a large area is something that you’ll be able to use in dozens of situations. You only need to play with this once to get the concept, and each additional time you use it, it will become easier to estimate just how much angle you’ll need. The first time I tried it, years ago, I spent ten minutes getting it right. These days, it takes only a minute or two. The best part? You can feather light from much shorter light-to-subject distances.

BUY THIS BOOK FROM AMAZON

Thanks for describing the reason behind feathering. I was just "doing it" without really understanding why.
ReplyDelete