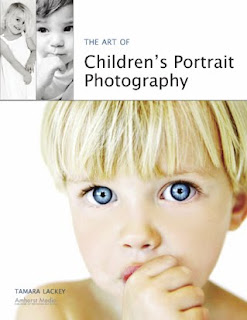
 Today's post comes from the book The Art of Children's Portrait Photography by Tamara Lackey. It is available from Amazon.com and other fine retailers.
When you are shooting in the studio, you have an incredible amount of options from which to choose when creating “the perfect light” for your session. You are basically considering three or four main factors: the main light, the fill light, and a reflector (for extra fill). Often, you should consider adding a back light or hair light, as well.
The main light is aimed at the subject to create the basic pattern of light and shadow on their face. One of the simplest ways to manage your main light is to use a large softbox and position it at a distance from the subject. This allows you soft, even lighting and a great spread of lighting to help track the little one as he makes his way around the shooting space.
The fill light is used to open up shadows that may be created on your subject’s face by the main light (or any other ambient lighting). This can be an actual second light source (set to produce less light than the main) or a reflector placed on opposite side of the subject from the main light. When using a fill light source, a supplementary reflector can also be added for additional fill. This is often used to create a more flattering and evenly distributed lighting effect across your subject, or to pop up catchlights in the eyes.

The choice between an artificial lighting setup and natural lighting setup can make the same scene look very different. You decide. Do you want the look of man-made lighting for a crisp and clear shot—an image that really pops (left)? Or do you want natural lighting, for a warm, soft, and more gentle image (right)?

It’s a good idea to keep a reflector in easy reach or attached to a small boom for easy placement when needed. Foam-core art board can be used as a simple and inexpensive reflector. This can be purchased in a variety of sizes (or cut down to whatever size you like), making it a very flexible option. It can also be very handy to create a large foam-core modifier by taping two pieces of 4x8-foot board together at one edge. This produces a large V-shaped modifier (often called a bookend) that can stand up on its own, making it great for bouncing light evenly across your subject. It can also be used as a simple backdrop when your subject scampers into it.
The following are some simple portrait lighting configurations to consider for a shooting room that has one main window.
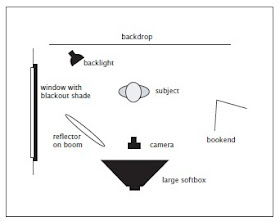
Setup A. This setup employs a main light (a large softbox), fill from a 4x8-foot bookend, a reflector, and a back light (see diagram). It offers you a clear, well exposed image with flattering, even light. You may accumulate some shadowing, but it is usually to pleasing effect. This is a great setup for children who move around a lot! (Note: For this setup, the window is blacked out, so it does not affect the lighting.)


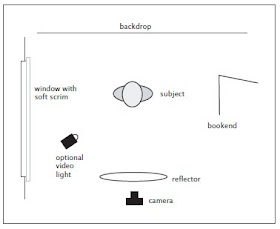
Setup B. This setup incorporates window light softened with a scrim as the main light, fill from a 4x8-foot bookend, and a reflector. Optionally, a video light can also be added. The light produced by this setup may be a little softer and warmer than that achieved with setup A. Because you do not have to wait for the lights to recharge, it also makes it easier to shoot in a rapid-fire style, so you don’t miss that quick change in expression.


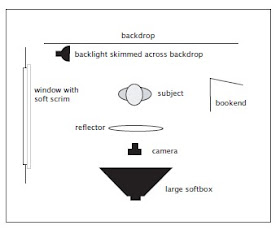
Setup C. In this setup, window light (with a scrim for softening) and a large softbox are combined as the main light for a controlled high-key look. Fill light comes from a 4x8-foot bookend placed to the side of the subject. Also used are a reflector and a back light. Altogether, this creates a very high-contrast, ultra-defining, minimally shadowed image that is bright and inviting. It does, however, limit you a bit in terms of how widely the subject can roam.


BUY THIS BOOK FROM AMAZON

wonderful!
ReplyDeleteThank you for this post.
ReplyDeleteNatureboy.