 Today's post comes from the book Available Light: Photographic Techniques for Using Exisitng Light Sources by Don Marr. It is available from Amazon.com and other fine retailers.
The number-one question I get asked when teaching lighting workshops is, “How much is all of this lighting equipment going to cost me?” It’s true that I am a recovering strobe nerd who has spent thousands of dollars on big power packs and several strobe heads. I still love the power that my strobe packs give me when I need to light a big area or am shooting in a very dark area. But I have been using them less and less these days. I prefer the freedom of working without strobes—the freedom to move quickly, the freedom to change lighting setups more quickly, and the relaxed feeling my subjects get when there isn’t a ton of gear surrounding them. If it makes you feel better or more professional to shoot a portrait with three power packs and ten strobe heads then go ahead and do it. Just don’t call me to haul your gear.
So the answer to the question above is, “You don’t need lighting equipment to take good portraits.” You can get a lot of shots to look like they were done with strobes just by using the lights and windows you have around your house or by buying some inexpensive lights from the hardware store.
Your Thumb, Your Friend
When it comes to photographing someone in your home, you will probable ask the question: Where should I put him or her?My answer is: Let the light guide you. Use an area that has pleasing light to your eye. If you are not sure where that might be or you don’t want to move your subject from sofa, to dining room, to barstool, to family room just to find the right light, then use this ancient photographer’s secret. Hold your thumb out at arm’s length at the position your subject will be at. Observe how the light is hitting your thumb. Your thumb is like a little face. It’s round and has a pointy front. Look at the lighting contrast from side to side. Is it frontal or side lighting? Is there enough fill light on the shadow side? Is light from the rear wrapping around the sides of your thumb? Does your thumb look like it’s in a good mood today? Take your thumb on a walk from room to room to find the good light.
Positioning the Subject
The first image was taken in a living room. Sunlight came through a window and created a very high-contrast situation. I actually prefer more contrast when I’m photographing men because I think it gives them a stronger appearance. Although this shot is interesting, it has a bit too much contrast. The interior of the room acts like a big cave and hardly reflects any sunlight back onto the dark side of the subject’s face. And there are hot spots on the highlight side of his face. So, in essence, the bright side is too bright and the dark side is too dark. Also the wall in the background is flat and uninteresting. You get the idea.
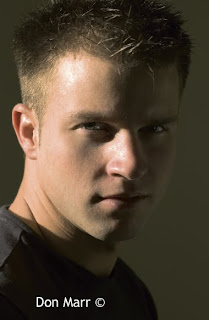
A quick solution to this high-contrast situation is to turn the subject away from the sunlight so that the sun hits their hair and shoulder, as with the image below. Now the sun acts like a hair light. In this case, a simple lamp (with a daylight-balanced low energy fluorescent bulb) was added at camera left to light his face. You can see the catchlight from this lamp reflected in his eyes. This is a simple reading lamp with a movable lamp head that can be pointed in any direction.
Window blinds form the background for this shot, and by playing around with these a bit I was able to position “the hair light” (the sunlight) exactly where I wanted it to hit the subject. Comparing the first and second images, you can see that the blinds also are a better looking background than the wall since they create some shape and texture. For a shot like this, it’s also helpful to shoot with a telephoto lens and a narrow depth of field. The telephoto lens and shallow depth of field help throw the background out of focus and keep the attention on the subject’s face, especially their eyes.
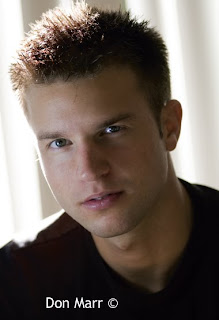
To create the next image, the lamp was moved to camera right and placed a bit higher. This is a classic light placement called loop lighting. The lamp is placed about 45 degrees to the side of the subject and about 45 degrees up from the subject. It’s called a loop light because of the loop-shaped shadow formed by the subject’s nose. The sun still acted as hair light on the back of his head and shoulders, although it was toned down a bit by closing the blinds further.
The Living Room Studio
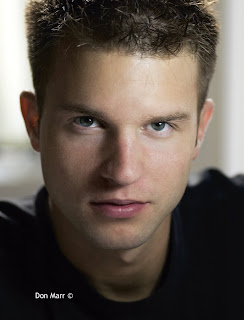
The next sequence illustrates a technique you can use to produce a variety of studioesque (is that a word?) looks right in your own living room. The following sequence of shots were taken on a cloudy day in a living room with windows on three walls, but they could have been done in a room with windows on two walls, as well. The subject faced a north-facing window. North light is always soft, especially on a cloudy day, so this was a good choice for our portrait. There were also translucent white curtains on this window, which gave more options for controlling the quality of light. It wasn’t very bright, so a slower shutter speed was used—along with a tripod.
In the first shot, the translucent curtains were pulled closed behind the camera. This diffused the northern light even more, creating a very soft main light. The window at the back wall let some light in to light the subject’s right shoulder and hair. The dark green curtain over her left shoulder was closed to block virtually all of the light from that window.
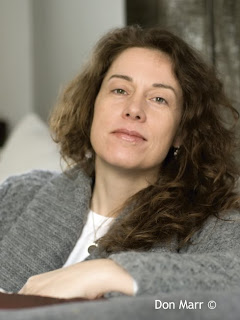
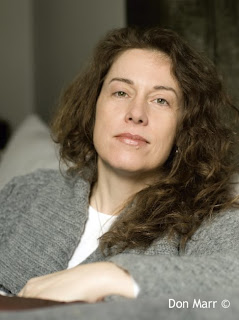
In the next shot, the translucent curtain behind the camera position was opened up to allow the overcast daylight to light the subject’s face fully. Of course, this let a lot more light into the room but mostly just in the area of the subject. This affected the exposure, so a faster shutter speed was used to keep a correct exposure on the subject’s face. Notice that the background has gone darker now, relative to the subject. The quality of light has changed slightly, as well. It is a bit higher in contrast due to the fact that the diffusing curtain was not used.
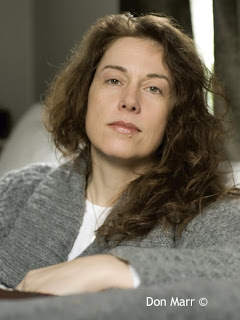
For this next shot, the dark green curtains directly behind the subject were opened slightly. You can see them clearly in the shot. This created a hair light on the subject. Be careful about letting too much light in from this “hair light,” though; it could cause lens flare. Not that there’s anything wrong with that! Just be aware of it.
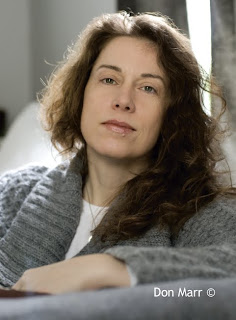
For the final shot, the translucent white curtains behind the camera were closed once again. This reduced the light on the subject, so the exposure was changed back to what it had been in the first shot. Now the background has gone lighter since the overall exposure has increased. And we are back to our softer quality of light on the subject’s face. I think this is the best shot of the bunch!
BUY THIS BOOK NOW

No comments:
Post a Comment