Nikon Speedlights

Today's post comes from the book Nikon Speedlight Handbook by Stephanie Zettl. It is available from Amazon.com, Barnes & Noble, and other fine retailers.


THE ART DECO COUCH
LOCATION: The lounge of an art deco hotel
EQUIPMENT: three sb-900 speedlights, mono-pod, RadioPoppers, Nikon  D700 camera
CAMERA SETTING: f/2.8,  1/100  second , 1000  ISO
FLASH SETTINGS:  TTL ,  FEC  –1 EV for main light, FEC  –1.3 EV for accent light.  Each speedlightwas equipped with a RadioPopper.  The main light and accent light were controlled by an on-camera  master flash set to commander.

My camera’s white balance was still set to tung-sten from a previous shoot when I took the first photograph from this session, but I found the unnatural color palette appealing and decided to continue using it ( images 1  and  2) .

#1
#2
 I liked the spotlight effect of the direct flash on Mallory, but I didn’t like how there was no definition to her legs. To address this, I placed a second accent Speedlight on the floor to camera right and aimed it toward her legs. While it prop-erly illuminated her legs, it also caused a distract-ing cross shadow on the couch (images 3 and 4). By using a piece of black foam to flag my flash I was able to better control the light falling on her legs (images 5 and 6) .

#3
#4

#5

#6
 For comparison, I also photographed our beautiful model in the same setup with a soft-box and a more accurate color balance. You can see how these changes created a totally different mood in the shot (images 7 and 8) .


#7
#8

Hollywood Lighting

Today's post comes from the book Hollywood Portraits: Hot-Light Techniques for Professional Photographers by Lou Szoke. It is available from Amazon.com, Barnes & Noble and other fine retailers.

Classic Hollywood
This couple wanted an image with a classic Hollywood look. They work wonderfully with the camera, and they have become great friends of ours.


The lighting for this image was very basic. The main light came from above, lighting the woman’s face and spilling onto the man’s face at a slightly lesser intensity. I put a hair light on the woman and a background light behind the man. The fill light was in line with the man’s nose.


Get Close
I have been in this business for many years, and I can tell you, with confidence,that the best-selling image is usually a close-up. I think it comes down to the theory that the eyes are the entry-way to the soul.


Nevertheless, to make sure the client has a variety of images to choose from, I also try to do a full-length and a 3/4-length shot in each session.


Shoot As It Happens
Some of the best images come about when you are simply watching the client and capture an image when the right moment presents itself.


In this particular session, the baby was being restless and fidgety. I noticed that Dad kept looking down and talking to him, so I shot the portrait as the moment transpired.

Sometimes the children in the image dictate what is going to happen. You might as well just shoot and hope for the best. Some of my best shots have been the spontaneous takes such as this one.

The Language Of One's Eyes
This young lady was working at the local mall when my wife and I came across her. I loved her look and wanted to add her to my portfolio. We are not bashful at all about asking people to model for us. They are usually very humbled by the offer and are excited to do so. I pay the models for their time with 8x10-inch finished photographs of their choice.


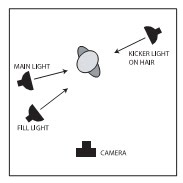
To light this image, I used a main light modified with a barn door at camera left. I used a small kicker light on her hair. The fill light was placed in front of her and in line with her nose.

Corrective Posing

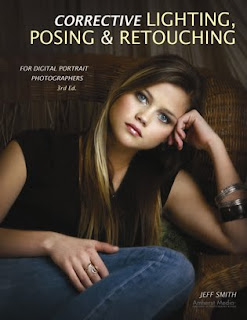
Today's post comes from the book Corrective Lighting, Posing & Retouching for Digital Portrait Photographers, 3rd Edition by Jeff Smith. It is available from Amazon.com and other fine retailers.

Personally, I think posing is the most fascinating part of what we do. If you put a person in front of a window, you can move their arm or their leg—or do something as simple as turn their head—and completely change their appearance. With light as a constant, posing the various parts of the body can be the difference between a happy client and one who walks out of your studio without buying.

The pose can make even the most basic type of portrait come alive. Other than the expression, nothing will sell more than the pose. Posing can also do more to hide clients’ flaws than any other technique—and probably as much as all of the others combined. Posing alone can hide almost every flaw that the human body can have. For every person, in every outfit, there is a pose that can make them look great. You just have to find it.

THE PURPOSE OF THE PORTRAIT
Your first consideration in posing is the purpose of the portrait, not just making the client look good. Too often, a photographer creates beautiful images that the client never buys—and the photographer never understands why. Usually, it is because the portrait that was created didn’t match the client’s purpose for having the portrait taken.
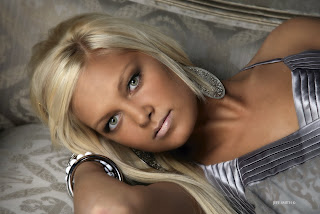
A pose like this makes for a striking image—but if this were my daughter, I might get a little creeped-out looking at it (and receive some strange looks if colleagues saw the portrait on my desk).

I have children, and when I see a photo of them I want to see them the way I see them everyday—relaxed and looking like they are enjoying life. I also have a wife. When I see her, I want to see the beautiful woman that God has given me to share my life. I am a business owner and author, and when I see photos of myself in this light, I want see a traditional portrait taken to fit a specific purpose. If you mix up any of these portraits and give them to the wrong person it doesn’t work. I don’t think my children want an alluring picture of their mother any more than they want a photo of me looking like a sober judge.
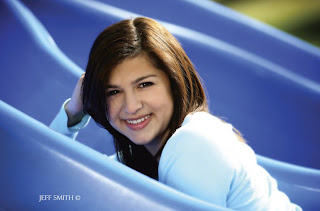


In the same vein, many senior portrait photographers struggle with the fact that educators and books present very sexy, fashion-oriented portraits of seniors. Photographers love these, but they don’t sell well to the client—because most people want senior portraits to send out to family and close adult friends. Parents don’t want to send out a portrait in which their teen daughter looks “sexy.” However you can incorporate a fashion edge in less alluring portraits that will actually sell.

This is the difference between thinking like a photographer and businessperson: a businessperson knows that pretty pictures don’t pay the bills, pictures that fulfill the purposes of the client do. Here is an interesting fact: You can take a somewhat crappy portrait that has so-so lighting and isn’t posed or composed very well, but if it fulfills the purpose of the client, in all likelihood they will buy that somewhat crappy picture.
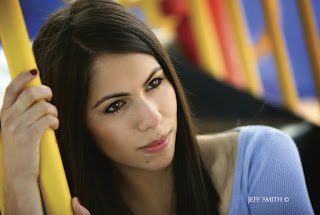
To be salable, portraits must sometimes please two different people. In the case of senior portraits, this means pleasing the senior and their parent.

Conversely, if your portrait doesn’t fulfill the purpose your client had in mind, even if it is an award-winner, they will walk out without buying the portrait that helped put a ribbon around your neck. While I don’t advocate taking so-so portraits, I think photographers could live a whole lot better if they would just think of each client’s wishes when they create portraits—and make creative decisions based on the client’s wants and not their own.

CHOOSE THE RIGHT STYLE
Once you know the reason the portrait is being taken and to whom it will be given, you can design a portrait to fit that need. This is the first step in designing a portrait. The clothing, pose, lighting, expression, and set/location/background should all be selected to produce that style of portrait, for that buyer.

Keep in mind, however, that in some cases you may need to balance the demands and tastes of multiple people. In senior portrait photography, for example, we have two buyers. This means that two different styles of portraits are required. The senior is the first buyer, and she will want to look cool for her friends. The second buyer is the parent, who will want a portrait that makes her little girl look like the young lady she sees when she looks at her daughter. If you don’t consider both buyers, and the end use of each set of portraits, you will lose half your business—or never get the senior through the door in the first place.

Once you understand the purpose of the portrait, you need to select a posing style that will be appropriate for the final portrait. Basically there are three posing styles to work with: traditional posing, casual (or “slice of life”) posing, and glamorous posing.Within a single person’s session you may use a variety of posing styles. This is a business decision you must make. But to learn posing you need to be able to distinguish between the various types of posing and know what type of situation each is suited for.

Traditional Posing. Traditional posing is used for business and yearbook portraits, as well as for photographing people of power or distinction. This style of posing reflects power, and to some degree wealth, respect, and a classic elegance. Whether these portraits are taken in a head-and shoulders or full-length style, the posing is largely linear, with only slight changes in the angles of the body. Whether sitting or standing, the spine of the body stays fairly straight and the shoulders stay fairly square. The back is straight and the chest is up (unless photographing a woman with a large bust).
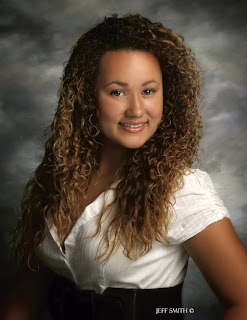


Casual Posing. Casual poses show the person you are photographing as they really are. Watching people as they relax, read a book, watch TV, or have a picnic at a park will give you some of the best posing ideas you can find. Notice the way people lay, lean or rest their bodies, legs, arms, and even faces. See how people use one part of the body to support another. They will bring up their knees to support their arms and bring up their hands to support their heads. Casual poses are used when the portrait is to be given to a loved one, like a sibling or parent.
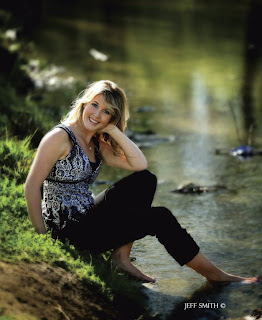


Glamorous Posing. Glamorous poses make the person look alluring—the way they wish they looked all the time. Ideas for these poses can be found in sources from fashion magazines to lingerie catalogs. If you want to add to your glamour posing style, look at a Victoria’s Secret catalog. Your clients may have more clothing on, but the structure of the posing will be the same.
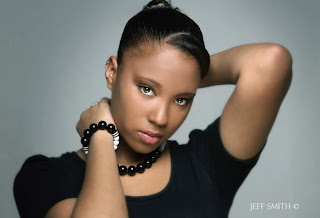

The purpose of defining each type of pose, as well as determining the reason the portrait is being taken, is to have a direction for the session. This is the point at which a photographer’s own style and experience take over. For example, many of my traditional poses are much more glamorous in their look than what the average photographer would consider traditional. This is because, as human beings, I think we all want to appear attractive.

If you don’t have a great deal of time to spend with your client before a session, ask them to tear out images from magazines or catalogs that show what they have in mind for their portraits. This is a great way to get new posing ideas that are handpicked by your target market. (I keep all these tear sheets for my next test session.)

BASIC PRINCIPLES
Less is More. The less you show of a person, the fewer flaws you have to correct. I can create a beautiful and salable portrait of a woman who is a hundred pounds overweight, provided I compose it as a waist-up image. With the right clothing, the correct lighting, and a cool pose to help hide the signs of weight gain, it will be beautiful. If this client wanted me to create a full-length image of her, however, it would be much harder. It could be done, but beyond a certain weight, it is extremely difficult to provide the client with full-length images her ego will accept.

The idea of “less is more” isn’t just for minimizing the flaws that the average paying client has. Some of the most requested poses for all clients, at least as of this writing, are the extreme close-ups. In fact, head-and-shoulders poses make up 75 percent of the portraits that people actually purchase. While photographers have always thought that full-length poses should be included in a session for variety, there are clearly times when they shouldn’t be—and from a business standpoint, spending time on portraits that are less likely to sell doesn’t make sense.

Stand, Don’t Sit. When weight is a concern, which it will be for about 75 percent of your clients, standing is often better than sitting.When someone sits, the legs push up the stomach, the stomach pushes up the chest, the chest hides the neck, and before you know it you have a lady with her head sitting on top of two large breasts. When you stand that same person, gravity works in your favor and pulls the weight downward, away from the face.

Camera Angle. When photographing larger people, elevate your camera angle so you are shooting down toward your client. With the client posed normally, simply raising their face up toward the elevated camera stretches and smooths the skin of the neck and face. This is very effective—and it’s all the rage right now even for subjects with average builds.

This technique works on portraits from head-and shoulders to full-length. With the camera in an elevated position (yes, you will need to stand on a ladder), the body can be included in the shot—but its size will be minimized because it is partially obscured by the face and shoulders.
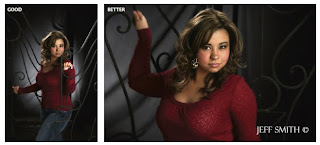
Tighter shots make up 75 percent of what people actually buy—and, for most subjects, they are the most flattering type of images.

Avoid Mushrooming. When the subject’s body touches or rests on a surface, it should only rest on bone. If you have a client sit down, the butt and thighs are going to mushroom out, adding weight and inches to them in their portraits. If, on the other hand, you have the client roll to the side and shift their weight onto one hip (where there is a bone) the hips will look thinner and the bottom will be hidden from view.

The same is true for resting an arm on a column or tree branch. The average client will rest their forearm on the surface, making it mushroom out and appear larger. Instead, have them shift their weight to the elbow and slightly raise their forearm off the posing surface.

If a pose has a client sitting squarely on their bottom, lift their knees up. Bringing one foot or both closer to the camera keeps the pressure points on the two hip bones, lifting the thighs so they do not mushroom out.

Turn the Body Away from the Main Light. No matter what style of posing you are using, start with the body facing away from the main light. This is the thinnest view of the body and creates shadowing in which we can hide flaws. Then, turn the face back toward the main light to properly light it and stretch out the loose skin that most clients have under the chin.

Consulting With The Subject

Today's post comes from the book Understanding and Controlling Strobe Lighting: A Guide for Digital Photographers by John Siskin. It is available from Amazon.com and other fine retailers.
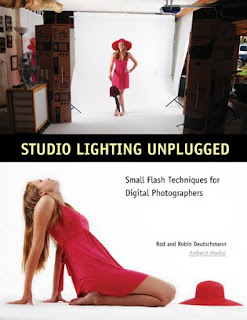
A great portrait depends on more than just light—certainly, the pose and the mood created in the image are also important. If you define the subject’s face well and create lighting that is appropriate for your subject, you will make more successful portraits.

This is one of my favorite portraits. I call the shot What?

Before I take a single shot, I talk to the subject about how they want to appear. Listening to the client voice their expectations gives me time to study their face and decide whether I want to work with hard or soft light. I also try to identify features I want to highlight or hide and consider what background might complement the clothes. I make it a point to ask the client how the image will be used. A shot that will be in an annual report should be carried out differently than a portrait made for a loved one.

Light creates definition, shape, and color to any shot. Each portrait should be lit to suit the subject.

Since all people do not look alike or want to be shown in the same way, lighting should be customized for each subject. While department store studios don’t do this, it is one of the ways an independent photographer can add value to their services.

All people have different facial features and skin tones, which depend on their ancestors’ origins. I use a longer tonal scale with pictures of people of African origin than persons of European origin. For persons with Asian ancestry, I build more contrast into the face to make the image more three-dimensional.

Sometimes character is what makes a shot compelling.

Finally, when you are making decisions about how to light your subject, you should consider his age. We might create character lighting for a man using a small light source, say just an umbrella. For someone who wants to appear more youthful, I would use a large light source and a reflector, just as a start.

Not all portraits are about the face.

LIGHTING IDEAS
There are a few things that I do for most portraits. I start with a large light source (usually the umbrella/light panel combination) placed to one side of the face to accentuate the shape of the face. Sometimes this is the only light, but I typically add a smaller, harder light near the camera. This gives me catchlights in the eyes and changes the contrast in the face. I might use a warm filter on this light. I may even mount this on a camera bracket rather than a light stand, so the light travels with me. The third tool I have is a reflector, usually a light panel. I have a silver cover on one side and gold on the other. I don’t use this setup constantly. Nothing works for everyone. I would set this up if I didn’t know anything about whom I would be shooting. Since I do commercial shooting, this happens pretty frequently.

For this shot, the only light was a snoot. I used a large reflector for fill.


A simple setup was used to create this soft and delicate image. There are three lights: an umbrella/light panel (large light), a beauty dish (this smaller light was used for the catchlight), and a reflector (background light).

In this shot, the hair light was important. It added definition and sparkle to the hair.

There are many special-purpose tools for portraiture, and there are other ways to use the more typical tools. The basic tools I use are the large light source, a hard light for contrast, and a reflector. I may use a hair light on a boom or a rim light positioned behind the subject. However, I start with a simple setup.

Flawless Indoor Portraits With Flash

Today's post comes from the book Studio Lighting Unplugged: Small Flash Techniques for Digital Photographers by Rod & Robin Deutschmann. It is available from Amazon.com and other fine retailers.

There is nothing as intimidating as photographing a living subject. So far, our journey has been nonthreatening to our egos (the wall in front of you has yet to complain about a bad photo).

When you photograph people, they are going to want to see the image—and they may give you feedback about your work. This may make you uncomfortable at first.

You may want to invest in a “shooting” stool. This gives your model a chance to rest between shots and keeps them at a comfortable height for the photograph.

Ask someone who loves you very much to help with the fol -lowing experiments and let them know that you are simply trying to better yourself as a studio photographer. Smile a lot, be positive, and when you do get an image perfect, make sure to let your subject know it had everything to do with their winning smile and not just the lighting you created.

Exercise: Freezing Motion
• Work in a room that you are very familiar with, one that you have already had photographic success in.
• Ask your model to stand or sit several feet from you.
• Start with an aperture of f/5.6.
• Set the camera’s ISO to 200
• Set the camera’s shutter speed to its flash sync speed.
• Point the flash toward the ceiling.
• Turn the power of the flash to full (1/1).
• Take a test image and examine it.
• Adjust the power setting of the flash until your model is lit perfectly.
• Examine the image closely. Check out the focus and look at the colors. Adjust the white balance if needed. Do what you can to improve the shot. Make it perfect, then move onto another room and do it again. Devoting just an hour of your time to this exercise will yield some great benefits— confidence and pride in your abilities.
• Now, move the camera a bit when you shoot. Try to create motion blur. You’ll find it’s impossible to get a blurry photo when shooting with a flash in the studio. Imagine never again having to worry about your subject (or you) moving when you take a photograph indoors.


Off the Wall
The light on your portrait subject looks great when it is bounced off the ceiling, but what if you could bounce it off of something farther away, like a distant wall? What effects could you achieve with an even larger light source, coming from a different angle? Let’s check it out


Notice how the shadows from a bounced flash are much more flattering on your subject and background.


By bouncing the flash off a nearby wall, you are both enlarging and scattering your light source. This creates a very pleasing quality of light. Notice the difference between this image and the previous one where the light was bounced from the ceiling. Look closely at the differences between the shadows, how they fall, and the difference in the level of detail that can be perceived in the shadow areas.


Exercise: Off-the-Wall Lighting
• Set the same aperture, shutter speed, and ISO setting you used in the previous exercise.
• Rotate and spin the flash head toward a wall. Ensure the flash is pointed directly at the wall, at a full 90 degrees.
• Take a shot and review the results. Adjust your flash settings and take another photograph. Repeat the process until you are happy with the lighting on your subject. Don’t be surprised if you have to increase the power from the flash dramatically. As the distance needed to illuminate your subject increases, so does your need for power.

Working In A Client's Home

Today's post comes from the book Family Photography: The Digital Photographer's Guide to Building a Business on Relationships by Christie Mumm. It is available from Amazon.com and other fine retailers.


The high ISO capabilities of today’s DSLRs have made shooting in clients’ homes much more feasible. I love the excitement of heading out to a client’s home and knowing it will be an utterly unique shooting location. There are always special areas to photograph the family. An added bonus is that their images will be even more significant because they represent their lives in such a personal way.


Evaluating the Light. Some special considerations with shooting in clients’ homes may include the lack of control you will have over lighting quality and color, working with pets, and learning to be comfortable asking clients to move furniture for the portraits. Many clients will have an idea of where in their home they would like to have portraits taken; sometimes, however, these
locations will not be the best for lighting. As I noted earlier in this chapter, lighting is much more important than the background. Try to prepare your client in advance of their session by letting them know that you will be asking to see all the rooms in the house to determine the best light. This will avoid the potential embarrassment if certain rooms are not tidy and ready for photography.


It is also a good idea to speak with clients in advance about the direction their windows face. This can help you plan the appropriate time of day to hold their session. If the home has many large windows facing due west, I would not recommend shooting there late in the day. At that time, the light will be harsh and hard to control. A morning or early afternoon session would be a better idea. Naturally, the opposite is true for east-facing windows. North-facing windows are great all day long in the northern hemisphere; southfacing windows are, accordingly, good all day for the southern hemisphere.


Locations to Try. Portraits of kids in their own bedrooms can be very fun. Most children love to show off their stuff and will enjoy the personal attention they get. Backyards can be nice—especially if the yard has some sort of play structure (trampolines are particularly fun for kids and grownups alike). I also love to take portraits of families flopped down on Mom and Dad’s bed—cuddling, reading, having a tickle fight, etc. Big, comfy beds are also great for baby and maternity portraits—so encourage your clients to allow you to shoot in their bedrooms if the lighting allows. Other good places can be bathrooms (tubs and showers make clean, simple backdrops) and kitchens, which usually have beautiful light and nice floors.

Lighting is more important than the background—but here the coordinating cool tones of the wall and the parents’ clothes make the warm skin tones the focus of the image.

Creating A Photojournalistic Atmosphere

Today's post comes from the book Engagement Portraiture: Master Techniques for Digital Photographers by Tracy Dorr. It is available from Amazon.com and other fine retailers.

To be truly photojournalistic, your portrait subjects need to be totally at ease and unaware of your presence. Since engagement sessions are scheduled and consist of only the three of you, there is little opportunity for this to occur naturally. They are only with you for a half an hour to an hour and they know that you are shooting their engagement photo, so of course they are more than aware of you and your camera. If the subjects are properly distracted, however, they may momentarily forget all about you, creating a truly photojournalistic moment. So what can you do to encourage a photojournalistic atmosphere?


When you begin the session, select a few poses that allow the couple to loosen up and get comfortable. That will create the open atmosphere needed for them to improvise. Be sure to comment to them that you want them to do whatever comes naturally. They should not feel constrained to a pose—you want them to ad-lib as much as they would like. Offer up examples such as, “Feel free to pick up your fiancĂ©e or move to a new location. You don’t need my permission or instruction to try anything that comes to mind.” By allowing them to dictate what pose comes next or be creative in how they interact, you will inspire natural moments—and totally photojournalistic moments will be born out of those.


You will also benefit from welcoming any and all distractions that occur. If a dog runs through your shot or a huge gust of wind blows, don’t put down your camera and wait for the distraction to pass! Utilize that moment to its fullest extent—be ready to capture the couple’s reaction to whatever distracts them and see how that encourages them to relate to each other. Those moments will be totally unscripted and demand that their attention be withdrawn from you for at least a few moments.