
 Today's post comes from the book Jeff Smith's Posing Techniques for Location Portrait Photography by Jeff Smith. It is available from Amazon.com and other fine retailers.
The eyes are the windows to the soul and the focal point for any portrait. You can create the most stunning pose in the most stunning scene, but if the eyes are not properly lit and properly posed, the portrait will not be salable.
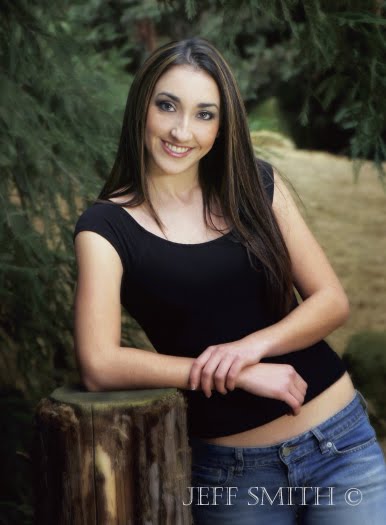 Poses with direct eye contact are usually the most popular among portrait buyers.
Position of the Eyes. There are two ways to control the position of the eyes in a portrait. First, you can change the pose of the eyes by turning the subject’s face. Second, you can have the subject change the direction of their eyes to look higher, lower, or to one side of the camera.
Typically, the center of the eye is positioned toward the corner of the eye opening. This enlarges the appearance of the eye and gives the eye more impact. This is achieved by turning the face toward the main light while the eyes come back to the camera. This works well for all shapes of eyes, except for people with bulging eyes. When this is done on bulging eyes, too much of the white will show and draw attention to the problem.
 When the mouth smiles, the eyes must smile, too—otherwise the expression won’t look natural.
Eye Contact. The point at which you ask the subject to focus their gaze in respect to the position of the camera’s lens also, in essence, poses the eye. First and foremost, the subject should always be looking at someone, not something. To do this, I put my face where I want their eyes to be. There is a certain spark that the eyes have when they look into someone else’s eyes that they don’t have when they are looking at a spot on the wall or a camera lens.
Usually, I position my face directly over the camera. This puts the eyes in a slightly upward position, increasing the appearance of the catchlights (see page 39). If the camera position is too high to make this possible, I position my face on the main-light side of the camera, never beneath it and never to the shadow side of it. Both would decrease the catchlights.
Usually, I position my face directly over the camera. This puts the eyes in a slightly upward position, increasing the appearance of the catchlights (see page 39). If the camera position is too high to make this possible, I position my face on the main-light side of the camera, never beneath it and never to the shadow side of it. Both would decrease the catchlights.
 Having the subject look at your eyes (rather than a spot on the wall or some other inanimate object) gives their eyes more spark in the portrait.
When the eyes of the subject look into the lens (or very close to it), the portrait seems to make eye contact with the viewer. An overwhelming majority of our senior clients prefer the intimate feeling of eye contact as opposed to the more reflective portraits where the eyes look off-camera, but this is our clients. You need to offer both styles of portraits and discuss with
your clients what is right for them.
Reflective Poses. Reflective posing works well in a storytelling portrait—a bride glancing out a window as if waiting for her groom, a senior glancing over the top of a book and thinking of the future, etc. If the eyes are to look away from the camera, there a few rules that need to be followed. First of all, the eyes should follow the line as of the nose. It looks ridiculous to have the eyes looking in a different direction than the nose is pointing. This goes for poses with the subject looking just off-camera, as well as for complete profiles. Also, as you turn the face away from the camera, there comes a point where the bridge of the nose starts to obscure the eye farthest from the camera. At this point, you have gone too far. Either go into a complete profile, showing only one eye, or bring the face back to provide a clear view of both eyes.
 Reflective poses show the subject looking off camera.
Catchlights. Outdoors, the single biggest mistake I see photographers make is not having the proper catchlights in the subject’s eyes. This usually comes from working with light that has no direction. In almost all of my portraits, I use a small reflector near the subject to ensure there are beautiful catchlights in both eyes. If you evaluate the catchlights, you can often diagnose any problems with your lighting. If each eye shows a distinct catchlight in the proper position, your main light is good; if the catchlights aren’t right, neither is your main light. Usually, this means your light lacks direction, indicating that the main light source is too large and too soft.
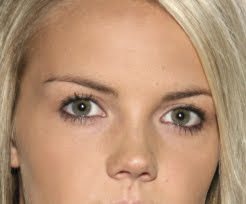
 With no direction to the light, catchlights are absent and the eyes have a dull look.
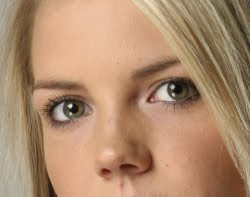
 On-camera flash creates a tiny catchlight in the center of the eye. This is not the ideal position.
 The top catchlights are in the proper position and a reflector below the subject has produced a second catchlight. This smooths the skin, softens any darkness under the eyes, and produces a glamorous look.
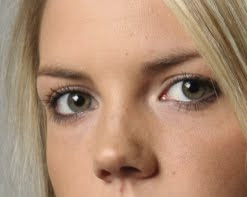 In this final image, the catchlights are strong, well defined, and located in the proper position on the eye. This is the result you want in a professional-quality portrait.
 With no direction to the light, catchlights are absent and the eyes have a dull look.
 On-camera flash creates a tiny catchlight in the center of the eye. This is not the ideal position.
 The top catchlights are in the proper position and a reflector below the subject has produced a second catchlight. This smooths the skin, softens any darkness under the eyes, and produces a glamorous look.
 In this final image, the catchlights are strong, well defined, and located in the proper position on the eye. This is the result you want in a professional-quality portrait.
I love these photography specially first one. You did a great job.
ReplyDeleteSacramento Senior Portraits
Really great discussion of how to pose the eyes and blending in the subject of catch lighting.
ReplyDeletePosing is such an important element in photographing people. I may obtain and review your book.
For a large variety of catch light examples using different studio light modifiers see http://glamourphotography.co/?p=739
It was great to visit your blog, I really liked the detailed information you provided, this helped me tonne thanks!
ReplyDelete