Showing posts with label billy pegram. Show all posts

Direction of the Light

Today's post comes from the book Lighting Techniques for Photographing Model Portfolios by Billy Pegram. It is available from Amazon.com and other fine retailers.

In addition to its quality, you must also consider the direction of the light. As noted above, light that comes from overhead is usually not flattering, because it creates dark shadows on the eyes. Instead, look for light that strikes the subject from another angle.

Front Light. Light that comes from directly in front of the subject is commonly used in beauty photography because it tends to smooth the skin and flatter female faces. However, it can also flatten the features and create a lack of depth in your image.

Angled or Side Light. Light that strikes the subject’s face from an angle puts highlights on one side of the subject (the side closer to the light) and shadows on the other side of the subject (the side farther from the light). This adds a sense of depth and helps show the shape of the subject. As a result, it is a great lighting choice for images designed to showcase the model’s body (such as fitness shots). Because light from the side accentuates texture, it also works well for clothing shots where texture needs to be visible. One downfall of this lighting is that the model’s face will be shown with texture, as well. This can be effective with men’s facial structure, but it is not normally as flattering to a woman’s face.

Light that skims across the body from the side is great for highlighting a toned physique.

Backlight. Backlight occurs when the light source is directly behind the subject and directed toward the camera. One thing to watch out for when using strong backlighting is lens flare. This occurs when light shines directly into the lens and results in a loss of contrast and color saturation, and in some cases the creation of bright geometric artifacts (reflections off the elements within the lens itself).

In this image, Backlighting created highlights to separate the subject from the background.

When paired with some kind of stronger front or side light, backlighting can add impact and separation to a photograph by accenting the edges of the subject, an effect called rim lighting. In the image above, a light placed at an angle to the subject illuminated her from the front. Two lights behind the subject created bright highlights (rim lighting) along the edges of her body, separating her from the background. In this case, the lights themselves also formed a compositional element in the background.

With a weaker (or nonexistent) front or side light, backlighting can also allow you to create silhouette (or semi-silhouette) effects. Experimenting with this technique you can achieve some amazing photographs. In the series of photographs below, I focused on the model. Her body shielded my lens, and I had her move slightly to my left so the sun would just break past her body. I varied the output of my flash for each photograph, achieving a variety of different exposure and results. Who is to say which exposure is correct?

Different flash settings combine with backlighting to produce a variety of effects.


BUY THIS BOOK FROM AMAZON

Photographing Models with Natural Light

Today's post comes from the book Lighting Techniques for Photographing Model Portfolios by Billy Pegram. It is available from Amazon.com and other fine retailers.

Natural vs. Artificial Light
There are two sources of light: natural (which includes sunlight, moonlight, and reflected light from either the sun or moon), and artificial (which includes sources like tungsten lights, fluorescent lights, electronic flash, and studio flash). Natural light is not limited to the outdoors, nor is artificial light exclusively indoors. Many times, I use flash to fill in shadows while shooting outdoors. I have also effectively used filtered window light for an indoor shot with natural light.

As you’ll see, sunlight is a great option for photography. It’s natural, often very flattering to your subjects, and widely abundant (and you can’t beat the price!). However, it does present certain challenges when it comes to control—and, unless you can shoot near a window, it’s not always an option for images shot indoors. In many cases, you’ll also find that you need more precise control than you can easily exercise over natural light. That is why photographers also need to be adept at creating effective lighting setups using artificial light sources.

As a photographer, both of these forms of light are at your disposal. It’s up to you to learn how to use them effectively in all their many incarnations.

Sunlight
Generally, the average photographer is most concerned with daylight. But saying “daylight” is just the beginning of the story—there are countless variations of just this one light source.
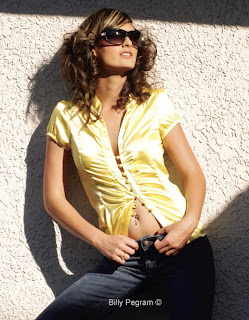
1. The high contrast in this scene, shot in bright sunlight, wasn’t captured optimally using the camera’s autoexposure mode.

Bright Sunlight. There are several problems inherent in working with bright sunlight. These problems intensify when shooting against a brightly lit background such as a light-colored wall, a beach, or snow. In these cases, the overall light tones in the image can trick the in-camera meter and lead to incorrect exposures. When shooting against a predominately dark background, you may find that your film or image sensor can’t handle the very high contrast of the scene—you’ll either have blown-out highlights (white with no detail) or blocked up shadows (black with no detail). Fortunately, with a digital camera, it is easy to shoot a few images and then preview them. Working in the manual mode (for total control), pay attention to the exposure settings as you are shooting, review your results, then adjust the aperture, shutter speed, and ISO as needed. For the most accurate results, it’s advisable to use an incident light meter and monitor the amount of light that is actually striking your subject, then set your camera accordingly. You also bracket your exposures (shoot some above and below the meter’s recommended exposure setting) to ensure you capture all the critical details.

2. Switching to the manual mode allowed the scene to be recorded more appealingly.

Cloudy Skies. Some beginning photographers hide when clouds cover the sun. The seasoned professional, however, realizes how beneficial this lighting can be. It is as if the sky has become a huge softbox, softening the hard light. Film and digital imaging equipment have a difficult time recording the high contrast scenes created by bright sunlight. When cloud cover softens this light, however, the range of contrast between shadow and highlight is lowered. Color is more vibrant and shadows are not as overpowering. The softer light is also easier on the model’s eyes. If desired, the images captured on a cloudy day can be warmed up either with an on-camera filter, by adjusting the white-balance setting, or after the shoot in Photoshop.

Practical Example: Bright Sunlight. Sunlight is the major source of light for photography—in fact, we’re usually only imitating it when we use studio lights. Therefore, photographers must learn to work with the variety and quality of light given by the sun on any particular date and time.

3. Sunlight through a thin layer of clouds produced soft, even lighting.

For this demonstration, I will address five varieties of sunlight and the advantages and disadvantages of each. The photographs in this series are unedited, allowing you to fully appreciate the differences in quality between them. All of the images were shot at 1/200 second at f/11—except for image 3; because of the low intensity of the light, this image was shot at 1/60 second at f/8.

For photograph 3, the sun was diffused by a thin layer of clouds, which provided beautiful, even lighting that was soft and virtually shadow-free. Notice how the exposure is consistent throughout the entire image. Also, notice how the colors in the jeans are true to life. This is like having a huge softbox covering the model. It is no wonder that this is the preferred light for most photographers. Very little modification needs to be done to create beautiful photographs of models or landscape scenes under this light. When shooting models, however, it is usually best if you direct the model to turn her face away from the sun to prevent squinting.
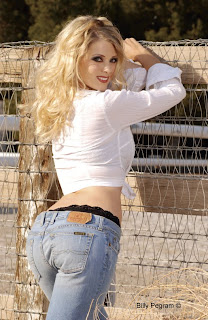
4. When the clouds moved out, the model was left in direct sun. Even with the addition of a reflector, the shadows are very pronounced.

In photograph 4, the clouds had moved from the scene and the model was in full afternoon sun. Although a silver reflector was placed next to the fence, bouncing the sunlight back to the model, the shadows are still very prevalent. There’s a significant difference in quality between this image and the previous one; the image sensor can no longer handle the large difference in exposure between the bright sunlight and the heavy shadows. Notice, particularly, the heavy shadows on the background. There is an advantage to using this style light, though: it allows you to enhance the curves of the model’s body. Notice the shadowing on the model’s chest and how it accentuates the contours of the legs. Be careful, however, that you put sufficient fill light on the model’s face. Otherwise, you will create unwanted contours on her face, as well! Because the reflected light in a situation like this can be very bright, you may need to have the model close her eyes and open them for the exposure on a set count.

5. Removing the reflector results in an image that is not appealing.

Photograph 5 was shot without the use of a reflector. Notice how hard the light is on the model’s face and how every little imperfection is magnified. The shirt has also lost some of the detail. Overall, it is not a very pleasing photograph.

6. Hard light is common in fashion photography because it emphasizes the texture of the clothing.

Bright sunlight coming over your shoulder can be acceptable with landscapes. It can also work with models, provided that the face is not the primary area of interest in the image, as shown in photograph 6. Many high-fashion images are actually shot this way because of the way the harder light enhances the texture of the clothing. In this situation, it is best to have the model look away from the sun or at least down. Generally speaking, if a photograph calls for bright light with contrast, it is best to schedule the shoot for the golden hour.

7. Adding fill flash allows you to create a more flattering effect.

Photograph 7 shows what, when given the choice, is my favorite solution to this lighting situation. This is a combination of sunlight with fill flash. It is the most technically challenging to accomplish and make look natural, but it provides the photographer with the most control. The principle is this: the sunlight exposes the majority of the image; therefore, you set your exposure for the sunlight. Then, you add an auxiliary flash to fill in (lighten) the shadows to whatever degree you desire. You let the sunlight contour the model’s body and use the flash to reduce the negative effects of sunlight on imperfections. This also allows the model to look away from the sun, eliminating squinting.

8. Here, cloud-covered skies paired with flash create a good lighting scenario.

Photograph 8 was shot under an overcast sky with the use of a flash. This combination gives the photographer the softness of the cloud-covered sunlight and the control of using a flash. Notice the detail in the jeans, the vibrant color, and the lack of heavy shadows. Many photographers prefer this lighting combination for shooting models, because you have the beautiful light covering the model’s face and figure—but, by controlling the output of the flash, you can also quickly change the look and feel of the image.

BUY THIS BOOK FROM AMAZON

Light Modifiers

Today's post comes from the book Lighting Techniques for Photographing Model Portfolios by Billy Pegram. It is available from Amazon.com and other fine retailers.

Some light modifiers can be used with any light source, from sunlight to studio strobe. These are all handy devices to have around. Best of all, they tend to be inexpensive—and many can even be improvised with a quick trip to the hardware store. Reflectors, gobos, and scrims fall into this category. Other light modifiers, like softboxes and umbrellas, are designed specifically for use on studio lights. These can range widely in price, but are invaluable for exercising complete creative control.

Reflectors
A reflector is any object used to bounce light—it could be a wall, a white tshirt, a mirror, or a commercially purchased kit. This is an easy and effective way to control light. Unlike using flash for fill light, reflectors give you visual confirmation of where the light is. With reflectors, you can also set up and fine-tune your results more quickly than with flash. Additionally, you are not limited to the flash-sync speed of your camera.

Collapsible reflectors, available in a wide variety of finishes, are a very popular (and portable) type of reflector.

Surface. Reflectors range widely in size, color, and design. Typically, photographic reflectors have either a matte white, silver foil, or gold foil surface. The metallic surfaces provide more light intensity and contrast in the bounced light than the matte white surface. Gold reflectors also add a warm coloration to the bounced light.Mirrors are another type of reflector to experiment with. Because they return almost all of the light that strikes them, they can actually be used outdoors to turn backlight into front light.

Design. Round fabric reflectors on collapsible metal frames (often called disc reflectors) are a very popular design option, especially for location photography. They are easy to transport and simple to position—an assistant can simply hold the reflector in position, then adjust it according to your instructions. (Note:When I shoot on location, I typically bring a piece of white cardboard to use as a reflector, along with a Westcott disc reflector that is silver on one side and gold on the other.) For studio photography, large, white opaque reflectors (often called flats) are often moved into position on rollers or casters. Once in place, studio lights can be bounced into them to create a large, soft source of light.

For Fill. Reflectors are most commonly used to provide fill light, picking up some of the main light and wrapping it around onto the shadow side of the face to make the shadows less intense. To use a reflector for fill, place it slightly in front of the model’s face. Direct the reflected beam of light gradually toward the subject’s face until you get the desired results. Be careful when doing this; the reflected light can actually be quite intense if you shine it right in the model’s eyes. You must also avoid creating unwanted shadows of the nose on the opposite cheek. This is best accomplished by positioning the reflector to fill in the whole mask of the face.

Practical Example: Reflected Fill on Location. Let’s look at the different effect you can create using a variety of reflectors for fill when shooting on location. The image below shows the subject with no reflected fill.


In the next image , the assistant is holding a white card. The white board reflects the same color of light that is striking it and reflects back to the model a soft light that is usually easy on her eyes. This eliminates some of the squinting associated with shooting in bright sunlight. Even if the reflected light is not intense enough to increase the light value much in the shadow area, the reflector still creates pleasing catch lights in the eyes. The disadvantage of using a white board is that it is rigid and doesn’t reflect a great deal of light back to the subject compared to a silver reflector. However, its dual function as a gobo outweighs the disadvantages. Additionally, since it is rigid, it can easily be leaned against a tree or a stand while the assistant is busy or holding another reflector.


A white board is used to add soft fill light.


Like the white board, a silver reflector bounces light without changing the color balance (images below). However, because the surface of the reflector is metallic, it is highly reflective. This means that, used at the same distance to the subject as a white reflector, the light from a silver reflector will be more intense. To reduce the intensity of the fill, the reflector can be placed at a greater distance from the subject. The physical flexibility of the discs makes them versatile in kicking light to a specified area. They can be used to increase light levels in the shadow areas but also to create beautiful highlights on the hair, a piece of jewelry, or even a shoulder (to help separate the model from the background).

A silver reflector.


Below, a gold disc reflector reflects warm and romantic light back to the subject. The gold color can also compensate for some of the blue cast that is prevalent in a heavily shadowed area. Although I personally would not have chosen this image (because of the hand positions), it was the model’s favorite image from this series. To finish it, the image was cleaned up in Photoshop and the edges were darkened slightly to direct the viewer’s eyes to the model’s face.

A gold reflector adds warm-colored fill light.


Practical Example: Natural Reflectors. This image was taken with the late afternoon sun reflecting off a building and onto the model at an industrial park. The gray background was another building in the complex. Because I used a long lens, a 300mm Nikkor, and shot with the aperture wide open, the building in the background went out of focus just enough to look like the horizon line on a beach. Keep your eyes open for great natural reflectors in your environment—and when you see them, note the time of day to shoot there. These can be simple, beautiful light sources.

Natural reflectors, like the late-day light reflected off a building, can be very flattering light sources.


*excerpted from the book Lighting Techniques for Photographing Model Portfolios

BUY THIS BOOK FROM AMAZON

Views of the Face


Today's post comes from the book Posing Techniques for Photographing Model Portfolios. It is available from Amazon.com and other fine retailers.


When photographing the human face, there are three principle views that you can produce.

FULL FACE.
The first is a full-face view. This is produced when the model is facing directly into the camera. In this pose, both ears are visible. A full-face pose is good when you want to show the symmetry of a model’s face, or when you want to convey an assertive attitude.

In a full-face view, you see both of the subject’s ears. This view works well for a shot where you want to show symmetry.


THREE-QUARTER VIEW.
When the model’s face is turned slightly away from the camera, the far ear disappears. This is a three-quarter view of the face. This pose is good for revealing the shape and contours of the face. It is also more demure and less assertive than a full-face view. Normally, it is recommended that the face not be turned so far that the nose extends past the line of the cheek. In a full-face view, you see both of the subject’s ears. This view works well for a shot where you want to show symmetry.


A three-quarter view is good for showing the contours of the face.

PROFILE.
When the face is turned at a 90-degree angle to the camera, the pose is called a profile. In this pose, only one side of the face is visible. This is a classic type of portrait that exudes grace and abiding beauty.

Profiles reflect a quiet and simple beauty that is timeless.

BUY THIS BOOK FROM AMAZON


*excerpted from the book Posing Techniques for Photographing Model Portfolios

Posing the Body: The CSI Program


Today's post comes from the book Posing Techniques for Photographing Model Portfolios by Billy Pegram. The book is available from Amazon.com and other retailers.

CSI PROGRAM: A STARTING POINT
A photographer must understand the basics of posing each part of the body and be able to recognize the problems inherent in each area. While I don’t recommend memorizing thousands of poses, it is helpful to recognize a few basic starting points for posing the human body.

History and Purpose.
Years ago, a former model turned teacher named Loa Andersen created the CSI program to teach prospective models how to pose for the camera. This idea was based on methods taught by early European artists. Today, the poses used in her original photographs are considered stilted, stiff, and old-fashioned. Yet, the basic idea of the CSI program (named for the three major poses it identifies; see below) is still valid for photographers who wish to develop their posing skills. The program also enables a beginning model or photographer to analyze and re-create a pose selected from a magazine or catalog. Furthermore, it helps photographers to determine how the pose affects the focus and overall flow of a photograph.

Diagramming a Pose.
The CSI program begins with learning to diagram a pose. First, a line is drawn through the shoulders. Second, a line is draw across the hips. A third line is then drawn from the center of the shoulder line to the center of the hip line, creating the body line. Next, a fourth line is drawn from the center of the body line to the foot that has the least weight on it. The fifth and final line is drawn from the center of the shoulder line to the center of the head mass.

The C, S, and I Poses.
The diagrammed lines will create either a C, an S, or an I—hence the name of the program. If you pick up a catalog or magazine, you’ll see that many of the poses used do, in fact, loosely fall into one of these categories. For those that don’t, the act of diagramming will show how the pose was created—which shoulder was dropped, how the hips were angled, and where the weight was balanced. Knowledge of these factors will simplify the process of creating a similar pose when working with your own models. Additionally, the CSI program categorizes foot positions. This is especially useful when shooting for a catalog where space is at a premium and several models will be shot together. In the first position, the feet are close together. One faces the camera, while the other is angled slightly off camera. In the second position, the angled foot is pushed outward from the body. In the third position, the same foot is extended even farther.

Here are the three basic poses in the CSI program. As you can see, the lines form the letter shapes that are used to name each pose. The S pose is considered by many artists to be the most graceful and attractive position for a female body. Many of today’s most contemporary poses are softer versions of this basic pose.


Excerpted from the book "Posing Techniques for Photographing Model Portfolios" by Billy Pegram.

Buy This Book from Amazon