 Today's post comes from the book Lighting Techniques for Photographing Model Portfolios by Billy Pegram. It is available from Amazon.com and other fine retailers.
Natural vs. Artificial Light
There are two sources of light: natural (which includes sunlight, moonlight, and reflected light from either the sun or moon), and artificial (which includes sources like tungsten lights, fluorescent lights, electronic flash, and studio flash). Natural light is not limited to the outdoors, nor is artificial light exclusively indoors. Many times, I use flash to fill in shadows while shooting outdoors. I have also effectively used filtered window light for an indoor shot with natural light.
As you’ll see, sunlight is a great option for photography. It’s natural, often very flattering to your subjects, and widely abundant (and you can’t beat the price!). However, it does present certain challenges when it comes to control—and, unless you can shoot near a window, it’s not always an option for images shot indoors. In many cases, you’ll also find that you need more precise control than you can easily exercise over natural light. That is why photographers also need to be adept at creating effective lighting setups using artificial light sources.
As a photographer, both of these forms of light are at your disposal. It’s up to you to learn how to use them effectively in all their many incarnations.
Sunlight
Generally, the average photographer is most concerned with daylight. But saying “daylight” is just the beginning of the story—there are countless variations of just this one light source.
 1. The high contrast in this scene, shot in bright sunlight, wasn’t captured optimally using the camera’s autoexposure mode.
Bright Sunlight. There are several problems inherent in working with bright sunlight. These problems intensify when shooting against a brightly lit background such as a light-colored wall, a beach, or snow. In these cases, the overall light tones in the image can trick the in-camera meter and lead to incorrect exposures. When shooting against a predominately dark background, you may find that your film or image sensor can’t handle the very high contrast of the scene—you’ll either have blown-out highlights (white with no detail) or blocked up shadows (black with no detail). Fortunately, with a digital camera, it is easy to shoot a few images and then preview them. Working in the manual mode (for total control), pay attention to the exposure settings as you are shooting, review your results, then adjust the aperture, shutter speed, and ISO as needed. For the most accurate results, it’s advisable to use an incident light meter and monitor the amount of light that is actually striking your subject, then set your camera accordingly. You also bracket your exposures (shoot some above and below the meter’s recommended exposure setting) to ensure you capture all the critical details.
Cloudy Skies. Some beginning photographers hide when clouds cover the sun. The seasoned professional, however, realizes how beneficial this lighting can be. It is as if the sky has become a huge softbox, softening the hard light. Film and digital imaging equipment have a difficult time recording the high contrast scenes created by bright sunlight. When cloud cover softens this light, however, the range of contrast between shadow and highlight is lowered. Color is more vibrant and shadows are not as overpowering. The softer light is also easier on the model’s eyes. If desired, the images captured on a cloudy day can be warmed up either with an on-camera filter, by adjusting the white-balance setting, or after the shoot in Photoshop.
Practical Example: Bright Sunlight. Sunlight is the major source of light for photography—in fact, we’re usually only imitating it when we use studio lights. Therefore, photographers must learn to work with the variety and quality of light given by the sun on any particular date and time.
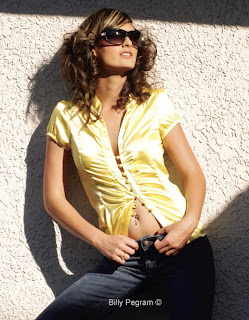
For this demonstration, I will address five varieties of sunlight and the advantages and disadvantages of each. The photographs in this series are unedited, allowing you to fully appreciate the differences in quality between them. All of the images were shot at 1/200 second at f/11—except for image 3; because of the low intensity of the light, this image was shot at 1/60 second at f/8.
For photograph 3, the sun was diffused by a thin layer of clouds, which provided beautiful, even lighting that was soft and virtually shadow-free. Notice how the exposure is consistent throughout the entire image. Also, notice how the colors in the jeans are true to life. This is like having a huge softbox covering the model. It is no wonder that this is the preferred light for most photographers. Very little modification needs to be done to create beautiful photographs of models or landscape scenes under this light. When shooting models, however, it is usually best if you direct the model to turn her face away from the sun to prevent squinting.
 4. When the clouds moved out, the model was left in direct sun. Even with the addition of a reflector, the shadows are very pronounced.
In photograph 4, the clouds had moved from the scene and the model was in full afternoon sun. Although a silver reflector was placed next to the fence, bouncing the sunlight back to the model, the shadows are still very prevalent. There’s a significant difference in quality between this image and the previous one; the image sensor can no longer handle the large difference in exposure between the bright sunlight and the heavy shadows. Notice, particularly, the heavy shadows on the background. There is an advantage to using this style light, though: it allows you to enhance the curves of the model’s body. Notice the shadowing on the model’s chest and how it accentuates the contours of the legs. Be careful, however, that you put sufficient fill light on the model’s face. Otherwise, you will create unwanted contours on her face, as well! Because the reflected light in a situation like this can be very bright, you may need to have the model close her eyes and open them for the exposure on a set count.
Photograph 5 was shot without the use of a reflector. Notice how hard the light is on the model’s face and how every little imperfection is magnified. The shirt has also lost some of the detail. Overall, it is not a very pleasing photograph.
Bright sunlight coming over your shoulder can be acceptable with landscapes. It can also work with models, provided that the face is not the primary area of interest in the image, as shown in photograph 6. Many high-fashion images are actually shot this way because of the way the harder light enhances the texture of the clothing. In this situation, it is best to have the model look away from the sun or at least down. Generally speaking, if a photograph calls for bright light with contrast, it is best to schedule the shoot for the golden hour.
Photograph 7 shows what, when given the choice, is my favorite solution to this lighting situation. This is a combination of sunlight with fill flash. It is the most technically challenging to accomplish and make look natural, but it provides the photographer with the most control. The principle is this: the sunlight exposes the majority of the image; therefore, you set your exposure for the sunlight. Then, you add an auxiliary flash to fill in (lighten) the shadows to whatever degree you desire. You let the sunlight contour the model’s body and use the flash to reduce the negative effects of sunlight on imperfections. This also allows the model to look away from the sun, eliminating squinting.
Photograph 8 was shot under an overcast sky with the use of a flash. This combination gives the photographer the softness of the cloud-covered sunlight and the control of using a flash. Notice the detail in the jeans, the vibrant color, and the lack of heavy shadows. Many photographers prefer this lighting combination for shooting models, because you have the beautiful light covering the model’s face and figure—but, by controlling the output of the flash, you can also quickly change the look and feel of the image.
BUY THIS BOOK FROM AMAZON


No comments:
Post a Comment