Showing posts with label model. Show all posts

Lighting Design in Action

Today's post comes from the book Wes Kroninger's Lighting: Design Techniques for Digital Photographers by Wes Kroninger. For this post we are featuring three of his many lighting designs from the book. In this book Kroninger showcases a number of his remarkable images and breaks them down into how they were setup and what equipment was used to achieve the final result, often times including valuable tips about that shot. Each shot is accompanied by multiple diagrams. This book is available from Amazon.com and other fine retailers.

The Scoop
This image is another example of the teamwork between performing and visual artists. It was captured in an abandoned warehouse where I had wanted to create a series of images for a long time. I visualized the juxtaposition of the beautiful lines of the dancers contrasted with the gritty texture of the old building. It took some investigation and a lot of phone calls to get access to the location, but the site proved to be perfect for the shoot.


Tech
There was no electricity, so battery-powered lights were used to create these images. One 4x6-foot softbox was used as the main light. A second bare-bulb strobe was placed off set to camera right to add some light to the darkened building. In this image, a third light was placed on the first floor pointing up through the hole in the floor at the bottom left of the image.


Tip
I did my research on which battery powered lights had the shortest flash duration, but I overlooked the fact that (to save on battery charge) most battery-powered strobe packs have little to no modeling light. As the sun set, this was a big problem while trying to focus. Fortunately, a friend had come to the set to shoot some video and happened to bring a generator with a hot light, which created just enough ambient light to focus.


The Scoop
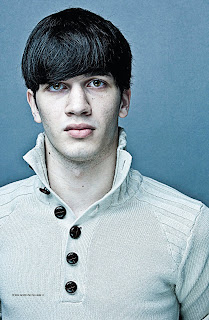
When photographing actors for their promotional materials, it is a good idea to keep your lighting as simple as possible. Casting agents who are searching for acting talent like to see what a potential selection looks like without distractions or excessive embellishment. By keeping the lighting simple, you make the image a quick read of an actor’s facial features and overall appearance.

Tech
This is another example of how simple lighting can be when the right decisions are made for the right subject. Here, one medium softbox was used overhead. One reflector was used from below to add some upward fill. A digital “cross-processing” effect was used by selecting the tungsten white balance setting while using studio strobes; this created an overall cool blue tone to the image. Texture and grain were also applied for added effect.


The Scoop
Some of the best experiences as a photographer come when collaborating with other artists. Working with dancers is no exception. They are so conscious of their movement and the position of their bodies in action that it guarantees a beautiful image.

Tech
To create this image, two 4x6-foot softboxes were used at corners of the set. To achieve a very short flash duration, I dialed the pack down to a low setting. I adjusted for this loss of illumination by increasing the ISO of my camera to 400. (I generally hesitate to go above 400, because I want to eliminate as much grain or digital noise from the image as possible.) The model was backlit with two gridded lights at the edge of the seamless paper, one on either side.

Tip
When I photograph dancers, I like to stop motion. I find it fascinating to see still frames, frozen in time, of movements that otherwise pass so quickly before our eyes. Certain equipment selections have to be made to achieve these results. Some lights have very fast flash duration (the flash tube itself stays illuminated for a short duration during each firing). This speed eliminates any streaking or blurring in the captured image— because, essentially, the light is doing the work of your shutter. Most strobe packs offer their shortest flash duration when at low power settings, then grow longer as the power is increased.


BUY THIS BOOK FROM AMAZON

A Five-Light Setup

Today's post comes from the book Multiple Flash Photography: Off Camera techniques for Digital Photographers by Rod & Robin Deutschmann. It is available from Amazon.com and other fine retailers.

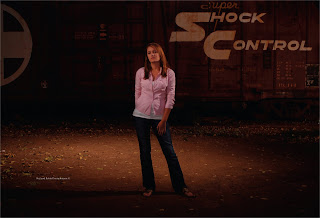
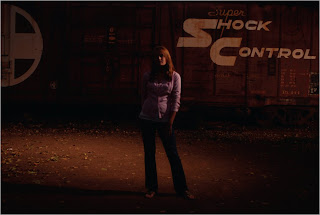
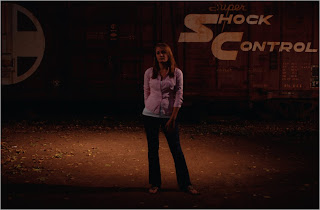
When you have a purpose, everything makes sense. Here, we wanted total control over the image. The aperture and shutter speed settings were quickly dialed in to eliminate any ambient light. From this, we began adding our flashes, lighting one graphic tier of information at a time. It took five unmodified flashes—three pointed at our model and two pointed toward various tiers in the background—to accomplish our objective.


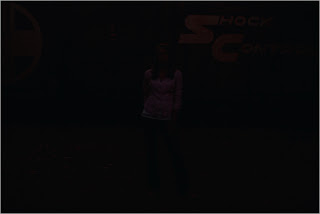
First, the base light was chosen by using an aperture and shutter-speed combination that stripped the natural light from the scene.


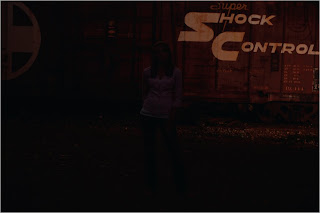
We always work from the back forward, adding light as we move. Here, one flash was used to illuminate the train car.


Two more lights were added, one to the side of the model and one on the ground.


Two more lights were added, one to the side of the model and one on the ground.


Finally, the photographer added the last flash with his hand-held unit. Note how different the day actually looks compared to the final image on the opposite page.


PUTTING IT ALL TOGETHER: ONE MORE FIVE-LIGHT SETUP

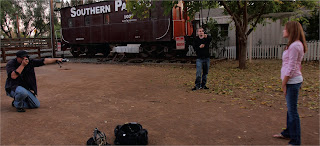
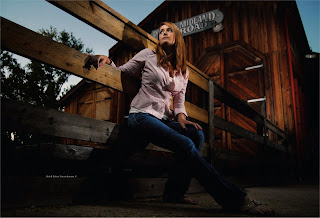
Two extending handles, five unmodified flashes shooting at full power, three assistants, and five minutes of light remaining—man, this multiple light stuff is fun! It all comes down to experience. The more you have, the more quickly you can create unforgettable images. It’s an added bonus when each and every person involved in a shoot knows not only what they are doing but what everyone else is doing as well. When we get a group of photographers together to test out equipment or simply take fun pictures, the whole process becomes one fluid movement. Each person knows their part and each is invested in a successful final outcome. This feeling of shared responsibility is contagious. It’s hard to go wrong when everyone cares.


This image shows what the chosen base light looked like.


Here, an assistant helps light the barn with one hand-held unit.


Quickly, each of us assumed a position. One person grabbed an older flash, attached a radio receiver to it, and aimed it at the barn itself. Another assistant took hold of a homemade ten-foot extending handle. The remaining assistant picked up the smaller Lastolite model. Both equipped their “light sticks” with two separate flashes; one sat atop the handle, while the other directed light from a lower section. The photographer quickly grabbed a wide-angle lens, attached a radio transmitter to the top of the camera, and dialed in the appropriate white balance, contrast, and saturation settings. He then picked an aperture and shutter speed and asked each member of the team to take their position. In less than five minutes, the final image was created.


BUY THIS BOOK FROM AMAZON

Direction of the Light

Today's post comes from the book Lighting Techniques for Photographing Model Portfolios by Billy Pegram. It is available from Amazon.com and other fine retailers.

In addition to its quality, you must also consider the direction of the light. As noted above, light that comes from overhead is usually not flattering, because it creates dark shadows on the eyes. Instead, look for light that strikes the subject from another angle.

Front Light. Light that comes from directly in front of the subject is commonly used in beauty photography because it tends to smooth the skin and flatter female faces. However, it can also flatten the features and create a lack of depth in your image.

Angled or Side Light. Light that strikes the subject’s face from an angle puts highlights on one side of the subject (the side closer to the light) and shadows on the other side of the subject (the side farther from the light). This adds a sense of depth and helps show the shape of the subject. As a result, it is a great lighting choice for images designed to showcase the model’s body (such as fitness shots). Because light from the side accentuates texture, it also works well for clothing shots where texture needs to be visible. One downfall of this lighting is that the model’s face will be shown with texture, as well. This can be effective with men’s facial structure, but it is not normally as flattering to a woman’s face.

Light that skims across the body from the side is great for highlighting a toned physique.

Backlight. Backlight occurs when the light source is directly behind the subject and directed toward the camera. One thing to watch out for when using strong backlighting is lens flare. This occurs when light shines directly into the lens and results in a loss of contrast and color saturation, and in some cases the creation of bright geometric artifacts (reflections off the elements within the lens itself).

In this image, Backlighting created highlights to separate the subject from the background.

When paired with some kind of stronger front or side light, backlighting can add impact and separation to a photograph by accenting the edges of the subject, an effect called rim lighting. In the image above, a light placed at an angle to the subject illuminated her from the front. Two lights behind the subject created bright highlights (rim lighting) along the edges of her body, separating her from the background. In this case, the lights themselves also formed a compositional element in the background.

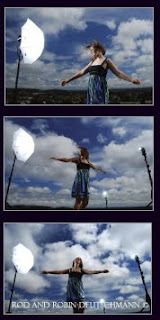
With a weaker (or nonexistent) front or side light, backlighting can also allow you to create silhouette (or semi-silhouette) effects. Experimenting with this technique you can achieve some amazing photographs. In the series of photographs below, I focused on the model. Her body shielded my lens, and I had her move slightly to my left so the sun would just break past her body. I varied the output of my flash for each photograph, achieving a variety of different exposure and results. Who is to say which exposure is correct?

Different flash settings combine with backlighting to produce a variety of effects.


BUY THIS BOOK FROM AMAZON

Capturing Motion with Off-Camera Flash

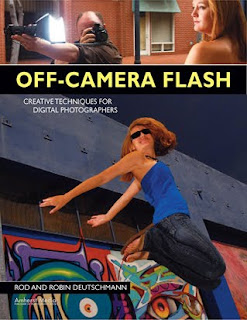
Today's post comes from the book Off-Camera Flash : Creative Techniques for Digital Photographers by Rod and Robin Deutschmann. It is available from Amazon.com and other fine retailers.

Capturing motion with your off-camera flash opens a world that is seldom seen. Being creative means pushing your vision and your equipment further than ever before.

VARIATIONS ON A THEME
As an artist with an off-camera flash, you have more options than most when it comes to dealing with movement. A quick splash of light from any angle or height will freeze things when nothing else will. It will also clear up a poorly executed pan or fill in the shadows on quickly moving subjects. You can, as always, highlight any tier of graphic information. Plus, if you use a fast enough shutter speed, you can darken even the brightest sky, ensuring that you can keep your true intent illuminated above everything else.

STARTING WITH ONE FLASH
As always, if you’re new to all this, begin with one flash connected to your camera via a wire and try to freeze some action. It doesn’t matter what—just freeze something. Even at slower shutter speeds, the flash will help freeze movement. Keep adjusting the power output on the flash. Change the aperture in the camera. Move closer and further away. Review your images. Notice
how even the slightest changes can weaken or strengthen the flash. Now, modify the light. Use a softbox to enlarge it or a snoot to direct it. Get to know the magic that one flash offers before you move onto more.

ADDING MORE LIGHT
When your skill allows it, move onto two flashes and trigger them wirelessly. Once you’ve mastered this, move onto three flashes—and then even more. Be creative with your lighting setups, triggering methods, and modification rituals. Don’t keep doing the same thing each time you shoot. Explore the possibilities of motion frozen with flash while paying attention to how things change in the rest of the image. You will use all of this experience later.


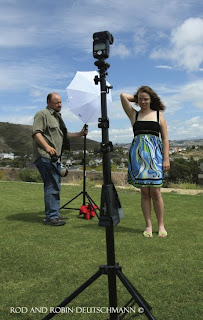
Two unmodified flashes gave this image the needed boost of light it deserved. The flashes were set off with the help of two optical slave devices called “peanuts.” These extremely small optical receivers are connected to a PC wire that runs directly to each flash. When these “peanuts” sense a bright contrast, they set off the flash unit they are connected to. In this case, the camera’s pop-up flash provided the needed contrast. When the pop-up flash fired, so did the other flashes. The pop-up flash did not illuminate any portion of the scene; it was only used as a triggering device for the much more powerful off-camera flashes


You have three choices when dealing with motion and using an off-camera flash: freeze it, let it blur, or do both at the same time. Here, one hand-held flash brings our message into the light (above).


It’s amazing what your images can look like when you employ as many lights as you possibly can. Remember: the more power you have, the more options you gain.


Seven unmodified lights set to full power were employed to freeze the twirling model. Four were used behind an umbrella, two were set on light-stands, and one was hand held by an assistant (and sometimes the photographer). High contrast and saturation settings were used along with a bluer-than-normal white balance.


One off-camera, unmodified flash can still be quite effective in freezing detail. The shallow depth of field seen here was accomplished with a very fast 85mm lens (f/1.4). The longer focal length also allowed the photographer to move backward, dramatically changing the offered perspective.


Two unmodified lights perfectly illuminated the right and front side of our model. A verywide-angle lens (18mm) was used.


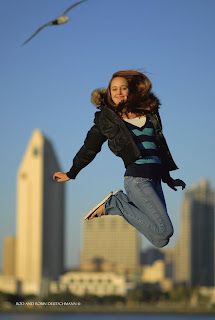
Four unmodified flashes set to full power were needed to light each corner of our model during this rather dramatic jump over the San Diego skyline. A very light red filter was added to each flash to complement the redder-than-usual white balance setting. In-camera contrast, saturation, and hue choices were adjusted to taste. A smaller aperture (f/11) and shorter focal length lens (18mm) were used to help with the required depth of field.


Now, increase the power of your flashes by combining them. Create as much light as possible and see what happens. Overpower the sun itself if you can. Know what gear it takes to have complete control over every aspect of the scene. And don’t limit your vision when it comes to subjects, either; there are more things to shoot than just people, so try it on moving animals, as well. Understand the maximum amount of light you can produce with all your gear, then figure out how you can use it with all moving subjects—at any time of the day or night.

Glamour Portrait Makeover

Today's post comes from the book Jerry D's Extreme Makeover Techniques for Digital Glamour Photographers by Bill Hurter. It is available from Amazon.com and other fine retailers.

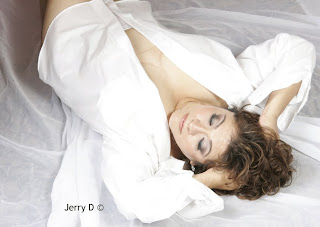
Vandella is a bubbly, confident, and giving person who needed a little bit of a self-image boost. All of us experience what Vandella was feeling when she first met Jerry. She was tied up in the day-to-day routine of her life and needed to be reminded of the fact that she is special. When her portrait was delivered, she felt as if she had been given a new lease on life.

This how Vandella looked when she came to Jerry’s studio.

Makeup
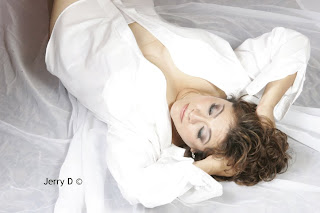
Vandella’s makeup was applied using the basic principles covered in chapter 1 of this book. At the completion of this process, the image below was created. This was the starting point for postproduction enhancement.

This is the first version of Vandella’s portrait. Notice the wrinkled tulle of the background fabric and the lack of shape in the oversized shirt.

Postproduction
The first step was to reshape her body and adjust the size of her breasts. This was accomplished using Photoshop’s Liquify filter (Filter > Liquify). Liquify is essentially a separate application within Photoshop that is used to stretch or distort areas within the photograph. In the Liquify window, Jerry selected the Forward Warp tool with a brush size of 516, a density setting of 50, a brush pressure of 80, and a turbulent jitter setting of 50 (this scrambles the reformatted pixels). With this tool, Jerry proceeded to adjust her shape by pushing the pixels into the desired positions. The image below shows Vandella after the Liquify process. In the upper right quadrant of the image, you can see that Jerry used the Clone Stamp tool to copy new fabric into the areas that were vacated by the Liquify filter. Note, too, the reshaped torso of Vandella.


Vandella’s torso was reshaped using the Liquify filter. After reshaping, Jerry used the Clone Stamp tool to repair areas of the background that became obviously distorted.

Jerry used the Clone tool to reshape Vandella’s hips, waist and arms (image below). The tool was set to 100 opacity and flow with a brush hardness of 80.
The torso was then reshaped using the Clone Stamp tool.

Next, a duplicate background layer was created. To this, Jerry applied the Gaussian Blur filter (Filter > Blur > Gaussian Blur) at a radius setting of 20 pixels. Working on the Gaussian Blur layer, Jerry then made two passes with the Eraser tool set at 30 percent opacity, restoring soft detail. Finally, he made another pass with the Eraser tool set at 80 percent opacity to bring out sharp image details (below).

After applying the Gaussian Blur filter on a duplicate background layer, sharpness was restored using the Eraser tool.

Jerry next applied the Burn tool as shown in the next image. This was adjusted to a 14 percent exposure setting. This technique creates shadows, which gives the illusion of depth. With each pass, the tonal values become deeper until the final effect is achieved.

The Burn tool was applied to add shape-revealing shadows.

Then, Jerry adjusted the contrast using the Brightness/Contrast function (Image > Adjustments > Brightness/Contrast). His objective was to deepen the blacks and lighten the whites, producing better overall contrast (below).

The contrast was enhanced to deepen the blacks and lighten the whites.

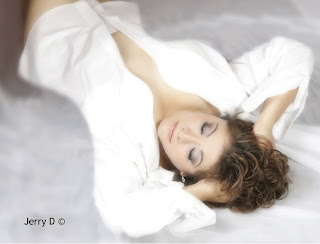
The final step was to use the Dodge tool, at an exposure setting of 25 percent, around the edges of the body. This cleaned up all of the distracting details and gave the background a cleaner look. This image shows Vandella’s final portrait.

The completed image of Vandella.