
We have had a lot of great response to the blog in 2010. Thanks to everyone who keeps coming back for a peek into some of the finest photo instruction and inspiration around. Look for the blog to continue on and expand in 2011. We'll keep the steady stream of the most current photography info coming and add in some new features as well.
If you're new here, be sure to dig around a bit, there is a wealth of great info at your fingertips.
And did you know that Amherst Media is active in the e-book market? Be sure to check us out for great books on your Kindle, Nook, iPad and other e-reader and tablet devices. The variety of titles and formats will just continue to expand through 2011 so be sure to poke around your favorite e-book seller and find us. I'll stick a few links below as well.
All the best and Happy New Year!
-Amherst Media
Kindle
Nook and Nook Color
iPad
Amherst Media on Facebook
Amherst Media on Twitter
Lighting Design in Action
 Today's post comes from the book Wes Kroninger's Lighting: Design Techniques for Digital Photographers by Wes Kroninger. For this post we are featuring three of his many lighting designs from the book. In this book Kroninger showcases a number of his remarkable images and breaks them down into how they were setup and what equipment was used to achieve the final result, often times including valuable tips about that shot. Each shot is accompanied by multiple diagrams. This book is available from Amazon.com and other fine retailers.
The Scoop
This image is another example of the teamwork between performing and visual artists. It was captured in an abandoned warehouse where I had wanted to create a series of images for a long time. I visualized the juxtaposition of the beautiful lines of the dancers contrasted with the gritty texture of the old building. It took some investigation and a lot of phone calls to get access to the location, but the site proved to be perfect for the shoot.

Tech
There was no electricity, so battery-powered lights were used to create these images. One 4x6-foot softbox was used as the main light. A second bare-bulb strobe was placed off set to camera right to add some light to the darkened building. In this image, a third light was placed on the first floor pointing up through the hole in the floor at the bottom left of the image.
Tip
I did my research on which battery powered lights had the shortest flash duration, but I overlooked the fact that (to save on battery charge) most battery-powered strobe packs have little to no modeling light. As the sun set, this was a big problem while trying to focus. Fortunately, a friend had come to the set to shoot some video and happened to bring a generator with a hot light, which created just enough ambient light to focus.
The Scoop
When photographing actors for their promotional materials, it is a good idea to keep your lighting as simple as possible. Casting agents who are searching for acting talent like to see what a potential selection looks like without distractions or excessive embellishment. By keeping the lighting simple, you make the image a quick read of an actor’s facial features and overall appearance.

Tech
This is another example of how simple lighting can be when the right decisions are made for the right subject. Here, one medium softbox was used overhead. One reflector was used from below to add some upward fill. A digital “cross-processing” effect was used by selecting the tungsten white balance setting while using studio strobes; this created an overall cool blue tone to the image. Texture and grain were also applied for added effect.

The Scoop
Some of the best experiences as a photographer come when collaborating with other artists. Working with dancers is no exception. They are so conscious of their movement and the position of their bodies in action that it guarantees a beautiful image.

Tech
To create this image, two 4x6-foot softboxes were used at corners of the set. To achieve a very short flash duration, I dialed the pack down to a low setting. I adjusted for this loss of illumination by increasing the ISO of my camera to 400. (I generally hesitate to go above 400, because I want to eliminate as much grain or digital noise from the image as possible.) The model was backlit with two gridded lights at the edge of the seamless paper, one on either side.

Tip
When I photograph dancers, I like to stop motion. I find it fascinating to see still frames, frozen in time, of movements that otherwise pass so quickly before our eyes. Certain equipment selections have to be made to achieve these results. Some lights have very fast flash duration (the flash tube itself stays illuminated for a short duration during each firing). This speed eliminates any streaking or blurring in the captured image— because, essentially, the light is doing the work of your shutter. Most strobe packs offer their shortest flash duration when at low power settings, then grow longer as the power is increased.

A Five-Light Setup
 Today's post comes from the book Multiple Flash Photography: Off Camera techniques for Digital Photographers by Rod & Robin Deutschmann. It is available from Amazon.com and other fine retailers.
When you have a purpose, everything makes sense. Here, we wanted total control over the image. The aperture and shutter speed settings were quickly dialed in to eliminate any ambient light. From this, we began adding our flashes, lighting one graphic tier of information at a time. It took five unmodified flashes—three pointed at our model and two pointed toward various tiers in the background—to accomplish our objective.

First, the base light was chosen by using an aperture and shutter-speed combination that stripped the natural light from the scene.

We always work from the back forward, adding light as we move. Here, one flash was used to illuminate the train car.

Two more lights were added, one to the side of the model and one on the ground.

Two more lights were added, one to the side of the model and one on the ground.

Finally, the photographer added the last flash with his hand-held unit. Note how different the day actually looks compared to the final image on the opposite page.

PUTTING IT ALL TOGETHER: ONE MORE FIVE-LIGHT SETUP
Two extending handles, five unmodified flashes shooting at full power, three assistants, and five minutes of light remaining—man, this multiple light stuff is fun! It all comes down to experience. The more you have, the more quickly you can create unforgettable images. It’s an added bonus when each and every person involved in a shoot knows not only what they are doing but what everyone else is doing as well. When we get a group of photographers together to test out equipment or simply take fun pictures, the whole process becomes one fluid movement. Each person knows their part and each is invested in a successful final outcome. This feeling of shared responsibility is contagious. It’s hard to go wrong when everyone cares.

This image shows what the chosen base light looked like.

Here, an assistant helps light the barn with one hand-held unit.

Quickly, each of us assumed a position. One person grabbed an older flash, attached a radio receiver to it, and aimed it at the barn itself. Another assistant took hold of a homemade ten-foot extending handle. The remaining assistant picked up the smaller Lastolite model. Both equipped their “light sticks” with two separate flashes; one sat atop the handle, while the other directed light from a lower section. The photographer quickly grabbed a wide-angle lens, attached a radio transmitter to the top of the camera, and dialed in the appropriate white balance, contrast, and saturation settings. He then picked an aperture and shutter speed and asked each member of the team to take their position. In less than five minutes, the final image was created.

BUY THIS BOOK FROM AMAZON
The Eyes
 Today's post comes from the book Jeff Smith's Posing Techniques for Location Portrait Photography by Jeff Smith. It is available from Amazon.com and other fine retailers.
The eyes are the windows to the soul and the focal point for any portrait. You can create the most stunning pose in the most stunning scene, but if the eyes are not properly lit and properly posed, the portrait will not be salable.
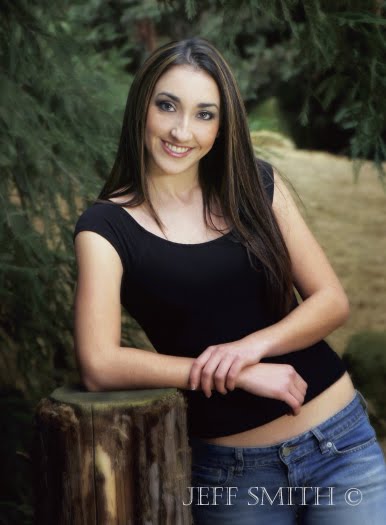 Poses with direct eye contact are usually the most popular among portrait buyers.
Position of the Eyes. There are two ways to control the position of the eyes in a portrait. First, you can change the pose of the eyes by turning the subject’s face. Second, you can have the subject change the direction of their eyes to look higher, lower, or to one side of the camera.
Typically, the center of the eye is positioned toward the corner of the eye opening. This enlarges the appearance of the eye and gives the eye more impact. This is achieved by turning the face toward the main light while the eyes come back to the camera. This works well for all shapes of eyes, except for people with bulging eyes. When this is done on bulging eyes, too much of the white will show and draw attention to the problem.
 When the mouth smiles, the eyes must smile, too—otherwise the expression won’t look natural.
Eye Contact. The point at which you ask the subject to focus their gaze in respect to the position of the camera’s lens also, in essence, poses the eye. First and foremost, the subject should always be looking at someone, not something. To do this, I put my face where I want their eyes to be. There is a certain spark that the eyes have when they look into someone else’s eyes that they don’t have when they are looking at a spot on the wall or a camera lens.
Usually, I position my face directly over the camera. This puts the eyes in a slightly upward position, increasing the appearance of the catchlights (see page 39). If the camera position is too high to make this possible, I position my face on the main-light side of the camera, never beneath it and never to the shadow side of it. Both would decrease the catchlights.
Usually, I position my face directly over the camera. This puts the eyes in a slightly upward position, increasing the appearance of the catchlights (see page 39). If the camera position is too high to make this possible, I position my face on the main-light side of the camera, never beneath it and never to the shadow side of it. Both would decrease the catchlights.
 Having the subject look at your eyes (rather than a spot on the wall or some other inanimate object) gives their eyes more spark in the portrait.
When the eyes of the subject look into the lens (or very close to it), the portrait seems to make eye contact with the viewer. An overwhelming majority of our senior clients prefer the intimate feeling of eye contact as opposed to the more reflective portraits where the eyes look off-camera, but this is our clients. You need to offer both styles of portraits and discuss with
your clients what is right for them.
Reflective Poses. Reflective posing works well in a storytelling portrait—a bride glancing out a window as if waiting for her groom, a senior glancing over the top of a book and thinking of the future, etc. If the eyes are to look away from the camera, there a few rules that need to be followed. First of all, the eyes should follow the line as of the nose. It looks ridiculous to have the eyes looking in a different direction than the nose is pointing. This goes for poses with the subject looking just off-camera, as well as for complete profiles. Also, as you turn the face away from the camera, there comes a point where the bridge of the nose starts to obscure the eye farthest from the camera. At this point, you have gone too far. Either go into a complete profile, showing only one eye, or bring the face back to provide a clear view of both eyes.
 Reflective poses show the subject looking off camera.
Catchlights. Outdoors, the single biggest mistake I see photographers make is not having the proper catchlights in the subject’s eyes. This usually comes from working with light that has no direction. In almost all of my portraits, I use a small reflector near the subject to ensure there are beautiful catchlights in both eyes. If you evaluate the catchlights, you can often diagnose any problems with your lighting. If each eye shows a distinct catchlight in the proper position, your main light is good; if the catchlights aren’t right, neither is your main light. Usually, this means your light lacks direction, indicating that the main light source is too large and too soft.
 With no direction to the light, catchlights are absent and the eyes have a dull look.
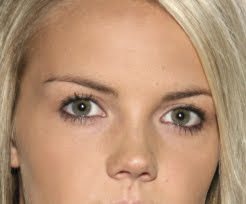 On-camera flash creates a tiny catchlight in the center of the eye. This is not the ideal position.
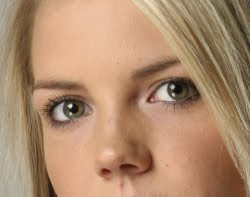 The top catchlights are in the proper position and a reflector below the subject has produced a second catchlight. This smooths the skin, softens any darkness under the eyes, and produces a glamorous look.
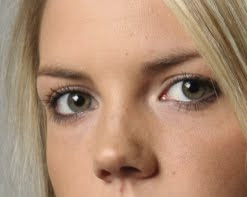 In this final image, the catchlights are strong, well defined, and located in the proper position on the eye. This is the result you want in a professional-quality portrait.
Studio Lights Outdoors
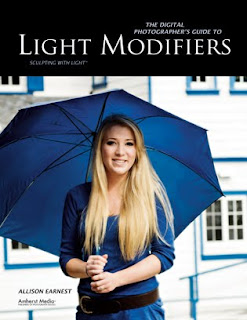 Today's post comes from the The Digital Photographer's guide to Light Modifiers: Sculpting with Light by Allison Earnest. It is available from Amazon.com and other fine retailers.
Using your studio lights outside is the same as inside—with one exception: you must determine your shutter speed for the desired background (ambient light) exposure. When shooting with a combination of flash and ambient light, your shutter speed controls the available-light exposure (the exposure of everything not lit by the flash), while your aperture controls the the flash exposure (in most cases, this is the exposure of your subject). Yes, it takes much more effort and
courage to use your studio lights outdoors, but the final images you show your clients will be worth the effort.
Ballerina Rhiona O’Laughlin was the perfect subject for this outdoor studio portrait (PHOTOGRAPH 1). Once the location, wardrobe, and props were selected, a wonderful team of helpers started setting up lights—while trying to stay warm. The main light used on this image was a ring flash on axis with the camera. This was metered to record one stop brighter than the background. A simple monolight fitted with barndoors was used as the accent/hair light. This was powered to record one stop brighter than the main light. The barn doors were useful to help block unnecessary light on the scene.
 PHOTOGRAPH 1. An incident-light meter reading taken of the ambient light determined my shutter speed. My flash was metered to determine the aperture, which controlled the exposure desired on my model. SUBJECT: Rhiona O’Laughlin. CAMERA: Nikon D300, Lexar media. SETTINGS: AWB, manual mode, 1/80 second, f/7, ISO 200.
  Set scene for PHOTOGRAPHS 2 and 3.
In photograph 2, the main light was changed to a medium softbox. This was positioned at a 45-degree angle to the subject, producing a soft lighting pattern on Rhiona’s face. A warming gel was placed over the accent/hair light to closely match the warmth of the late afternoon sun. My shutter speed was lowered to record more of the ambient light in the scene.
 PHOTOGRAPH 2. My shutter speed was lowered to record more ambient light in the scene, and the main light was slightly underexposed. SUBJECT: Rhiona O’Laughlin. CAMERA: Nikon D300, Lexar media. SETTINGS: AWB, manual mode, 1/40 second, f/10, ISO 200.
 With the same softbox, the light was remetered after Rhiona changed poses (below). Here’s a bit of advice: when shooting on location, always bring a small wood board for your model to stand on when posing. I didn’t have one for this shoot, and the young lady accidentally stepped on a hidden cactus. As a true professional dancer, Rhiona continued to pose and smile—despite the cactus and the very chilly Colorado weather. It definitely takes a great team to create great photographs.
 PHOTOGRAPH 3- Working with the same lighting setup as in photograph 4-6, the exposure was adjusted as Rhiona shifted poses. SUBJECT: Rhiona O’Laughlin. CAMERA: Nikon D300, Lexar media. SETTINGS: AWB, manual mode, 1/125 second, f/5, ISO 200. WARDROBE, STYLING, MAKEUP: Elliot Brooke.
Direction of the Light
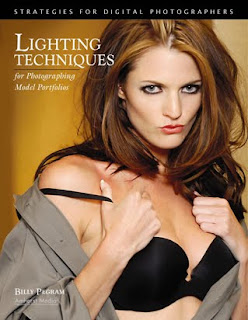 Today's post comes from the book Lighting Techniques for Photographing Model Portfolios by Billy Pegram. It is available from Amazon.com and other fine retailers.
In addition to its quality, you must also consider the direction of the light. As noted above, light that comes from overhead is usually not flattering, because it creates dark shadows on the eyes. Instead, look for light that strikes the subject from another angle.
Front Light. Light that comes from directly in front of the subject is commonly used in beauty photography because it tends to smooth the skin and flatter female faces. However, it can also flatten the features and create a lack of depth in your image.
Angled or Side Light. Light that strikes the subject’s face from an angle puts highlights on one side of the subject (the side closer to the light) and shadows on the other side of the subject (the side farther from the light). This adds a sense of depth and helps show the shape of the subject. As a result, it is a great lighting choice for images designed to showcase the model’s body (such as fitness shots). Because light from the side accentuates texture, it also works well for clothing shots where texture needs to be visible. One downfall of this lighting is that the model’s face will be shown with texture, as well. This can be effective with men’s facial structure, but it is not normally as flattering to a woman’s face.
 Light that skims across the body from the side is great for highlighting a toned physique.
Backlight. Backlight occurs when the light source is directly behind the subject and directed toward the camera. One thing to watch out for when using strong backlighting is lens flare. This occurs when light shines directly into the lens and results in a loss of contrast and color saturation, and in some cases the creation of bright geometric artifacts (reflections off the elements within the lens itself).
 In this image, Backlighting created highlights to separate the subject from the background.
When paired with some kind of stronger front or side light, backlighting can add impact and separation to a photograph by accenting the edges of the subject, an effect called rim lighting. In the image above, a light placed at an angle to the subject illuminated her from the front. Two lights behind the subject created bright highlights (rim lighting) along the edges of her body, separating her from the background. In this case, the lights themselves also formed a compositional element in the background.
With a weaker (or nonexistent) front or side light, backlighting can also allow you to create silhouette (or semi-silhouette) effects. Experimenting with this technique you can achieve some amazing photographs. In the series of photographs below, I focused on the model. Her body shielded my lens, and I had her move slightly to my left so the sun would just break past her body. I varied the output of my flash for each photograph, achieving a variety of different exposure and results. Who is to say which exposure is correct?


 Different flash settings combine with backlighting to produce a variety of effects.
BUY THIS BOOK FROM AMAZON
The Double Main Light
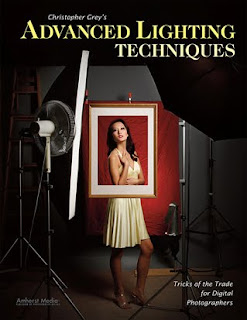 Today's post comes from the book Christopher Grey's Advanced Lighting Techniques: Tricks of the Trade for Digital Photographers. It is available from Amazon.com and other fine retailers.
 I’ve written about using a double key light approach several times, both in my Master Lighting Guide for Portrait Photographers and in my columns for shootsmarter.com and prophotoresource.com. It’s such a cool technique that I imagine I’ll write about it again in the future, as I keep finding uses for it and new ways to work with it. If you play with it just once, I’m sure you’ll be impressed by the level of its coolness and will find many applications for it in your own work.
The principle is simple: Use a large softbox (the bigger the better; in this case, I opted to use a 4x6-foot unit), along with another light fitted with a gridded parabolic reflector or beauty bowl (image below). The softbox will provide an underexposed but overall soft light, and the reflector will give the most important part of the image a correct and proper exposure.

To prepare for the first series, I began with a grid-spotted beauty bowl and set both lights approximately 6 feet from where my model would be standing. I placed the softbox behind the beauty bowl, keeping both lights at roughly the same angle. This meant that the softbox (as measured at the height of the strobe unit) would be higher than the beauty bowl when the beauty bowl was centered against it. Think of it as a straight line between both strobe units, because we want the same angle to the light so that we can avoid any possibility of conflicting shadows.
This setup takes a little extra time because both sources must be measured separately, then together. While my model was in makeup, I found the hottest area from the gridspot and measured it with my flashmeter, tweaking the power output from the pack until I had a perfect f/11.
I wanted the softbox light to be two stops under the other light. I turned the beauty bowl light off and sparked up the softbox, changing the power output until it was a perfect f/5.6—two stops less than the other light.
When I switched the other light back on and again metered at the hot spot, I found that the extra light increased the exposure by 1/3 stop (the effects of light are additive), which meant my camera’s effective aperture would be f/13.
Finally, I placed a strip light on a boom, centered directly over the model’s space but about 2 feet behind it to avoid having light spill onto the top of her nose. This light was powered up 1/3 stop brighter than the double main light.
Once you have the position of the lights figured out, it’s a simple matter to make adjustments if you change the position of the gridspot or the softbox: simply turn off whichever light you didn’t move and change the power of the other until you get to the same, original, f-stop. I had to do that for this first shot (image below) because the 25 degree grid threw a light that was too broad at its distance from the subject and the actual effect of the double main light was diminished. I found I had to move the beauty bowl in about halfway, to about 3 feet from the model, in order to get the effect I was looking for—a combination of the two lights that would show both underexposure and perfect exposure on the same subject and location.

Notice how the gridspot forms a gentle circle of soft light that seems to dissolve in from the slightly darker light below. This is the beauty of the double main light setup. You can spotlight your subject but still maintain a great deal of detail in the remainder of her form.
Of course, you can use regular parabolic reflectors, too. For the next shot (below), I removed the beauty bowl and replaced it with a parabolic reflector and a 20 degree grid. I had to re-meter and re-power the parabolic as its light is more concentrated than that of a beauty bowl. When I had achieved my target reading of f/11, my model and I were good to go, and we continued with the shoot. Notice that the background is slightly darker here because the reflector is more narrow. You’ll also note that the circle of light is more tightly defined and the shadows are harder because the light source is smaller.

When your subject wears white or light-colored clothing, you can drop the exposure from the softbox even more than two stops and still retain detail. If your strobes don’t allow linear power changes (and are accurate when making adjustments up or down), you’ll have to turn off the gridspot each time you re-meter the softbox. The exposure from the softbox, for this shot (image below), was dropped an additional full stop to an effective f/4. You will still have to re-meter the two lights together to get a working f-stop because the sum output of the two lights will change.

I switched to a 10 degree grid for the next shot (image below) to show what a narrow gridspot would look like. It’s a look that I personally like very much, and I often use it for senior portraits because my clients like the unusual look as well. I also bumped the power from the softbox down an additional stop, making it four stops below the parabolic. I could tell from my camera’s LCD that the exposure on the background was becoming dangerously dark and would soon be ineffective for this series. The solution was to move all of the lights farther from the background (ahh! the Inverse Square Law at work!). By moving everything farther from the background, the amount of exposure reduction due to falloff was reduced and background detail was maintained. The ratio and spacing of the three lights to the model remained the same.

This double main light technique is something you’ll never see the “fast photo” outlets attempt. They use preset lighting scenarios that, to my eye, look like junk. They are simple, foolproof, and without a spark of creativity. Play and practice with techniques like the double key and you’ll produce results that those practitioners can only dream about.
Please note that your results, based on your equipment, shooting style, etc., will, and should, be different from mine. The amount of reflectivity from the walls of your studio, the size of your studio, and other factors will make a difference in your results. However, the premise is sound and will work beautifully. Your assignment is to make it work for you.
BUY THIS BOOK FROM AMAZON
Working With One Light
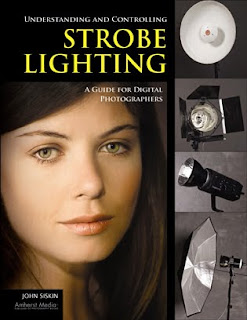 Today's post comes from the book Understanding and Controlling Strobe Lighting: A Guide for Digital Photographers by John Siskin. It is available from Amazon.com and other fine retailers.
There are several reasons to work with one light. One of the most important is so that you can understand how one light source works. If you understand the way one light works—how the size and position of the light affect the subject—it will be easier to add other lights to your shots. Other reasons for working with a single light are the ease, speed, and flexibility of your lighting setup. When I work, I want to be able to start with a powerful character light and move to a soft light without interrupting the flow of the shoot. I can do that with one light and a few simple tools!
JUST AN UMBRELLA
For the first shot in this exercise, I used a Norman LH2400 strobe head with just 250 watt-seconds of power, plus a 42-inch ribless umbrella. My aperture was set at f/11.3. Though umbrellas often create more even lighting, the effect here is a little harsh because the light is directional and there is no light filling in the shadows. (If you shoot in a small studio space with white walls, the bounced light will fill in the shadows.)
 This image was made with a single umbrella. The light works, but it could be better.
  For this shot, I placed one light on a stand and positioned it above the subject and to one side. It was a quick and easy setup.
 Using a setup like this is great for creating character shots, as texture and shape are well defined. The closer the light is to the subject, the less defined the character lines will be.
ADD A REFLECTOR
I added a large reflector panel to the first shot to create the two images below. I shot two frames—one with a silver reflector and the other with a gold one. Once again, this is a very fast and easy change. Much of the character of the first image is retained, but I’ve opened up the shadows. People often set up a portrait with the lights and reflectors at distances of more than 5 feet from the subject. This will greatly reduce the smoothness of the light in the image.
MAKE A LARGER LIGHT SOURCE
To create the next image, I added a light panel covered with white cotton broadcloth between the umbrella and the subject. This created a soft light the size of the panel. Compare the resulting image to the first shot in this chapter: you can see that the diffused light has yielded softer highlights and there is a smoother transition from highlight to shadow. This light is more flattering, as the wrinkles are not as well defined.
 Silver reflector.
  Gold reflector. Note that the gold reflector warmed up the shadows.
 I added a reflector to the original setup to open up the shadows.
 To create this shot, I positioned a light panel between the umbrella and the subject.
 Here I used the umbrella/light panel combination. I use this setup a lot.
 Adding a silver reflector allowed me to fill in the shadows on the right side of the frame, building light that is even softer than that produced by the umbrella alone. The result is similar to the image above, but there is more fill.
 Here is the setup.
BRING BACK THE REFLECTOR
For the next image, I added a silver reflector, just like I did in the second image. It was placed opposite the diffuser, creating two walls of light. The result is similar to the previous image, but there is more fill. The character lines are softer. That makes many people happy. Because I haven’t changed the light source, there was no change in the exposure. Remember, you can opt to use a gold or white reflector to vary the color of the reflected light if you choose.
 For this shot, I positioned the reflector to pick up more light from the umbrella than from the panel.
 The light on the subject’s face is very even in this shot. The silver reflector added some highlights, and there isn’t anything filling in from the subject’s left side.
 You can position the reflector so it gets more light directly from the umbrella, rather than just through the light panel. This makes the reflector brighter compared to the side of the shot with the light panel and gives you a very soft, even light, like a tent. This will change your exposure a little because you are going to have to adjust the reflector and the light with the umbrella. I use this when I need a quick setup for a shot.
BUY THIS BOOK FROM AMAZON
Subscribe to:
Posts (Atom)