Metal Reflectors

Today's post is an excerpt from the book Photographic Lighting Equipment: A Comprehensive Guide for Digital Photographers by Kirk Tuck. It is available from Amazon.com and other fine retailers.

This section is focused on the accessory reflectors that are available for many of the studio flash heads and monolights on the market. (Most movie lights—and hot lights in general—already incorporate their own reflectors, and fluorescent light units are mostly used with softboxes and umbrellas or they have their own built-in reflectors.) Part of the appeal of these lighting systems is that they are flexible and adaptable. There are specialized reflectors for many different applications. These interchangeable reflectors can radically change the character of the light coming from the business end of your studio flash!

The electronic flash head is like a blank canvas for photographers. The most flexible systems allow us to choose the reflectors we need to best do the shot in front of us right now. I own Profoto, so I’m going to use their reflectors as examples, but nearly all of the flash manufacturers offer a good range of metal reflectors that are made to modify the light from the flash tubes in a certain way.

Different reflectors have different properties. The rule of thumb is that a bigger reflector yields a softer light. This is true most of the time, but the internal finish of the reflector and its shape also have a lot to do with the quality of light they reflect.


Umbrella Reflectors. These are also called “spill kill” reflectors. These modifiers have a small diameter lip that keeps light from the flash tubes from spilling back toward the camera. A bare flash sends light in all directions, and although the body of the flash head or monolight blocks some light, you’ll need an umbrella reflector if you want to keep the photons corralled into the front 180 degrees of your flash head. While the Profoto reflector (like all the light modifiers for the system) can be “zoomed” forward or backward to narrow or widen the beam, we mostly use them in a position that fills our umbrella with light and blocks any extra light from spilling around the edges. I call it “tuning the reflector” to the umbrella. Other manufacturers design their spill kills so that they work well for most umbrellas. Even the simplest and least expensive
ones from budget flash makers like AlienBees work well in its intended use.

I wouldn’t use an umbrella reflector by itself as the light would be too uncontrollable.

Top—Part of the charm of a well-designed system is the range of looks you can get with the combination of a good modifier system. Note the numbers on the side of the monolight shown here. The head can be slid forward or backward along the body of the flash to change the angle of dispersion for the flash. This allows you greater control when “tuning” the reflector and head for use with an umbrella or softbox. Bottom—Profoto 600 watt-second monolight with an umbrella reflector. The umbrella reflector can also be used in situations where you need a hard, almost barebulb effect, but with greater efficiency.

Standard Reflectors. As the name implies, these are the all-purpose reflectors that usually come with the flash head or monolight. They are usually 7 to 9 inches in diameter and restrict the beam from the flash tube to somewhere between 90 and 120 degrees. They provide enough light control so if you bounce your flash from the ceiling, no direct light will strike your subjects. They are useful when you need to bounce your flash off a ceiling, a wall, or a big hunk of foam core. They can also be used as a decent substitute for an umbrella reflector. Usually, the interior surface is a pebbled metallic finish or a silver matte finish, as manufacturers try to steer a middle course between light efficiency and softness. Standard reflectors are also available with a highly polished interior for use with grids. Keep your standard reflectors handy. You will always find a use for them.
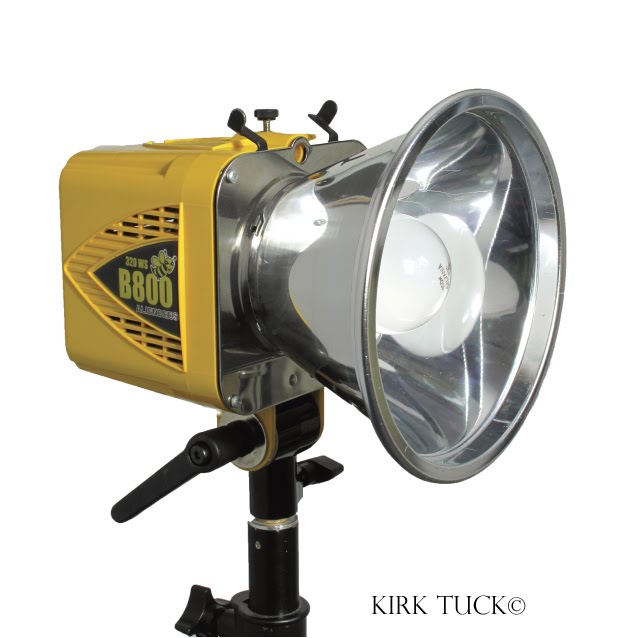
This is the standard AlienBees monolight package with the included standard reflector. Note the two “ears” sticking up near the top. These are spring-loaded levers that hold accessories in place.

Profoto lights offer an excellent selection of modifiers. This is their standard reflector, and it takes full advantage of the head design, which allows modifiers to be “zoomed” backward or forward on the body of the flash head or monolight. This allows one reflector to have a tighter or broader light pattern.

Magnum Reflectors. Every flash line seems to include one of these reflectors. Bigger than the standard reflector by at least a factor of two and a bit smaller than a beauty dish reflector, these allow for an output that is midway between the contrasty light of the smaller units and the very soft light of umbrellas and softboxes. Photographers who swear by these units use them because the bigger bowl and the wider diameter gives them more control when they want to use the edge or penumbra of the light. (The edge of the light can be softer and more interesting than the middle of the beam.) Master portrait lighters like to put a light over to the side and then rotate it so the main beam moves in front of the subject. At some point, they will see the penumbra effect and they’ll know they’ve got the light right where they want it. I try to do that, but it is hit and miss for me, so I use the Magnum reflector to produce a nice, even source of direct light on a background plane or as the “delivery option” when pushing an even light through a diffuser or scrim. It has a softer character than the standard reflector, but it will still give your light some edge when used correctly.

This is the front of a Profoto Magnum reflector. It is about 13 inches in diameter and does a good job of throwing a compact circle of light, which is slightly softer than the standard reflector.
This is a reflector size that seems lost in the middle region of lighting accessories—it is too big to be a hard light source but too small to be really soft for portrait work. Really, it is a very useful modifier that gives a good tonal rendering with snappy edges. Used in expert hands, it can be a very beautiful main light for dramatic portraits.

Beauty Dishes. A beauty dish is a large flat dish reflector in the range of 16 to 30 inches in diameter. Most have a white painted interior to reduce specularity and soften the light. Nearly all of them have a little panel that “floats” over the flash tube so that no direct light is emitted from the reflector. All illumination comes from the white bowl. One specialty manufacturer even makes a 40-inch version, but the price is outrageous. So, here’s the gist of the argument: I understand that the beauty dish is meant to be used close to a model’s face; my fashion photographer friends even have a formula that says beauty dishes should be used at a distance equal to about 2x the diameter of the beauty dish. That’s about 32 to 60 inches from the subject. What I’m supposed to see is “a soft, smooth light with crisp (but not hard) shadows that quickly falls off on the edges.” I’ve owned a beauty dish for years, and I just don’t see much of a difference between it and a well-tuned umbrella of the same basic size. But take this with a grain of salt. I’m not a professional beauty photographer, and I admit that they’re probably more sensitive to the nuances of their specialty. My biggest reason for choosing a small, black backed umbrella over the beauty dish is the difference between $22 (a little umbrella) and $300 (the cool beauty dish). My portraiture style usually calls for a much bigger and softer light source like a 60-inch umbrella or a big softbox.


The design of a typical beauty dish seeks to collimate the light from a flash into a controlled but soft beam of light that falls off more at the edges than light from an umbrella or a typicalparabolic reflector. Most beauty dishes are 16 to 30 inches in diameter and have a center reflector plate that keeps direct light from the lamp or flash tube from hitting the subject. The beauty dish evolved back in the late 1950s when glamour photographers were seeking a softer look from the very bright hot lights in use with the slow films of the day. The well-designed beauty dish has a look all of its own, and they continue to be popular with modern portrait photographers.

Play with a beauty dish. You might find it irreplaceable. Then again, you might find it about as useful as a 20- or 32-inch umbrella. With all light modifiers, so much is subjective and dependent on your style. That’s my two cents’ worth.

Left—A rear view of the AlienBees beauty dish gives you some idea of its relative size. Many location photographers are replacing their umbrellas and softboxes with beauty dishes because they are more stable in the wind. One problem with beauty dishes is that you can’t tilt them down very far when they are attached to a conventional light stand. Right—This is a side view of a beauty dish on an AlienBees monolight. The beauty dishes range from simple to elegant, but all do the same job: they throw crisp light on a close by subject while hastening the falloff on the edges.

Telephoto Reflectors. Some companies offer longer, narrower reflectors that are meant to throw a beam of light a long distance by concentrating it into a narrower pattern. These are usually marketed to sports photographers who are trying to get some light on an athlete at a distance. I’ve never felt the need for one, so I can only assume they do what they’re designed to do, and if you have a burning need to light something 50 feet away you’ll want to look into them. At least you now know that they exist.

All of the above reflectors are standards in most well-equipped equipment lines. There are lots more to choose from, but you needn’t own every article in a manufacturer’s catalog to do great work. My research tells me that most of my peers use one or two reflectors year after year and supplement those with one or two favorite attachable light modifiers.

BUY THIS BOOK FROM AMAZON

ON-LOCATION PORTRAITURE

Today's post comes from the book Off-Camera Flash: Creative Techniques for Digital Photographers by Rod and Robin Deutschmann. It is available from Amazon.com and other fine retailers.

Off-camera flash photography and on-location portraiture go together like peanut butter and jelly. The options and rewards of creating light while in the field are as limitless as your imagination.

PORTRAIT PHOTOGRAPHY IS CHANGING
The leash has been cut. The use of off-camera flash brings with it the freedom to take our message-building skills outside—away from the stale props and overused reflectors of yesterday. Finally, our creative voice can shine unhindered as the world becomes our well-lit backdrop and our vision grows as the scenery changes.


Off-camera flash photography has brought the studio outdoors—and with it all of the options, advantages, and challenges of unrestrained light. You can now seize upon nature’s gifts or capitalize on man-made alternatives. With the aid of family and friends, even the most problematic of shoots are quickly reined in. When shooting in the city, it’s wise to stay away from the use of tripods or anything else that can impede traffic. Not only is it dangerous, but chances are that the city will require permits. Avoid the hassle and enlist some help.

A NEW TRUTH
As portrait photographers using off-camera flash, each new outdoor location brings with it amazing possibilities and a chance to test our skill, knowledge, and competence. Gear choice will be a testament to our adventurous side. Do we take one light connected with a cord or several and use wireless options? Do we ask friends or family to hold the gear or do we employ light stands, hand-held booms, or beanbags? Will we visit an exotic locale for the ambiance, or do we tackle the hustle and bustle of downtown? Are we up for a trip to the mountains, hauling sandbags to keep light stands from blowing away? Or do we head to the beach, wrapping each flash in its own plastic bag to protect the gear from sea spray? Creativity, as you might have guessed, may just lie in our answers to these questions.


One large softboxed flash was used to illuminate our model’s face. It was held by an assistant slightly off camera. The background, with its beautiful shapes, lines, and color, needed to be in crisp focus, so a very small aperture (f/16) was chosen. A redder-than-normal white balance was incorporated to add drama and draw attention to the model more quickly.


WHAT TO EXPECT
If you’re new to the idea of using off-camera flash for your on-location portraits then be prepared for something very special: the lights change everything. Every rule that you thought you knew now doesn’t apply. Every weather condition—rain, sunshine, muggy, cloudy, even a tropical storm— brings new opportunities and new “looks” for your message. There is no need to ever worry about having the “right” light; you’re going to be bringing it with you.With enough flashes and modification devices, you can easily replace the sun as your main light source when it’s just not cooperating, creating sunsets and mood anywhere, at any time you want. Plus, you’ll still maintain complete control over your lighting, depth of field and perspective—something that’s nearly impossible if you’re only using one on-camera flash.


Challenge yourself and your equipment whenever you shoot outdoors. If you’re comfortable using one off-camera flash, then push yourself to use two. If you use indoor studio lights, create a set for outdoors. Don’t settle for the ordinary.


A FRESH APPROACH
Keep things extraordinarily simple at first.Master the use of one light. Learn what it takes to support it, to modify it, and how to trigger it. Use the flash both indoors and out. Demand as much from it as you do from your camera and subjects. Practice shooting with the flash set at full power, then modify it. Don’t accept a poor image. Review each shot as it is taken—and if you don’t like it, fix it right then. Each bad photo now affords you experience, so get as much of it as you can. Learn from your mistakes and make them work for you.

DOUBLE YOUR FUN
Two lights will always offer more options. The placement, height, angle, and power output can be adjusted independently—and you can add separate filters, gels, and modifiers. Once you’ve moved on to two flashes you will need to think about using some kind of light stand. Keep in mind that, when it comes to support, you get what you pay for. Choose a cheap stand or an inexpensive tripod and you can expect trouble. It’s best to go with a quality product rather than an inexpensive one that will break or, worse yet, fall over.


Two lights with no modification were placed at opposite sides of our model for this series of images. In the first image the lights were turned off. In the second image, the left light was turned on. In the last image both lights were fired. The differences are obvious—and very important.


TAKING IT TO THE NEXT LEVEL
Creativity in portrait photography really kicks in when you start adding several off-camera lights. You’ll eventually search out tools and accessories to make the job of holding them even easier. Get creative with your support systems. Call in favors from family and friends, ask your kids, your wife, or your husband for help. Use tools you already have, such as tripods, monopods, and beanbags. Combine your modification tools; use a snoot on one flash and a softbox on another. Change the ways you introduce light to the scene. Drag out some of that old studio equipment and modify it to suit your new outdoor needs.

Don’t be afraid to challenge the norm. If a support tool or modification contraption that you need can’t be purchased, then make one. You would be surprised at how far a few strips of Velcro, a pair of scissors, and some black foam will get you.

Light stands, sync-cords, extending handles, softboxes, snoots, reflectors, and more await. Get creative with your tools—but, more importantly, get to know them before you go out and shoot.

DEALING WITH GLARE: A “POLARIZED” REMINDER
If you’re unaware of how powerful a polarizer is when using flash photography, then you haven’t been using one correctly. For the best results, place your lights 90 degrees from your lens to remove any glare they produce. If you mistakenly add light from the wrong direction, you will create more of a problem than any polarizer can handle. Remember, you’ll still need to turn the polarizer (no matter the type) to make it work. If you don’t, then your off-camera flash photography will always be lacking the punch that other photographers’ images have. (Note: If you’re shooting in any automatic mode, you’ll need to purchase a circular polarizer. If you’re a manual shooter who uses manual focus, either a circular or linear polarizer will work just fine.)

The top image was created with one unmodified off-camera flash placed to the right of the model. A polarizer was attached to the lens but was rotated incorrectly. In the bottom image, the exact same camera settings were used, and the same flash was fired, but the polarizer was now rotated correctly for maximum effect.

Polarizers
Want the most from your polarizer? Then learn to shoot in manual. Unfortunately, polarizers can’t work at 100 percent if the camera is in any automatic setting. The camera, in its attempt to capture average images, will actually fight the desirable effects the polarizer produces.

BUY THIS BOOK FROM AMAZON

Why Are Strip Lights So Cool?

Today's post comes from the book Christopher Grey's Studio Lighting Techniques for Photography by Christopher Grey. It is available from Amazon.com and other fine retailers.

I know I won’t be telling you anything you don’t know when I say that photographers are just little kids playing with their toys. Over the course of my career, I’ve been lucky to be interested in shooting everything, and I have managed to stock a very large toy box with all sorts of goodies.

Some time ago I decided to replace my nondigital studio strobes with new gear as sophisticated and precise as my camera and light meter. I wanted to duplicate everything I’d previously purchased and add a few new items as well. Though I’ve always had a wide selection of softboxes, I’d never before had a totally matched set. In the past, I added gear as necessary, or just because I wanted to play with something to see what it could do. There’s nothing wrong with that approach—it’s certainly less of a strain on the ol’ checkbook than doing it all at once—but the various brands and ages of the equipment meant color temperature differences were getting wider as the gear got older and digital cameras got better.

Along with everything else, I replaced two earlier strip lights, about 16x48 inches each, with 1x6-foot Profoto strip light softboxes. I became so enthralled with the look and shape of the light they produce that I now use them in place of more traditional modifiers and in situations I’d never thought to try before. I think you’ll see possibilities for your work, too.

When used as a background light, these long, narrow boxes create a long and consistent light that’s reminiscent of a horizon just after sunset. In this shot of a singer, the strip light creates a background light that splashes and rides up the folds of the curtain just as bounce light from a spotlight might do.


Use two strip lights, one from each side, to illuminate both the subject and the background. When they’re evenly spaced relative to the subject and the background, and powered to the same strength, the light is even across both. The look is terrific and very easy to create, yet it’s important to remember that the model can’t be too far forward of the background (about four feet, in this case). As the model is moved farther away from the background, it will become darker, because the light will lose strength.


For product and stock photography, softboxes like these have a lot to offer. For example, beverage, stemware, and cookware photographers spend a great deal of time placing highlights that accent the form of the product. Because strip lights are so long, they can create a highlight that runs the entire height of the vessel.

The highlights on this glass of brandy were easily formed by setting a softbox on each side, angled to a V shape to mimic the shape of the glass. Both strobe heads were powered equally. In order to get a reflection that followed the entire shape, it was necessary to place the bottom of the light below the base of the product.


This shot of old boots was lit by placing a strip light flat against the back of a sheet of milky white Plexiglas, so that the edges would stay relatively sharp and defined. The parabolic reflector on the main light was fitted with a 10 degree grid to keep light from spilling onto the Plexi and diluting the shadow.


You can use one of these modifiers to create beautiful hair light for an individual or multiple strip lights to create even, semicircular coverage over your subjects’ heads and shoulders. Center the light over and slightly behind the subject(s).

Gelling the light is as easy as taping the colored acetates to the black nylon frame of the softbox, a little trick that produces stunning results for applications such as editorial or stock photography. The main light modifier for this shot was a 20-inch beauty bowl, and the background light was a 2x3-foot softbox, powered to 1/3 stop under the main light and placed close to the background to fall off rapidly. The strip light power was 1/3 stop over the main light. My 70–200mm zoom was used at 150mm to compress the perspective and throw my chemist slightly out of focus at f/9 (images 18.6 [diagram] and 18.7).


One of the older and smaller live theaters inMinneapolis, the Southern, features a proscenium arch with intricately carved and formed plaster details that must have been spectacular when new. Well, the years have not been kind to the property, and much of the detail has been chipped away or scraped off, but the wall and arch are still intriguing, especially as a photographic background. Frankly, if I had a wall like this in my studio, I’d insure it with Lloyd’s of London.

One of my professional dancer friends, Denise Armstead, rented the theater as a background for a video she was producing for her company, DADance, and had promised me some time to shoot. She and her dance partner, Gerry Girouard, had created and choreographed a tango that was outstanding as a motion piece but which begged to be shot as stills.

I’d brought quite a bit of gear to the shoot because I’d not previously seen the dance and had no idea what I would need to set up the shot. After watching the performance, I felt strip lights would create a sense of fluid drama quite nicely.

I set one strip light at each end of the wall on the left side of the arch. Each strobe was powered equally, and I made a mental note (looking at features on the wall) where the two strobes metered to the same stop. The lights were set to feather across the wall’s details but were mostly aimed at the dancers, who had about five feet to move between the points of perfect exposure. As they moved from one side to the other, the two narrow softboxes took turns being main light or fill, allowing the dancers more freedom of movement than they’d have had if they’d been lit for only one place on the floor (images 18.8–18.10).


So, if you’re looking for a new twist on an old standard, you might want to investigate a strip light softbox. Most manufacturers do not offer a box as narrow as Profoto’s, so make sure your brand of strobe gear makes a speed ring that works with the narrow rod placement that the brand of softbox you buy will require. If you like what the softbox does as much as I do, buy another so you’ll have a matched set—then go play with your toys.

BUY THIS BOOK FROM AMAZON

Subtractive Lighting

Today's post comes from the book Jeff Smith's Lighting for Outdoor & Location Portrait Photography by Jeff Smith. It is available from Amazon and other fine retailers.

Subtractive lighting is just what the names implies: removing light or, in essence, creating shadows to achieve a more dimensional portrait. I learned subtractive lighting from Leon Kennamar, who was probably the most well-known subtractive-light photographer of his day. The outdoor portraiture he created was truly outstanding, because with subtractive lighting he could completely control the shadows of his images—something that most photographers to this day don’t do. As we have already learned, it is the darkness that draws our eyes to the light and without shadows, no one notices or cares about the light.

Here, a reflector is actually used as a gobo. Placed directly over the subject’s head, the reflector blocks the overhead light and eliminates the dark circles under the subject’s eyes.

The downside of the teaching of subtractive lighting is that, while it is great for creating shadows, reducing the size of the main light to a proper size, or keeping light from hitting a certain part of the subject or scene, a scene must be close to ideal to use only subtractive lighting techniques.

To demystify subtractive lighting, let’s call it what it is: creating shadows. For example, if you have a main light that produces beautiful catchlights in the eyes but a flat lighting on the face, you know that your main-light source lacks direction and is too large. To correct the problem, just put a black panel, gobo, flag, or other light-blocking device on the side of the subject where the shadow should be. This will create a shadow and improve your final image.

A white reflector is used over the subject’s head as a gobo, blocking the overhead light and producing a more flattering lighting effect.


Which type of light blocker to use will depend on the circumstances. Black devices block light from the desired area, but they also tend to suck the light out of neighboring areas. Depending on the light levels and scene, white blockers can actually bounce light back onto your subject, adding a color cast or changing the desired appearance of the lighting. Let’s imagine you are placing a blocker above a subject to block the overhead light. If my subject was standing in a grassy area, I would typically use a white reflector for this. The light from the ground won’t cast enough light into this white reflector to act as a light source and won’t affect the light hitting the face. If, on the other hand, the subject was standing on light-colored concrete in direct sunlight, the concrete would reflect up enough light to change the appearance of the lighting. Switching to a black device might be necessary, although it would tend to darken the hair of the top of the head.

BASIC DECISIONS
The decision to add light or take it away always starts with the selection of the background. Many photographers suggest that you first find the light and then determine the background based on that area of ideal lighting. This is the practice employed by photographers who work at those “ideal light” times of day. When I go into an area, however, it is usually in the middle of the day, so my first consideration is to look for usable backgrounds; I know that I can make the light usable no matter what it currently looks like. This is the basic idea of working on location when the lighting isn’t perfect—it is much easier to change the light on the subject than the light on the background or the scene around the subject.

Once a background is located, the next decision is whether to use additive light sources or subtractive light sources—although there are times that both are used in the same image. This is typically a straightforward decision: if the light on the background is more intense than that on the subject, you must use at least some additive light sources. However, if the background is lit by the same light as the subject, then subtractive lighting alone may be enough. I find that there are very few scenes in which the light can’t be improved dramatically using additive or subtractive techniques.

SUBTRACTIVE LIGHTING IN PRACTICE
The easiest way to learn subtractive lighting is to start with a subject and available light only. Then, add the lighting controls you need and observe their effects as you transform the portrait into a salable image.

The unmodified light gives this subject raccoon eyes and unpleasant highlights on her cheeks and nose.

In the first image (above), you see this beautiful young lady in a typical outdoor location. The amount of light in the subject’s area is relatively close to the amount of light on the background area. This means that we will not have to add light to balance the scene (i.e., darken the background). However, because the light is coming down from directly overhead, the subject has raccoon eyes as well as unattractive highlights on her forehead and nose.

The first correction I would make is to place a white reflector overhead to block this light. I would use white here because the shaded grass will not reflect enough light up to the white reflector to affect the final image. In the second photo (below), you can see the improvement in the lighting with just that one correction. Yet, while the image is improved, there are still some problems that need to be corrected. The eyes have nice catchlights in them, but the face has no shadowing or transition zone to draw the viewer’s eyes to the most important areas of the face and hide those that shouldn’t be seen.

Adding a gobo overhead corrects some of the problems, but leaves the image without any shadowing to shape the face.

Therefore, a second step would be to place a black panel on the right side of the frame to establish a shadow zone and create a transition from highlight to shadow. In the third image (below) you see the effects of this change. The face appears thinner and the structure of the face is more noticeable. While this is a major improvement, we aren’t done yet!

Placing a black panel to camera right creates a shadow zone.

As you look at photo three, you see a little highlight toward the end of the nose, this means that the main light is wrapping too far around the subject. To compensate, you could put another black panel on the opposite side of the subject to reduce this side light—but that would create a second shadow on the highlight side of the face. The best solution is to use a piece of translucent fabric. Placed to camera left, this will reduce the light coming from the side without creating a second noticeable shadow area.

Now we are getting close to a salable image—actually, at this point, this image is better than most of the outdoor portraits I see displayed in some studios. Still, let’s take it one step further. Since most of the light in this scene comes from above, I almost always add a white or silver reflector underneath the subject’s face to give the portrait a more glamorous look. The light from this reflector brings out more of the eye color; softens the darkness under the eyes, something all of us have; and helps to smooth the complexion. I use white when reflecting sunlight and silver when reflecting light from a shaded area. At this point we have created a salable professional portrait.

Subtractive Light Photo Booth.
Subtractive lighting is one of the simplest ways to control the lighting in an average scene. Therefore, I have used these principles to assemble a photo booth that provides perfect outdoor lighting with any outdoor background. This booth consists of the exact combination of modifiers discussed above: a 4x8-foot black panel on a rigid frame, a translucent panel on a rigid frame, a
white reflector attached to the two panels with clamps, and a white or silver reflector clamped at the level needed to provide light in the appropriate place for a head-and-shoulders pose.


This photo booth makes outdoor lighting very easy to deal with. To use it, I look for an area that has strong backlighting, usually provided by the sun. I want to have each client separated by a backlight, since the majority of them have darker hair and I instruct them to wear darker shades of clothing as well. When I can find this backlight, I use the white reflector; when working in a shaded area with little or no backlight, I use the silver reflector.


The only variable in this setup is the main light. In most scenes, the area in front of the subject will be open sky, providing a fairly good main-light source—at least with all the photo-booth’s modifiers in place. Should the area have obstructions that don’t provide a usable main-light source, you can simply add a reflector or scrim with mirrored light to produce one.

BUY THIS BOOK FROM AMAZON