Showing posts with label posing. Show all posts

Lighting Design in Action

Today's post comes from the book Wes Kroninger's Lighting: Design Techniques for Digital Photographers by Wes Kroninger. For this post we are featuring three of his many lighting designs from the book. In this book Kroninger showcases a number of his remarkable images and breaks them down into how they were setup and what equipment was used to achieve the final result, often times including valuable tips about that shot. Each shot is accompanied by multiple diagrams. This book is available from Amazon.com and other fine retailers.

The Scoop
This image is another example of the teamwork between performing and visual artists. It was captured in an abandoned warehouse where I had wanted to create a series of images for a long time. I visualized the juxtaposition of the beautiful lines of the dancers contrasted with the gritty texture of the old building. It took some investigation and a lot of phone calls to get access to the location, but the site proved to be perfect for the shoot.


Tech
There was no electricity, so battery-powered lights were used to create these images. One 4x6-foot softbox was used as the main light. A second bare-bulb strobe was placed off set to camera right to add some light to the darkened building. In this image, a third light was placed on the first floor pointing up through the hole in the floor at the bottom left of the image.


Tip
I did my research on which battery powered lights had the shortest flash duration, but I overlooked the fact that (to save on battery charge) most battery-powered strobe packs have little to no modeling light. As the sun set, this was a big problem while trying to focus. Fortunately, a friend had come to the set to shoot some video and happened to bring a generator with a hot light, which created just enough ambient light to focus.


The Scoop
When photographing actors for their promotional materials, it is a good idea to keep your lighting as simple as possible. Casting agents who are searching for acting talent like to see what a potential selection looks like without distractions or excessive embellishment. By keeping the lighting simple, you make the image a quick read of an actor’s facial features and overall appearance.


Tech
This is another example of how simple lighting can be when the right decisions are made for the right subject. Here, one medium softbox was used overhead. One reflector was used from below to add some upward fill. A digital “cross-processing” effect was used by selecting the tungsten white balance setting while using studio strobes; this created an overall cool blue tone to the image. Texture and grain were also applied for added effect.


The Scoop
Some of the best experiences as a photographer come when collaborating with other artists. Working with dancers is no exception. They are so conscious of their movement and the position of their bodies in action that it guarantees a beautiful image.

Tech
To create this image, two 4x6-foot softboxes were used at corners of the set. To achieve a very short flash duration, I dialed the pack down to a low setting. I adjusted for this loss of illumination by increasing the ISO of my camera to 400. (I generally hesitate to go above 400, because I want to eliminate as much grain or digital noise from the image as possible.) The model was backlit with two gridded lights at the edge of the seamless paper, one on either side.

Tip
When I photograph dancers, I like to stop motion. I find it fascinating to see still frames, frozen in time, of movements that otherwise pass so quickly before our eyes. Certain equipment selections have to be made to achieve these results. Some lights have very fast flash duration (the flash tube itself stays illuminated for a short duration during each firing). This speed eliminates any streaking or blurring in the captured image— because, essentially, the light is doing the work of your shutter. Most strobe packs offer their shortest flash duration when at low power settings, then grow longer as the power is increased.


BUY THIS BOOK FROM AMAZON

Direction of the Light

Today's post comes from the book Lighting Techniques for Photographing Model Portfolios by Billy Pegram. It is available from Amazon.com and other fine retailers.

In addition to its quality, you must also consider the direction of the light. As noted above, light that comes from overhead is usually not flattering, because it creates dark shadows on the eyes. Instead, look for light that strikes the subject from another angle.

Front Light. Light that comes from directly in front of the subject is commonly used in beauty photography because it tends to smooth the skin and flatter female faces. However, it can also flatten the features and create a lack of depth in your image.

Angled or Side Light. Light that strikes the subject’s face from an angle puts highlights on one side of the subject (the side closer to the light) and shadows on the other side of the subject (the side farther from the light). This adds a sense of depth and helps show the shape of the subject. As a result, it is a great lighting choice for images designed to showcase the model’s body (such as fitness shots). Because light from the side accentuates texture, it also works well for clothing shots where texture needs to be visible. One downfall of this lighting is that the model’s face will be shown with texture, as well. This can be effective with men’s facial structure, but it is not normally as flattering to a woman’s face.

Light that skims across the body from the side is great for highlighting a toned physique.

Backlight. Backlight occurs when the light source is directly behind the subject and directed toward the camera. One thing to watch out for when using strong backlighting is lens flare. This occurs when light shines directly into the lens and results in a loss of contrast and color saturation, and in some cases the creation of bright geometric artifacts (reflections off the elements within the lens itself).

In this image, Backlighting created highlights to separate the subject from the background.

When paired with some kind of stronger front or side light, backlighting can add impact and separation to a photograph by accenting the edges of the subject, an effect called rim lighting. In the image above, a light placed at an angle to the subject illuminated her from the front. Two lights behind the subject created bright highlights (rim lighting) along the edges of her body, separating her from the background. In this case, the lights themselves also formed a compositional element in the background.

With a weaker (or nonexistent) front or side light, backlighting can also allow you to create silhouette (or semi-silhouette) effects. Experimenting with this technique you can achieve some amazing photographs. In the series of photographs below, I focused on the model. Her body shielded my lens, and I had her move slightly to my left so the sun would just break past her body. I varied the output of my flash for each photograph, achieving a variety of different exposure and results. Who is to say which exposure is correct?

Different flash settings combine with backlighting to produce a variety of effects.


BUY THIS BOOK FROM AMAZON

Working With One Light

Today's post comes from the book Understanding and Controlling Strobe Lighting: A Guide for Digital Photographers by John Siskin. It is available from Amazon.com and other fine retailers.

There are several reasons to work with one light. One of the most important is so that you can understand how one light source works. If you understand the way one light works—how the size and position of the light affect the subject—it will be easier to add other lights to your shots. Other reasons for working with a single light are the ease, speed, and flexibility of your lighting setup. When I work, I want to be able to start with a powerful character light and move to a soft light without interrupting the flow of the shoot. I can do that with one light and a few simple tools!

JUST AN UMBRELLA
For the first shot in this exercise, I used a Norman LH2400 strobe head with just 250 watt-seconds of power, plus a 42-inch ribless umbrella. My aperture was set at f/11.3. Though umbrellas often create more even lighting, the effect here is a little harsh because the light is directional and there is no light filling in the shadows. (If you shoot in a small studio space with white walls, the bounced light will fill in the shadows.)

This image was made with a single umbrella. The light works, but it could be better.

For this shot, I placed one light on a stand and positioned it above the subject and to one side. It was a quick and easy setup.

Using a setup like this is great for creating character shots, as texture and shape are well defined. The closer the light is to the subject, the less defined the character lines will be.

ADD A REFLECTOR
I added a large reflector panel to the first shot to create the two images below. I shot two frames—one with a silver reflector and the other with a gold one. Once again, this is a very fast and easy change. Much of the character of the first image is retained, but I’ve opened up the shadows. People often set up a portrait with the lights and reflectors at distances of more than 5 feet from the subject. This will greatly reduce the smoothness of the light in the image.

MAKE A LARGER LIGHT SOURCE
To create the next image, I added a light panel covered with white cotton broadcloth between the umbrella and the subject. This created a soft light the size of the panel. Compare the resulting image to the first shot in this chapter: you can see that the diffused light has yielded softer highlights and there is a smoother transition from highlight to shadow. This light is more flattering, as the wrinkles are not as well defined.

Silver reflector.

Gold reflector. Note that the gold reflector warmed up the shadows.

I added a reflector to the original setup to open up the shadows.

To create this shot, I positioned a light panel between the umbrella and the subject.

Here I used the umbrella/light panel combination. I use this setup a lot.

Adding a silver reflector allowed me to fill in the shadows on the right side of the frame, building light that is even softer than that produced by the umbrella alone. The result is similar to the image above, but there is more fill.

Here is the setup.

The light panel sucked up some light in this rendition of the subject, so I added more light to achieve a similar aperture.

BRING BACK THE REFLECTOR
For the next image, I added a silver reflector, just like I did in the second image. It was placed opposite the diffuser, creating two walls of light. The result is similar to the previous image, but there is more fill. The character lines are softer. That makes many people happy. Because I haven’t changed the light source, there was no change in the exposure. Remember, you can opt to use a gold or white reflector to vary the color of the reflected light if you choose.


For this shot, I positioned the reflector to pick up more light from the umbrella than from the panel.

The light on the subject’s face is very even in this shot. The silver reflector added some highlights, and there isn’t anything filling in from the subject’s left side.

You can position the reflector so it gets more light directly from the umbrella, rather than just through the light panel. This makes the reflector brighter compared to the side of the shot with the light panel and gives you a very soft, even light, like a tent. This will change your exposure a little because you are going to have to adjust the reflector and the light with the umbrella. I use this when I need a quick setup for a shot.

BUY THIS BOOK FROM AMAZON

Corrective Lighting- Keep It Simple

Today's post comes from the book Corrective Lighting, Posing & Retouching for Digital Portrait Photographers, 3rd Ed by Jeff Smith. It is available from Amazon.com and other fine retailers.

Lighting a portrait is a simple process that photographers have complicated over the years. This has happened for two reasons. First we are gadget freaks. We think, “Why should I use one light when I have three?” Second, most teachers of professional lighting techniques are sponsored by (a nice way of saying their fees are paid by) equipment companies. These companies have all that equipment to sell, so the question becomes, “Why use one light, when we want to sell three and we can charge more for the big one than the little ones?”

This leads many photographers down the path of “crapping up” a simple thing. If I sent most photographers into a white room with one large window, they would be able to take a properly lit image. However, if I gave these same photographers a flash unit with a softbox attached, many of them would look lost. Yet, isn’t it the same thing? If you put the softbox where the window was and placed the subject in the same position in relation to it, wouldn’t it appear the same?

The second problem of sponsored learning is the “bigger is better” approach to main lights, which is completely wrong—at least from the perspective of correcting flaws. These monster sources of main light are the most forgiving to improper placement, but they are the least controllable. It is like the different between a rifle or shotgun, a bow and arrow or a grenade. They all might get the job done, but one is more precise than the other. (Of course, the other is more forgiving if you’re a lazy shooter who doesn’t like to take the time to aim!)

Smaller main light sources give you better control over which areas of your subject are lit and which remain more in shadow.

Huge main light sources illuminate everything on the subject—they ruin the shadowing that we need to conceal our clients’ problems. With a four- to six-foot main light source, a subject will be evenly lit from head to toe. It will light her less-than-flat stomach, her large thighs, her “cankles” (ankles that never really slim down, so the calf appears to be connected directly to the foot), and her size twelve extra-wide feet. What a lovely sight.

To have control over your light, the light source must be smaller. You want light only where the client’s face and body can handle light being put. Small light sources allow you to place light exactly where you want it (and, therefore, draw the viewer’s eyes to the desired areas). If you have a huge light box and really don’t want to buy another (or don’t have room for a second light box), make or buy a reducer. Simply cut a small hole in the middle of a thick piece of black fabric and you have created a smaller main light source! Some companies like Photo-Flex have reducers available that are custom designed to their light boxes, but the fabric works just as well. (Note: Grids/louvers can also be used to narrow the beam of light, but they don’t allow you to feather the light [softening it by using the light rays from just the edge of the light box].)

Huge main lights aren’t the only way we can overcomplicate our lighting. When I first started in this profession I went to a week-long class and studied with a man who was literally a legend. He showed the class his unique style of lighting and discussed the ratios of lighting he used when photographing. He explained that he used a 3:1 lighting ratio when not diffusing an image and a 4:1 lighting ratio when diffusing. (Note: For all you young photographers, this was in the days of film, when fine grain, medium-format film gave us too much detail for the average client’s face.)

I came away from this week of learning an enlightened photographer—right up until I started using these lighting ratios in my studio. The models used for the demonstrations were white with a suntan, but in my studio I worked with many Hispanic and East Indian people that had every shade of skin from olive to chocolate brown. While these lighting ratios worked well for my suntanned clients, the ratio was much too high for someone with darker skin.

Using reflected fill is one way to simplify your lighting and improve your control.

Another light went off; “Wouldn’t dark skin reflect less light in the shadow areas than light skin? Do you know how many shades of skin there are between suntan white and chocolate brown?” Taking what I had been taught, I would have had to test and come up with a working lighting ratio for every shade of skin and then categories what range of skin tone worked with each lighting ratio. What started off a simple way to understand lighting in a classroom setting turned into a complicated nightmare in the everyday workings of my photography business.

Unfortunately many theories are just like this one—good for the exact context in which they were demonstrated, but not very practical in everyday in business. I needed to find a simpler, more practical way to deal with this issue, and it dawned on me that I didn’t need to use flash to fill the shadows. Using flash to fill the shadow, you are always guessing at the amount of fill. With a reflector, the fill is always proportionate to the output of the main light. (You do, however, have to work in a studio area that has subdued lighting, with little or no ambient light from windows or overhead lights.)

Therefore, the first step to un-“crapping up” my lighting was to change from fill flash to filling in the shadows with a reflector. This allows me to fill the shadow on the face and leave certain parts of the body unfilled. Reflectors have different surfaces, everything from plain white to highly reflective silver, so you can use the material that gives you the best working distance and look (white will be placed the closest and provide the softest quality of lighting, etc.). The best part of using a reflector to fill the shadow is that what you see is what you get.

SHADOW, NOT LIGHT
Because of our photographic training, we often think that corrective lighting will do the most to hide flaws. Well, it doesn’t! In fact, our “training” in how to light a portrait is the biggest problem. When we start to learn about lighting, we learn that light is our “paintbrush.” Corrective techniques, however, rely on shadow, not light.

It is shadow that gives a portrait dimension, and it is shadow that lets you disguise your clients’ flaws.

Any student photographer with two lights and a meter can create a decent portrait—just put the main light at a 45-degree angle to the subject and place the other light behind the camera. Set the lights so the main light is two stops brighter than the light behind the camera, stick a diffusion filter on the lens, and there you have it—I have just taught everyone with any knowledge of photography to create a realistic portrait with the appearance of a third dimension. This is the lighting setup mall studios use because it is easy to learn, easy to use and, for most of the buying public, acceptable for a cheap portrait. Unfortunately, this is also the lighting setup that many professional studios use. While clients will accept this type of portrait if they are getting it cheap, they are not going to pay a professional studio’s price for something they could get at the mall for much less. Professionals need to deliver more than an “acceptable” portrait. This is where shadow comes in.

Shooting in a dark area ensures that no light is bounced off the walls or items in the room, so I can put light and shadow exactly where I want it and not have it diminished by the surroundings.

It’s obvious that not much would exist in an image without light, but it is the darkness that draws the viewer’s eye to the light. It is shadow that gives a portrait dimension, and it is shadow that lets you disguise your clients’ flaws—flaws they aren’t paying to see (or, perhaps better, flaws they won’t pay for if they do see them).

Corrective lighting is about control of light, but even more importantly, it is about control of shadow. In a basic lighting setup like I described earlier, control is impossible. Combine a large main light and a fill light with the white walls of most studios and you have light bouncing around off of everything. The three pitfalls of the average lighting setup are:

1. Using a main light modifier that is too large and uncontrollable. Because of our love of light, we reason that bigger is better. In fact, the larger your light source/modifier, the less control you have. If you use umbrellas and want to control your light better, throw them away and buy a small softbox with louvers.

2. Using fill flash instead of reflector fill. The fewer lights you can use in your camera room, the more control over the lighting you will have. When you use fill flash, you get fill everywhere and have no control of the shadow formation in specific areas.

3. Using light-colored camera rooms. These add to the lack of control in the shadow areas. In corrective lighting, I want light to fall only and precisely where I put it. That can’t happen with white or cream-colored walls and floors. These lightcolored surfaces themselves become a source of fill light, just like using a white reflector.

You must start thinking in terms of directing the viewer’s gaze to the areas where you want it to go (these are the areas you will light) and keeping the viewer’s gaze away from the areas you don’t want them to see (by leaving those areas in shadow).

At times, you will have to control the light and shadow very carefully, because hiding one problem in shadow will make another problem more noticeable. A good example would be when photographing a young lady with a heavy face. Your first instinct would be to have a portion of her face in shadow to reduce its apparent width. But what if she has a large nose and the shadow on the side of the nose makes it appear larger? The same is true for the hair, which might be dull and have dark roots showing in blonde hair. To make the hair look shinier, you would light it—but to hide the roots you would need to leave it in shadow. Using smaller lighting sources and pinpoint fill, you can deal with these multiple problems that require two types of lighting.

BUY THIS BOOK FROM AMAZON

Dappled Light

Today's post comes from the book Available Light: Photographic Techniques for Using Existing Light Sources by Don Marr. It is available from Amazon.com and other fine retailers.

Here we will challenge you to find the “buried treasures” of lighting. These are what I call Pockets of Light or Sun Spotlights. Normally we walk right by them, but I would like to invite you to slow down and find them. “Okay,” you say, “What the heck are they?” They are areas that seem to have their own special highlight on them, a spot where a little kiss of light seems to be telling a story. It’s a place that is lit with different light than anything around it, almost like a big stage light was put up in a tree to light the scene. This may sound like I want you take a trip to never-never land (Don’t go! The food is terrible.), but what I really want is for you to find these spots close by in your neighborhood. It could be the morning sun that comes in your window to light your spouse doing the Times crossword. It could be the lamppost on the corner that illuminates the pedestrians on the sidewalk at dusk. It could be the last bit of sunset light on the wall of your office.

One place to find a Pocket of Light is under some tree branches in an area of dappled light. Now, every bit of advice I’ve ever heard about making portraits has said to avoid this type of light. It leaves unappealing lines on peoples face and creates high-contrast edges. Shooting portraits in dappled light should be avoided at all costs. End of story, right? Well, all of that can be true—if you choose the wrong type of dappled light. If you choose the right kind, however, you can make beautiful portraits that are reminiscent of Hollywood portraits from the 1930s and 1940s.

When working with dappled light, you need to find areas with soft-edge shadows—and the best place to find soft-edge shadows is where there are trees. When shadows come from distant objects, such as tree leaves and branches that are perhaps twenty feet or more from the subject, the shadows created have a very soft edge. This is good. On the other hand, if the shadows come from leaves that are very close to the subject, then the shadow edge will be very hard and crisp. This is bad.

The key to working with dappled light is patience, on your part and your model’s. When you find some nice soft-edge shadows to work with, you will notice that the light acts like a spotlight; it will light only small areas. If the subject moves slightly, it can change the whole look of the shot. Where light may have been lighting their eyes a few seconds ago, it may now be lighting their ear. What happened? Chances are that your subject moved. Carefully coax them back to the original position (offers of money usually do the trick). This type of “spotlighting” can test the patience of your subject. Get them in a comfortable pose or position that they will be able to hold for a while, because you don’t want them to move out of the light. Reassure them by telling them that Cary Grant and Ingrid Bergman held their poses, too.

Morning and late afternoon are the best time to shoot with dappled light, mainly as it relates to the angle of the light hitting your subject.When the sun is lower in the sky, the light will come at your subject’s eyes more directly and produce a nice catchlight. If the sun is too high in the sky, your subject will have to turn their head skyward for the catchlights to be seen from the camera.

It’s possible to get different contrast effects in your shots with dappled light, depending on the where you are shooting. I have found that shooting in an urban environment works best for getting extra fill light into a portrait, because a lot of light bounces off pavement and buildings to fill in the shadow areas. If you want more drama, work with dappled light in the forest. The dark forest floor and surrounding trees do not bounce as much light as a city environment. Your natural sun spotlights will create a higher contrast between highlight and shadow in the forest, adding drama to your portraits.

Visual High Points
Here’s an important idea: an interesting portrait, or any photograph for that matter, has visual high points and other less important areas. Important parts of the subject are emphasized with light, while less important areas are kept shaded. Beginning photographers often make the mistake of lighting their subjects too evenly. That may work for shooting evidence and medical photos, but it makes for a boring portrait. Taking a cue from the classic Hollywood glamour portraits, where shadows and highlights created mystery, drama, and visual high points, you can look for where the sun creates its own Hollywood sets—right in your own neighborhood.

A Pocket of Light exists just left of the doors.

Do some research on the famous Hollywood glamour photographers. George Hurrell was a master at creating beautiful interplay between highlights and shadows. Also, the work of Laszlo Willinger, Ernest Bachrach, and C. S. Bull should inspire you to look for your own natural Hollywood lighting.

Here is a series to show you the possibilities that exist right in your neighborhood. In this scene (above), there is an area that is a Pocket of Light. Can you find it? It’s the area of sunlight just to the left of the doors. On sunny days, look for these little spotlights created by the sun. They make for excellent portrait opportunities, but they will require a bit of work from you and your subject.

Look for pockets of light that are about half the size of your subject. This will allow the light to create highlights in the areas that are getting direct sun but also allow the light to fall off into the darker, shaded areas. In this case (below), the subject was placed at the wall near the spotlight effect of the sun. The sun lit her left shoulder, but her face was just at the edge of the shadow.

When the sun creates spotlights like this, it also creates shadows of various shapes, forms, and angles. For example, shadows from objects closer to the subject will have crisp edges, while shadows from objects further away will have softer edges. Notice the two types of shadows in this shot. There is a crisp shadow next to the model’s left shoulder from the overhang of the doorway. The shadows from the flowers also cast crisp shadows. But the subtle shadows on the left side of the model’s face are from the top of a plant to camera right, which is about twelve feet above the model. These will come into play in the next shot.

Hard and soft shadows are formed by objects that are close or far away.

Reviewing the above image a bit more, notice how your eye keeps looking to the back wall, because it’s the brightest area in the shot. It’s a nice wall—but this is a portrait of her, not the wall. Changing the point of view to take advantage of the shadows (below) helps to take some of the attention away from the bright wall. Also, we can really start to see the potential of the soft light and shadows from this direction. Moving in close to the subject has helped, as well.

A different point of view takes the emphasis off the bright wall.

Additionally, setting the aperture at wide open, to create a shallow depth of field, helped to throw the background out of focus and keep the emphasis on the subject’s face. It’s not necessary to have a lot of depth of field when doing a portrait. A shallow depth of field keeps the emphasis on the person you are photographing while blurring any distractions in the background. In fact, you need just enough depth of field to get the face in focus—and sometimes it’s even enough to just have the eyes in focus. Further still, sometimes it’s enough just to have the eye that is closest to the camera in focus. If the forward eye is in focus, then your portrait is “in focus.”

The light is just a bit brighter on the subject’s forehead and eyes than on her chin and neck.

For the next shot (above), the model was directed to turn her head up to the light. This produced some nice catchlights in her eyes. (Because of the soft-edge shadows, the sun was not too bright for her to keep her eyes relaxed. Squinting eyes don’t make for good portraits!) Notice how the light is subtly brighter on her forehead and eyes than on her chin. This is the subtle shadow edge of the plant twelve feet above her. It can be difficult to work with these sun “spotlights” since they don’t stay static. They move as the sun moves. Your model will have to be patient, too, as you instruct her or him to angle their face to the best light-catching position.

Converting the image to black & white shows the soft spotlight effect more dramatically.

Lastly, the image was converted to black & white (above) as homage to the great George Hurrell. Keep your eyes open to find these sun spotlights or Pockets of Light. Whatever you want to call them, they’re out there.

In our next series of dappled light shots (below), morning sunlight spilled through tree branches and leaves. The morning sun, as it passed through the leaves, was not difficult for the model to look toward. (Squintfree light!) A pleasing soft spotlight was created on her face from the softedge shadows. The light fell off toward her hair and right shoulder, keeping the emphasis on her face. Since the tree branches and leaves were about fifty feet away, the shadows formed were very soft. If you aren’t sure where to find these soft-edge shadows in the area you are shooting in, just look at the ground or a wall. Chances are the sunlight will be making both soft and hard shadows from different branches and leaves at varying heights and it will show on these surfaces.

The subject was positioned so her face and necklace were lit.


Light through the branches and leaves of tall trees, located fifty feet from the subject, createdvery soft shadows.

Portrait Photography: Behind the Scenes

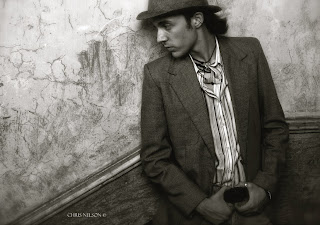
Today's post comes from the book Professional Portrait Photography: Techniques and Images from Master Photographers by Lou Jacobs Jr. This book is available from Amazon.com and other fine retailers. In the book, Jacobs profiles 10 leading portrait photographers about their craft and their business. Here is an excerpt from his profile of photographer Chris Nelson.

A former photojournalist and reporter, Chris used to supplement his income shooting weddings, advertising images, and senior portraits. In high school in the 1970s, he and his friends built a darkroom and shot for the school paper, yearbook, and sporting events. In 1991, he started a portraiture business now called Fall Creek Portrait Design in Fall Creek, WI. Since portraiture became his lifelong interest, Chris has earned Accolades of Photographic Mastery and Outstanding Photographic Achievement from WPPI, and is proud of winning WPPI’s senior portrait category in 2002 and 2004.

Describe your background.
I studied at University of Wisconsin–Milwaukee and graduated with a BA in English with photojournalism and fine art photography as part of my studies. While still in college, I did photography and graphic design for the college magazine, and after graduation, I worked at several newspapers as a reporter and photographer. Since my background was not portraiture, I wanted to learn all I could about this new area, and joining WPPI and PPA were great avenues.

Who are your influences and mentors?
When I caught Monte Zucker’s 1999 tour, and that of portrait artist Al Gilbert, I was blown away by their use of barebulb flash, as opposed to using softboxes, umbrellas, and reflectors. Those photographers had fluid posing styles that made subjects look really natural. I analyzed what they were doing and adopted some of their techniques so my work would look different from most other photographers’ portraits.

Don Blair and Michele Gauger influenced the foundations of my photographic style. Robert Lino and the late Dean Collins influenced my glamour style. While glamour photography comprises only about 20 percent of my studio’s business, that style influences much of my work. All my high school senior girls want to look like models, and seniors are 60 percent of my business.


Describe your studio.
I worked out of my home studio during a three-year transition from photojournalism to portraiture. I continued to take assignments with the local newspaper and shot for Chippewa Valley Technical College, creating images of students for the school’s cutting-edge programs.

In 1994, I moved into my current building, an 1880s bank on the main street of Fall Creek, WI (population 1,250). After renting half the building, I bought the property in 1998 and began restoration. In 2004, I added a large window-lighted camera room, a new production room, and a second dressing room. The studio is now about 3,000 square feet. Though I have two camera rooms, I still do a lot of location work because my clients and I love the variety. Many photographers in the vicinity don’t leave their studios.

I have three employees, my daughter Erin, my son Tim, and Ashley who does a little of everything, except shooting. She specializes in Photoshop, retouching, and finishing images, does client consultations, and a good share of the sales work.


Erin is like Ashley’s understudy, with much the same aptitude for graphics software applications. She has a great eye for design and is in training for high school senior album layout. Tim is a high school junior who enjoys being second camera at weddings, doing mostly candids. We expect when he’s in college he can shoot weddings on his own.

How do you approach your sessions?
The root of portraiture is the word portray. Photographers seek to visually portray their clients in artistic images that describe aspects of their lives or personalities. Before sessions I normally do a consultation where we get to know each other and exchange ideas; that helps keep us on track. How I approach getting what they want evolves through my style, coming from my consciousness and vision. If a casual observer can identify with and understand the meanings conveyed by an image, it’s a good, if not a fine, portrait.

How do you approach posing?
I have favorite poses, but they have to fit the subject. A pose might look great for one person and awkward for another, so you have to analyze your subject. My job is to accentuate the good features and downplay or hide what we don’t want to show through lighting. I try to make a positive aspect of the subject’s appearance so dramatic and compelling that viewers don’t notice a negative. For example, I created a glamour portrait of a woman who had recently had a baby and hadn’t lost all of her belly. She said her husband loved her butt, so I posed her with it at about a 30-degree angle to the camera and had her twist at the waist and look over her shoulder. This hid her tummy, and we chose a high key background with a hint of pink, which blended with her outfit.

In the last few years, I’ve adopted a new posing style by letting people pose themselves. I have clients talk about themselves and I watch their body language. When they do something that looks good, I tell them and then light that pose so it looks natural. This saves the effort of trying to fit someone into a pose. For example, I told a senior girl to pose on a stool in front of a formal
background. Instead, she knelt on it, sitting on her hocks, a pose I’ve never seen before. I said she looked great. I turned the stool about 45 degrees away from the main light, and she turned to look at me. The picture was uniquely her.

What strategies do you employ to communicate with your subjects and elicit the desired expressions?
I often describe the photo session as a stage performance where the part clients play is to talk about themselves. I reassure them, especially shy clients, that it’s my job to make them look good. “What’s the most important thing about a picture?” I’ll ask, and I get all kinds of answers. I’ll say, “The real answer is that you look great. The better I understand what you want, the better I can do this.”


In my orientation about posing, especially for women, I mention the ability to move body parts separately, face toward the light, and tip their head over their left shoulder. I’ll tell them, “Don’t move your upper body, but turn your hips away from me to the right.” I also tell people I don’t want them to smile all the time, that we need to capture a range of moods and expressions. I’ll suggest, “Point your chin toward me a little,” often getting a slightly bewildered look. Their cooperation shows they know I care what their images look like.

Shooting sequences is critical. If you get a good pose, quickly get different angles that really add variety to a sitting. Ask clients not to abandon a pose as soon as they hear the shutter click.

What type of backgrounds work best for you?
When we expanded the building we left the exterior brick exposed. I add props such as an old antique radio and phonograph, or antique furniture. I prefer props you find by chance to those from photographic catalogs, though I do have some of those. I also own painted backdrops, both muslins and canvases.

When a contractor remodeled a house near my studio I was given great old columns, a couple of which now frame the Plexiglas block window I built. I covered the cracked paint of the columns with a light coat of turquoise paint that harmonizes with the earth tones. The columns are used as the center of a set with the Plexiglas window backlit using a tungsten lamp.
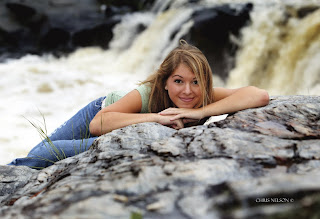
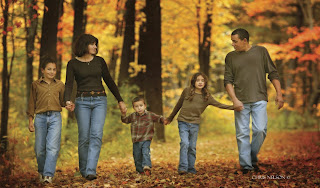
Do you conduct any location sessions?
At least 60 percent of my sessions include an outdoor segment, which pleases seniors, couples, and families. We use one of our terrific locations like the rusty riveted steel and geometric trusses of an old railroad bridge. I work in natural light at a dozen or so spots near my studio, and I often augment with a strobe. The sun is a main light, the ambient light level is another, and my strobe or reflector is a third.

Where the sun is intense and there’s no shade or reflected light, I’ll use the sun as backlight with a portable strobe as a main light. If the ambient light level is f/5.6 at 1/250, I’ll set the strobe at f/5.6, which gives me an f/8 highlight or a 2:1 ratio. An f/11 separation light (the sun) gives the subject’s hair a beautiful highlight.


The junkyard is another favorite spot for seniors. I found it doing a senior session for the owner’s son, and I immediately made arrangements to shoot there often. I also use a rustic barn with peeling paint, a hayloft, and antique implements. Horses, goats, geese, turkeys, and ducks add to the atmosphere.

How do you promote your studio?
One main advertising site is a mall kiosk where we have a 10x18-foot display at a key spot; it’s expensive but worth it. We rotate images often, and clients who appear in the display are flattered. Once a year, we sell the prints at 55 to 70 percent off list. Equally important is our web site, which keeps growing and is really quite a bargain. Do your best to keep your web site fresh. The more places you can reinforce your message, the better.


You are in a position where your photography can promote a lot of other businesses (or nonprofits) and end up photographing in the process of doing your job. This type of networking is huge and often doesn’t cost much. I make images available to hotels, limo companies, bars, hair salons, radio stations, and hospitals for nothing more than a photo credit. It’s surprising how much word of mouth you get as a result.

We also do as many as twenty different mailers a year, many of them smaller like our re-order and customer appreciation sale, plus the four we do yearly to our senior prospects. Always refer prospective clients to your web site, where you can put more detailed information. I also do radio advertising and trades for promotional events as well as giving sessions away to nonprofits and community organizations.

How important is a photographer’s personality to his or her success?
Your personality and your ability to communicate with and understand your clients is critical. They will love you for making the effort. In addition, you need to decide what kind of image you want people to have of your studio. They need to understand what kind of photography you do. Image and branding is important, and you have to make the decisions noted above. Once you decide on the message, don’t ever water it down.


BUY THIS BOOK FROM AMAZON

Portrait Photography Recipes

Today's post comes from the book Rangefinder's Professional Photography: Techniques From the Pages of Rangefinder Magazine, edited by Bill Hurter. It is available from Amazon.com and other fine retailers. This book compiles the work of almost 100 photographers as featured in Rangefinder magazine's Cookbook features. Essentially, each photographer offers a photograph and explains how they created it. Here are two of the "recipes".


Fernando Escovar: A Retro Fashion Series

I thought it might be a good idea to produce a retro style in my next fashion series, so I started with an old Shure microphone, like the ones you see in movies from the 1950s. I remembered a location at Bellagio in Las Vegas where they have a cool lounge called the Fontana Bar. They also have an old drum set with an ornate “B” on the bass drum.

A model/actress friend of mine, Amanda Swisten, loves anything retro, so I asked if she would do this for me. As a photographer you have to make a lot of phone calls to orchestrate these “mini movies.” The hair and makeup all had to be just right for this project, which ran as a sixteen-page spread and cover for Las Vegas magazine.


After I scouted and secured the location, I made a shot list with the editor to see what outfit looked best for each scene. That exercise took half a day. After making the selections, we had a fitting with Amanda to double-check the clothes.


I am all digital now, sporting Canon’s 1Ds Mark II, and I don’t remember how I ever lived before digital. The other day I was shooting an assignment for a client who wanted film. I kept looking down at the camera body to view the image I had just captured, but I couldn’t because it was a film camera.

With digital, I can quickly check my work when I am building a shot with lights—like the image of Amanda singing in front of the striking red curtains. I wanted to make sure I was getting shadows where I wanted them. I also wanted to keep light on the drum set and not fully on Amanda while shooting 100 ISO at f/8 and 1/125 second; shooting digital allowed me to ensure
these elements.

We made fine adjustments, flagged off the main Profoto strobe with some GatorBoard, and covered the other strobes with amber gels to give off some deeper colors. I only used three heads on this shot with an Acute 2400 pack.

INGREDIENTS
Camera: Canon 1Ds Mark II
Exposure: 100 ISO at f/8,
1/125 second
Light: Profoto strobe,
flagged off with
GatorBoard; other
strobes covered with
amber gels; Acute
2400 pack


Monte Zucker: The Touch
For this image, Monte Zucker wanted to create a high-key portrait outdoors with simple props. In order to do so, the first thing he looked for was a covered area with strong backlighting. The perfect setting was under a covered porch with no light coming in from above. To get the backlighting, he waited for the afternoon sun, then used a Westcott translucent panel directly behind the couple to diffuse the backlight.

The camera was a Canon EOS 10D loaded with a 640MB Delkin memory card. The ISO was adjusted to 200. Monte says, “I used aperture priority with the lens set at f/5.6. The internal exposure meter saw a lot of white behind them and stopped down too much, so the figures were underexposed. I had to override the in-camera meter by a stop and a half to get the correct exposure on their faces.


“Heads were positioned for profiles of both, with my normal lighting pattern for profiles coming thru the Westcott translucent panel. In addition, they were lying on a Westcott Black/White 4x6-foot panel.

“I used a 27-inch silver reflector as a kicker to help brighten the image. The reflector (Westcott’s Monte Illuminator) was tipped upward to catch light coming over the top of the translucent panel. This opened up the shadows slightly without overpowering the main light coming through behind them.”


Very little was done in Photoshop, except to remove a few minor blemishes from their skin. “The couple in the picture were high-school friends. They came to pose for one of my workshops. They got more and more into my photographing them when they saw how much fun we were having. They originally told me that they didn’t like posed photos, but as we took more pictures and they looked at the LCD screen, they got more enthusiastic. They said, ‘These aren’t what we meant when we said we didn’t like posed pictures. These are fun!’ They said they’ve never looked this good in photographs.”

About photography, Monte says, “It’s exciting to see how far you can take it and nail it every time! I believe in it completely and teach it with love and with passion.” —Bob Rose

INGREDIENTS
Camera: Canon EOS 10D
Lens: Canon 28–135mm
f/4 IS Zoom
Memory Card: Delkin
640MB
White Balance: ExpoDisc
Light Control: Westcott
4x6-foot panel,
Translucent panel and
27-inch silver reflector
(Monte Illuminator)