One-Light Portraits

Today's post comes from the book Doug Box's Flash Photography: On- and Off-Camera Flash Techniques for Digital Photographers by Doug Box. It is available from Amazon.com and other fine retailers.

Working with flash can make shooting on location less of a hassle. Prior to using off-camera flash, I used to have to bring two or three power heads, a couple of umbrellas, light stands, and a sack full of cords to every location. The setup and teardown would take 30 minutes. Now I bring in one off-camera flash in a softbox, a lightstand, a tripod, and my camera. I can carry everything in one trip, and the setup is a snap. Since I’ve begun working with flash, I’m more relaxed when photographing a session, and I love the results. The images are more natural looking.

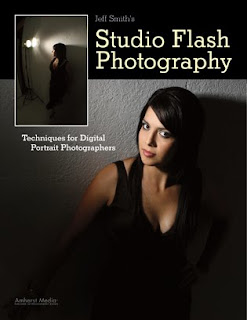
Using on-camera flash resulted in an amateurish image.

Here, I had the flash positioned high above and behind the subject’s head, still at a 45 degree angle. Note the beautiful result I was able to achieve using this unusual light position.


Here is the image created with the off-camera flash. I used Photoshop to do a little retouching and to create the brown line and black frame.

In one-light flash setups, the ambient light, which comes from windows, doorways, and existing light fixtures, provides the fill. As this light fills the room, it illuminates the background of the portrait. With everything in the room already illuminated, when I bring in the subject, I simply need to add light on him or her. Let’s look at a couple of images that illustrate this technique, which I call the ambient fill method.


To create these images, I metered the existing light and added the flash at 2/3 stop over the ambient exposure.

The Ambient Fill Method. Let’s take a closer look at how the ambient fill method can be used to create beautifully lit, salable images in no time. Here’s a step-by-step look at creating a one-light image on location. I’ve chosen some images of a beautiful bride to illustrate this approach.

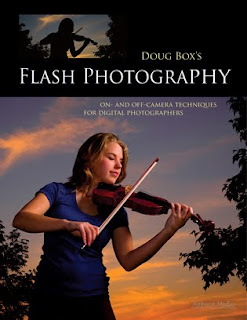
The setup for this beautiful image was simple. I used one small softbox with a battery-powered flash, two PocketWizards, one light meter, and a camera with a tripod.

You will notice that the subject’s face, part of the dress, and flowers are lit by the off-camera flash, housed in a softbox. I made sure the face of the box was position flat and parallel to the subject, and placed it at the 45º/45º position. With the light in this position, I was able to achieve beautiful light on the face and a nice falloff on the gown.

• Analyze the scene. How bright is the background? Is the ambient light level sufficient to allow you to show details of the background in the portrait? If so, are there elements in the background that will draw the viewer’s eye away from the subject?

• Decide where to place your camera. Consider where the subject will be posed and the direction in which the subject’s face will be turned in relation to the camera.

• Calculate the proper placement for the softbox. Remember, ensuring that the light unit is at the 45º/45º position will enable you to record catchlights in the desired 10 o’clock or 2 o’clock position. We want to light the mask of the face (eyes, forehead, nose, mouth, and chin), letting the side of the face closest to the camera fall into shadow.

• Meter the ambient light at the subject. Add flash so that the final (combined) reading is 2/3 stop over the ambient light exposure reading.

I used a softbox to simulate the appearance of window light in these images.


BUY THIS BOOK FROM AMAZON

Precision Lighting

Today's post comes from the book Jeff Smith's Studio Flash Photography: Techniques for Digital Portrait Photographers by Jeff Smith. It is available from Amazon.com and other fine retailers.

When I was learning about portrait lighting, I saw the work of the old masters of lighting like Marty Rickert, Don Blair, and Frank Criccho. Their portraits have so much impact, drawing the viewer’s eye right to the face, even in portraits that were composed to show more of the body. At this time (thirty some years ago), these masters used parabolic lights for the ultimate control over their lighting. Back then, they didn’t have the choices of lighting attachments we do today.

I think of controlled light as precision lighting. It can be used to play up your subject’s best features or attributes and downplay perceived flaws. This can be especially useful when a little extra body weight or the effects of age and gravity make you think a head-and-shoulders shot would be your best bet, but your client really wants a full-length shot.


Precision lighting allows you to bring out the very best in every client while concealing aspacts of their appearance they may be less comfortable with.


Here’s how you can use precision lighting to your advantage: When you look at your client, try to determine what she would like viewers to see—and what she would rather have downplayed in the final portrait. You can use grids, barn doors, or louvers to direct light where you want it. Light-blocking tools can be used to reduce the light falling on heavy hips, short legs, large feet—whatever it is you think your client would rather not see.


Keep in mind that in posing, one part of the body (e.g., a shoulder or the legs) is often much closer to the main light than other areas. To make skin tones look even throughout the frame, you may need to reduce the amount of light that falls on certain areas.


Precision lighting can also be used to fix problems that arise when the subject is posed in different ways. Say your client has bare shoulders and very fair skin. You pose her and she looks great, except that her shoulder is whiter than the rest of her skin and is closer to the main light than the rest of her. If you exposed the image normally, her shoulder would glow. If you exposed for the shoulder, her face would appear too dark. To solve the problem, you can use a gobo to block the light from hitting the shoulder or use barn doors to reduce the light on the area. With this simple fix, you have a balanced portrait that is ready for presentation, right out of the camera.

When you are shooting a full-length image, you might pose your client with her legs closer to the main light than her upper body. This might make her legs look brighter/lighter than her skin tone. No woman wants her legs to appear more pale than her face; society has told women their legs must appear tan! By blocking or reducing the light striking the legs, you can make them appear less pale.

TOOLS FOR PRECISION LIGHTING
There are a variety of tools you can use to achieve precision lighting:

Barn Doors. Barn doors are an adjustable light modifier that can be attached to your light source to control the width and direction of the beam of light. They can be used to keep light off of a subject’s problem areas without affecting the characteristics of the light.

This parabolic light was fitted with barn doors. The modifier allows for enhanced control over the way the light spreads and produces a directional lighting effect.

Gobos. A gobo is a device that is placed between the light source and the subject to modify the way the light source falls on the subject.

Grids. A grid, sometimes called a honeycomb, makes the light from a flash (or other source) more directional. Grids are rated in degrees (e.g., 10 degrees, 20 degrees, 30 degrees, etc.). The lower the degree rating, the more narrow the beam of light. Grids give a harder look to the light than you will achieve with barn doors.

Louvers. Louvers have slats that keep light rays from spilling out of the side of a softbox. To control light from the top and bottom of the box, you must either feather the light or use a gobo to block the light from hitting areas that you want to keep in shadow. Since louvers are vertical, they only control light in one direction (side to side). I mostly use them on hair and accent lights to keep the light from hitting the lens.

I typically use barn doors or gobos to control my lights. There are times when grids are very effective. Grid attachments on a softbox focus the beam of light to a certain area, which can be very effective. I have a small softbox with a grid attachment that I often use for close-ups. When I pose the subject with her head on her arms or in her hands, I can use this small “grid box” to light just her face, leaving her arms and/or hands in shadow. This helps to frame her face.


When photographing a subject with her head resting in her hands or on her arms—or in a similar position—I often use a grid box to focus the light on her face and throw her arms/hands into shadow. This ensures that the portrait viewer’s attention is directed to the face, as the lightest area of a portrait draws the eye.


BUY THIS BOOK FROM AMAZON

Mixed Lighting


Today's post comes from the book Doug Box's Flash Photography: On- and Off-Camera Flash for Digital Photographers by Doug Box. It is available from Amazon.com and other fine retailers.


Color Conversion Gels
Every light source, natural or artificial, has a specific color temperature, measured in Kelvin degrees. Daylight and flash, for instance, have a color temperature of about 5500K, while incandescent light measures about 3200K. The lower the temperature of the source, the “warmer” the light. The higher the color temperature, the “cooler” the light.

When you’re working in the studio, you have complete control over your lighting. However, when you’re shooting on location, you will encounter many lighting variables. When you’re faced with working with lights of different color temperatures, you have a powerful tool at your disposal: gels. These gelatin sheets can be used to modify your light source, changing the color temperature of your flash. You cannot gel the ambient light, so you must gel your on or off-camera flash to match the color temperature of the ambient light.

Here is an image taken on a cruise ship. It was nighttime, so the incandescent lightbulbs provided the only light in the scene. To capture the final image, I determined the exposure, placed a conversion filter on my flash, and changed the camera’s white balance preset to incandescent. That was it.

I photographed this image using an off-camera flash (5500K) modified with a color conversion gel to bring the flash temperature to 3200K. I also set the camera’s white balance preset to incandescent in order to produce neutral skin tones on the subject. However, the rest of the image has a blue color cast because the light is 5500K or higher. In addition, the light is flat and boring. The exposure was f/4 at 1/6 and ISO 200. The flash metered at f/4.


Here is the setup shot for the final image. The softbox was placed at the 45º/45º position. It was positioned perpendicular to the ground, so that the face of the box was parallel to the subject’s face. If you take a close look the final image, you can see that this rendered the face perfectly lit, and the light gently fell off so the subject’s shirt and pants—and even the rock wall—did not appear overlit. A small Morris Midi light with a warm gel was used below and behind the subject as a rim light.


Here is the final image. Selecting a faster shutter speed (1/60) rendered the background 3.5 stops underexposed, rendering the sky darker and more dramatic.

Case Study: Gels and Exposure Compensation
The images of the biker below were made in a challenging lighting situation. Let’s take a look at how I was able to make a successful image using gels and flash exposure compensation.

Here’s the scenario: The light in this scene came from streetlights—sodium vapor lights with a color temperature of roughly 2750K. I didn’t have the proper gel to convert my flash to 2750K, so I used a color conversion gel to produce an incandescent color balance, which is approximately 3200K. As you can see, the background is a little warm and the man’s back is too dark. The color isn’t perfect, but I like the way it looks. The exposure was f/4 at 0.5 second and ISO 200. In the first image, the on-camera flash was off.

To create the second, third, and fourth and fifth images in the series, I changed the flash exposure compensation on my ungelled on-camera flash to –3, –2, and –1, and 0 respectively. I used the flash compensation setting on the back of the flash rather than making the change via my camera. It is faster and allows for a –3 exposure, versus the camera’s maximum setting of –2. Each of the images in this series was made using the E-TTL mode on the on-camera flash, and each has a different contrast range, yet the images were captured almost as quickly as the flash recycled. The exposure of the subject’s face was consistent throughout all of the images because the off-camera flash was used in manual mode. The camera was also used in the manual mode.

Each of the images in this series was made using the E-TTL mode on the on-camera flash, and each has a different contrast range, yet the images were captured almost as quickly as the flash recycled. Note that the subject’s back, which was initially quite dark, became lighter with each exposure change. The exposure of the subject’s face was consistent throughout all of the images because the off-camera flash was used in manual mode. The camera was also used in the manual mode. As the man’s back becomes lighter, it also becomes more blue because of the color cast that an ungelled on-camera flash added when lighting the back of the subject.What a difference using gelled flash can make! The flash exposure compensation for the final image was set to –2.


Using Gels for Creative Effect
Sure, gels come in handy when you need to convert your flash units to match the color of the ambient light in the scene, but you can also use gels to create more interesting effects. There are some times when you may want to add strong color to a background or to an overall scene to create a more diverse array of image looks or moods. I keep a pack of gels in my camera bag at all times. I am surprised at how often I grab a little piece of color magic.

The images on the next page show how you can use gels to create a wide variety of portrait looks for your clients. By adding creative color to your images, you can add mood and character to your portrait offerings, which can lead to bigger sales.

This image was made with an ungelled flash and a softbox

Here, you can see the effect that was achieved when a purple gel was added to the kicker light (a flash) positioned behind the subject. I like both photographs, but the one made with the gelled flash seems to have more depth and appeal.


To create these two images, I used small Morris slaves with gels to color the black corrugated tin background.

To create the final image, I simply pointed the lights toward the camera, and they became an interesting part of the overall composition.

The Wireless Approach

Happy New Year! Today's post comes from the book Just One Flash: A Practical Approach to Lighting for Digital Photography by Rod & Robin Deutschmann. It is available from Amazon.com and other fine retailers.


Communication Through the Air
There are only two ways of triggering your flash wirelessly: optically (using another light source as a triggering device) or through the use of a radio transmitter and receiver.

Radio Triggering.
The radio option is, by far, the best; it’s cheaper, easier to use, and more reliable. To trigger your remote flash, we recommend a simple Cactus radio transmitter and receiver combination. At less than $40 a pair, there really is no better option for the manual off-camera flash photographer. Attach the transmitter to your camera and the receiver to your flash (any flash) and you’re ready to shoot. As a manual shooter, there will be no need to worry about camera or flash settings; you will have already dialed those in.


Beyond this, all of the same rules, processes, and techniques apply as before—except that you do lose the high-speed sync option. This isn’t that big of a deal, since you already know how to employ the cross-polarizing technique or to use several neutral-density filters to eliminate excess light.There are, of course, other radio systems available. Pocket Wizard is a very popular brand among photographers looking for a way around manual shooting. They offer a transceiver that allows for both manual and automatic shooting . . . but at nearly $200 a unit, this is a very expensive way of getting your flash to behave. As we tell our students, it really pays to be a confident manual shooter.

Off-camera wireless flash offers the optimum in control. With your flash now positioned well away from the camera, there is no excuse for an image not to appear as you like it. For these images, a volunteer (thanks Ed) held a flash and pointed it at our subject while each student in the workshop created their own version of the scene—changing the white balance, contrast, saturation, and focus to match their own unique vision.


When the flash is set to gently illuminate your subject, it should just caress, not overwhelm. In the image directly below, we see a perfectly illuminated model. In the bottom photo, we see what happens when the flash is set too high.


Optical Triggering.
You also have an optical choice when it comes to triggering your off-camera flashes. This comes in the form of small optical triggering devices that sit on the foot of your flash. When they sense another flash firing they send a small electrical signal to the flash they are attached to and force it to fire. This is called a “slaved” flash. The flash creating the triggering burst is the “master” unit.

This is a classic approach, but it has some drawbacks. First, it requires a line-of-sight triggering scenario. If the receiver can’t see the triggering flash, it will not fire its own unit. This prohibits certain placement constructs that you, as the artist, may feel are important—such as backlighting and complex side-lighting scenarios. Additionally, while slaved flashes are extraordinarily useful indoors, they don’t work so well outside. If there is an excess of ambient light (such as sunlight) there is a strong chance the receiver will not “see” the triggering flash. Plus, the price can be prohibitive. A good optical device will cost $50 or more . . . and if you’re going to spend that much on a tool that has limitations, why not spend less on a radio version that doesn’t?


To maintain the beauty of the sky above San Diego’s skyline, a single hand-held flash was employed. This extra light, aimed at our model and her concrete perch, enabled the photographer to choose a shutter speed that allowed the background to look the way it does. Any shutter speed slower than this would have created a background that was just too bright for the intended message.


Many camera manufacturers today offer an advanced lighting system that employs a similar optical slave/master technology. This is limited, as well, by line-of-sight prerequisites and requires expensive proprietary flash units to work. Again, a simple radio transmitter and receiver will outperform this advanced system—and will do it for a fraction of the cost. There is nothing advanced about a flash system that limits you to a line-of-sight firing scenario.

BUY THIS BOOK FROM AMAZON