Showing posts with label corrective. Show all posts

Corrective Lighting- Keep It Simple

Today's post comes from the book Corrective Lighting, Posing & Retouching for Digital Portrait Photographers, 3rd Ed by Jeff Smith. It is available from Amazon.com and other fine retailers.

Lighting a portrait is a simple process that photographers have complicated over the years. This has happened for two reasons. First we are gadget freaks. We think, “Why should I use one light when I have three?” Second, most teachers of professional lighting techniques are sponsored by (a nice way of saying their fees are paid by) equipment companies. These companies have all that equipment to sell, so the question becomes, “Why use one light, when we want to sell three and we can charge more for the big one than the little ones?”

This leads many photographers down the path of “crapping up” a simple thing. If I sent most photographers into a white room with one large window, they would be able to take a properly lit image. However, if I gave these same photographers a flash unit with a softbox attached, many of them would look lost. Yet, isn’t it the same thing? If you put the softbox where the window was and placed the subject in the same position in relation to it, wouldn’t it appear the same?

The second problem of sponsored learning is the “bigger is better” approach to main lights, which is completely wrong—at least from the perspective of correcting flaws. These monster sources of main light are the most forgiving to improper placement, but they are the least controllable. It is like the different between a rifle or shotgun, a bow and arrow or a grenade. They all might get the job done, but one is more precise than the other. (Of course, the other is more forgiving if you’re a lazy shooter who doesn’t like to take the time to aim!)

Smaller main light sources give you better control over which areas of your subject are lit and which remain more in shadow.

Huge main light sources illuminate everything on the subject—they ruin the shadowing that we need to conceal our clients’ problems. With a four- to six-foot main light source, a subject will be evenly lit from head to toe. It will light her less-than-flat stomach, her large thighs, her “cankles” (ankles that never really slim down, so the calf appears to be connected directly to the foot), and her size twelve extra-wide feet. What a lovely sight.

To have control over your light, the light source must be smaller. You want light only where the client’s face and body can handle light being put. Small light sources allow you to place light exactly where you want it (and, therefore, draw the viewer’s eyes to the desired areas). If you have a huge light box and really don’t want to buy another (or don’t have room for a second light box), make or buy a reducer. Simply cut a small hole in the middle of a thick piece of black fabric and you have created a smaller main light source! Some companies like Photo-Flex have reducers available that are custom designed to their light boxes, but the fabric works just as well. (Note: Grids/louvers can also be used to narrow the beam of light, but they don’t allow you to feather the light [softening it by using the light rays from just the edge of the light box].)

Huge main lights aren’t the only way we can overcomplicate our lighting. When I first started in this profession I went to a week-long class and studied with a man who was literally a legend. He showed the class his unique style of lighting and discussed the ratios of lighting he used when photographing. He explained that he used a 3:1 lighting ratio when not diffusing an image and a 4:1 lighting ratio when diffusing. (Note: For all you young photographers, this was in the days of film, when fine grain, medium-format film gave us too much detail for the average client’s face.)

I came away from this week of learning an enlightened photographer—right up until I started using these lighting ratios in my studio. The models used for the demonstrations were white with a suntan, but in my studio I worked with many Hispanic and East Indian people that had every shade of skin from olive to chocolate brown. While these lighting ratios worked well for my suntanned clients, the ratio was much too high for someone with darker skin.

Using reflected fill is one way to simplify your lighting and improve your control.

Another light went off; “Wouldn’t dark skin reflect less light in the shadow areas than light skin? Do you know how many shades of skin there are between suntan white and chocolate brown?” Taking what I had been taught, I would have had to test and come up with a working lighting ratio for every shade of skin and then categories what range of skin tone worked with each lighting ratio. What started off a simple way to understand lighting in a classroom setting turned into a complicated nightmare in the everyday workings of my photography business.

Unfortunately many theories are just like this one—good for the exact context in which they were demonstrated, but not very practical in everyday in business. I needed to find a simpler, more practical way to deal with this issue, and it dawned on me that I didn’t need to use flash to fill the shadows. Using flash to fill the shadow, you are always guessing at the amount of fill. With a reflector, the fill is always proportionate to the output of the main light. (You do, however, have to work in a studio area that has subdued lighting, with little or no ambient light from windows or overhead lights.)

Therefore, the first step to un-“crapping up” my lighting was to change from fill flash to filling in the shadows with a reflector. This allows me to fill the shadow on the face and leave certain parts of the body unfilled. Reflectors have different surfaces, everything from plain white to highly reflective silver, so you can use the material that gives you the best working distance and look (white will be placed the closest and provide the softest quality of lighting, etc.). The best part of using a reflector to fill the shadow is that what you see is what you get.

SHADOW, NOT LIGHT
Because of our photographic training, we often think that corrective lighting will do the most to hide flaws. Well, it doesn’t! In fact, our “training” in how to light a portrait is the biggest problem. When we start to learn about lighting, we learn that light is our “paintbrush.” Corrective techniques, however, rely on shadow, not light.

It is shadow that gives a portrait dimension, and it is shadow that lets you disguise your clients’ flaws.

Any student photographer with two lights and a meter can create a decent portrait—just put the main light at a 45-degree angle to the subject and place the other light behind the camera. Set the lights so the main light is two stops brighter than the light behind the camera, stick a diffusion filter on the lens, and there you have it—I have just taught everyone with any knowledge of photography to create a realistic portrait with the appearance of a third dimension. This is the lighting setup mall studios use because it is easy to learn, easy to use and, for most of the buying public, acceptable for a cheap portrait. Unfortunately, this is also the lighting setup that many professional studios use. While clients will accept this type of portrait if they are getting it cheap, they are not going to pay a professional studio’s price for something they could get at the mall for much less. Professionals need to deliver more than an “acceptable” portrait. This is where shadow comes in.

Shooting in a dark area ensures that no light is bounced off the walls or items in the room, so I can put light and shadow exactly where I want it and not have it diminished by the surroundings.

It’s obvious that not much would exist in an image without light, but it is the darkness that draws the viewer’s eye to the light. It is shadow that gives a portrait dimension, and it is shadow that lets you disguise your clients’ flaws—flaws they aren’t paying to see (or, perhaps better, flaws they won’t pay for if they do see them).

Corrective lighting is about control of light, but even more importantly, it is about control of shadow. In a basic lighting setup like I described earlier, control is impossible. Combine a large main light and a fill light with the white walls of most studios and you have light bouncing around off of everything. The three pitfalls of the average lighting setup are:

1. Using a main light modifier that is too large and uncontrollable. Because of our love of light, we reason that bigger is better. In fact, the larger your light source/modifier, the less control you have. If you use umbrellas and want to control your light better, throw them away and buy a small softbox with louvers.

2. Using fill flash instead of reflector fill. The fewer lights you can use in your camera room, the more control over the lighting you will have. When you use fill flash, you get fill everywhere and have no control of the shadow formation in specific areas.

3. Using light-colored camera rooms. These add to the lack of control in the shadow areas. In corrective lighting, I want light to fall only and precisely where I put it. That can’t happen with white or cream-colored walls and floors. These lightcolored surfaces themselves become a source of fill light, just like using a white reflector.

You must start thinking in terms of directing the viewer’s gaze to the areas where you want it to go (these are the areas you will light) and keeping the viewer’s gaze away from the areas you don’t want them to see (by leaving those areas in shadow).

At times, you will have to control the light and shadow very carefully, because hiding one problem in shadow will make another problem more noticeable. A good example would be when photographing a young lady with a heavy face. Your first instinct would be to have a portion of her face in shadow to reduce its apparent width. But what if she has a large nose and the shadow on the side of the nose makes it appear larger? The same is true for the hair, which might be dull and have dark roots showing in blonde hair. To make the hair look shinier, you would light it—but to hide the roots you would need to leave it in shadow. Using smaller lighting sources and pinpoint fill, you can deal with these multiple problems that require two types of lighting.

BUY THIS BOOK FROM AMAZON

Correcting Flaws With The Scene

Today's post comes from the book Corrective Lighting, Posing & Retouching for Digital Portrait Photographers, 3rd Edition by Jeff Smith. It is available from Amazon.com and other fine retailers.

The scene or setting can often be one of the most effective tools you have for correcting clients’ flaws. As you have seen, letting the body blend into the background can make problem areas like large hips or a balding head much less noticeable. This works well in low-key portraits, but when you start working with high-key settings (or even with a client in light-colored clothing), the problem area is still obvious. But, just as with poses that use the knee, arm, or leg to disguise a problem, elements in the scene can also be used to conceal flaws.


USING THE FOREGROUND
Most scenes give you ways to hide flaws by using the foreground. Although it is often overlooked, making use of the foreground not only gives you the ability to hide a client’s flaws but, from an artistic standpoint, provides a greater ability to create the illusion of depth in your portraits. By using an element in the foreground, the subject in critical focus, and then a background that recedes farther and farther from the subject, you have a built-in sense of depth.

BEFORE:


AFTER:

Foreground elements add depth and allow you to hide anything your client might not want to see.

When correcting a client’s flaws, it is amazing how even a simple foreground element like a plant or a few columns can soften or hide a large hip, tummy bulge, large upper arm, or hairy forearm. Whether you have something as simple as a client sitting backwards in a chair, or an entire set arranged to hide problem areas, it is a very effective way to give clients a version of reality they can live with.

COORDINATING THE FOREGROUND AND BACKGROUND
Learning how to coordinate the style, look, and color of the foreground elements with the other parts of the scene can be a challenge. A plant or tree is often used in the foreground because it is easy. It goes with just about everything and it doesn’t take any time to prepare. Chairs are also a
popular and versatile choice for the foreground element. Either one can be effective. (Indoors and out, you can enhance the feeling of depth by using multiple elements in the foreground, or by adding elements in between the subject and the background.)

OUTDOORS
What do you do when you are outside and have a client with a large body size? Well, first, you might find a tree and do the peek-a-boo pose, with the body hidden behind the tree and the face coming out from around the side of the tree. (Although this pose is a classic of corrective posing
technique, it is also a popular pose for young ladies who don’t have weight issues.) You might also photograph a girl lying in tall grass that obscures the outline of her hips and thighs. You could also simply decide to create something other than a full-length portrait.

This is a popular pose for subjects of all shapes and sizes. The tree in the foreground creates a nice sense of depth but also allows you to hide as much of your subject as necessary.

Outdoors, many photographers work at the edge of a clearing or have the subject leaning against a tree or column that has nothing else around it. This provides a scene in which the first element is the subject, then the background elements that recede farther and farther away from the subject. While I do this on occasion, I prefer to use a scene that provides elements in the foreground. This could mean using a tree with lower branches or posing the client in the middle of what most photographers consider the background—so there are foreground elements between the subject and the camera.

BEFORE:


AFTER:

Adding a foreground element can help create an image that is easy on the subject’s ego.

The density of the foreground elements will determine how much of the subject you are going to see. If the foreground is too thick, you will see none of the subject’s body. In this situation, you have to ask yourself why you’re presenting a reduced head size if it doesn’t result in seeing any more of the person. You might be better off just composing the image more tightly (cropping out areas you want to conceal rather than hiding them behind something).

Years ago I was hired to photograph a rodeo queen. She came from a nearby mountain community, so we looked around this area for a place to photograph her. We found an area where the light was great and the field of grass was high—it was perfect . . . or so I thought. The first problem was that it was late spring and we were in an area that was known for having a high rattlesnake population. Not realizing this, we walked through the tall grass without a clue. The second problem was that the grass was so high and so thick that you couldn’t even see an outline of her legs from the thighs down. Since I was very young at the time, though, I was very excited about these photos (and not getting bit by a snake), so I had a 30x40-inch print made for the studio. My wife looked at it when I unveiled it to our staff and she said, “It looks like she’s missing her legs!” In short, I should have cropped it closer and eliminated the foreground that showed nothing but grass.

The density of the foreground elements will determine how much of your subject is visible behind them.

Sometimes we get so caught up in the lighting, the posing, and the beauty of what we are focusing on, we don’t notice the unnecessary elements (like all that grass) and forget that someone else has to live with our creation. My wife was right; although I thought the foreground of grass was beautiful, the client would have preferred to see the subject larger in the frame—not ten feet of grass in the foreground.

IN THE STUDIO
The ability to add foreground elements and use them correctively is one the main reason we use sets, as opposed to just background fabrics, in the studio. Sets also allow us to place elements at different distances from the camera, which creates more depth than is possible with a painted background. I have always said I want at least five points of focus in the average studio portrait. The client is the main point of focus, but even in a head-and-shoulders pose there should be at least four other points of focus at different distances from the camera.

Chairs can be turned to create simple foreground elements.

The railing is used as a foreground element.

We have found many background and foreground elements at the local home store. For example, I purchased a French door on clearance for $10. We have also purchased ladders, steel grates, tin roofing material, and many other interesting foreground and background items at this type of store. You are only limited by your imagination and your time to shop around. When I first opened my studio, like most new photographers, I had all kinds of time but very little money to purchase sets. Now, with over three thousand seniors to photograph each year, my writing, and my family, I have much more money than I do time to look for background items, so I tend to purchase them from set manufacturers.

Whether you purchase them or create your own set elements, you need to look for unique ways to use them. Many photographers struggle with this when using the large, expensive sets that some designers sell. One problem is that they sometimes position the set components flat to the camera—and then wonder why their images didn’t look like those in the brochure. By angling any set toward the camera, you can create a foreground and bring the background to life by adding focal points at different distances. (Note: This idea works with most props, as well. Instead of placing a chair or couch flat to the camera, turning it [bringing one arm closer to the camera than the other] creates depth in the portraits—and a place to hide a seated client’s hips, thighs, and not-so-flat tummy!)


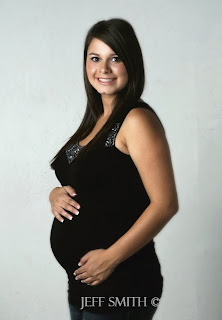
What are these poses hiding through the use of simple obstructions (mostly the subject’s own body)?


Posing—especially when combined with the use of obstructions—is one of the most powerful tools photographers possess. Look above to see portraits of this mom-to-be. Would you have guessed she was pregnant in any of these images?

Similarly, the average photographer sees an arch at a trade show. He buys it, brings it into his studio, and it remains a single arch for all time. Yet, in addition to being an arch, it is also three individual pieces that can be combined with other set components to create multiple looks. This
gives you the most for your money—and it also provides opportunities to improve your photographs and hide your clients’ flaws.


Always be on the lookout for items to put in front of clients—items that look natural and coordinate with your sets and outdoor scenes. Even the Viper or Harley (popular props at our studio) can produce a foreground to hide clients’ problem areas behind. Just use your imagination!

BUY THIS BOOK FROM AMAZON

Subtractive Lighting

Today's post comes from the book Jeff Smith's Lighting for Outdoor & Location Portrait Photography by Jeff Smith. It is available from Amazon and other fine retailers.

Subtractive lighting is just what the names implies: removing light or, in essence, creating shadows to achieve a more dimensional portrait. I learned subtractive lighting from Leon Kennamar, who was probably the most well-known subtractive-light photographer of his day. The outdoor portraiture he created was truly outstanding, because with subtractive lighting he could completely control the shadows of his images—something that most photographers to this day don’t do. As we have already learned, it is the darkness that draws our eyes to the light and without shadows, no one notices or cares about the light.

Here, a reflector is actually used as a gobo. Placed directly over the subject’s head, the reflector blocks the overhead light and eliminates the dark circles under the subject’s eyes.

The downside of the teaching of subtractive lighting is that, while it is great for creating shadows, reducing the size of the main light to a proper size, or keeping light from hitting a certain part of the subject or scene, a scene must be close to ideal to use only subtractive lighting techniques.

To demystify subtractive lighting, let’s call it what it is: creating shadows. For example, if you have a main light that produces beautiful catchlights in the eyes but a flat lighting on the face, you know that your main-light source lacks direction and is too large. To correct the problem, just put a black panel, gobo, flag, or other light-blocking device on the side of the subject where the shadow should be. This will create a shadow and improve your final image.

A white reflector is used over the subject’s head as a gobo, blocking the overhead light and producing a more flattering lighting effect.


Which type of light blocker to use will depend on the circumstances. Black devices block light from the desired area, but they also tend to suck the light out of neighboring areas. Depending on the light levels and scene, white blockers can actually bounce light back onto your subject, adding a color cast or changing the desired appearance of the lighting. Let’s imagine you are placing a blocker above a subject to block the overhead light. If my subject was standing in a grassy area, I would typically use a white reflector for this. The light from the ground won’t cast enough light into this white reflector to act as a light source and won’t affect the light hitting the face. If, on the other hand, the subject was standing on light-colored concrete in direct sunlight, the concrete would reflect up enough light to change the appearance of the lighting. Switching to a black device might be necessary, although it would tend to darken the hair of the top of the head.

BASIC DECISIONS
The decision to add light or take it away always starts with the selection of the background. Many photographers suggest that you first find the light and then determine the background based on that area of ideal lighting. This is the practice employed by photographers who work at those “ideal light” times of day. When I go into an area, however, it is usually in the middle of the day, so my first consideration is to look for usable backgrounds; I know that I can make the light usable no matter what it currently looks like. This is the basic idea of working on location when the lighting isn’t perfect—it is much easier to change the light on the subject than the light on the background or the scene around the subject.

Once a background is located, the next decision is whether to use additive light sources or subtractive light sources—although there are times that both are used in the same image. This is typically a straightforward decision: if the light on the background is more intense than that on the subject, you must use at least some additive light sources. However, if the background is lit by the same light as the subject, then subtractive lighting alone may be enough. I find that there are very few scenes in which the light can’t be improved dramatically using additive or subtractive techniques.

SUBTRACTIVE LIGHTING IN PRACTICE
The easiest way to learn subtractive lighting is to start with a subject and available light only. Then, add the lighting controls you need and observe their effects as you transform the portrait into a salable image.

The unmodified light gives this subject raccoon eyes and unpleasant highlights on her cheeks and nose.

In the first image (above), you see this beautiful young lady in a typical outdoor location. The amount of light in the subject’s area is relatively close to the amount of light on the background area. This means that we will not have to add light to balance the scene (i.e., darken the background). However, because the light is coming down from directly overhead, the subject has raccoon eyes as well as unattractive highlights on her forehead and nose.

The first correction I would make is to place a white reflector overhead to block this light. I would use white here because the shaded grass will not reflect enough light up to the white reflector to affect the final image. In the second photo (below), you can see the improvement in the lighting with just that one correction. Yet, while the image is improved, there are still some problems that need to be corrected. The eyes have nice catchlights in them, but the face has no shadowing or transition zone to draw the viewer’s eyes to the most important areas of the face and hide those that shouldn’t be seen.

Adding a gobo overhead corrects some of the problems, but leaves the image without any shadowing to shape the face.

Therefore, a second step would be to place a black panel on the right side of the frame to establish a shadow zone and create a transition from highlight to shadow. In the third image (below) you see the effects of this change. The face appears thinner and the structure of the face is more noticeable. While this is a major improvement, we aren’t done yet!

Placing a black panel to camera right creates a shadow zone.

As you look at photo three, you see a little highlight toward the end of the nose, this means that the main light is wrapping too far around the subject. To compensate, you could put another black panel on the opposite side of the subject to reduce this side light—but that would create a second shadow on the highlight side of the face. The best solution is to use a piece of translucent fabric. Placed to camera left, this will reduce the light coming from the side without creating a second noticeable shadow area.

Now we are getting close to a salable image—actually, at this point, this image is better than most of the outdoor portraits I see displayed in some studios. Still, let’s take it one step further. Since most of the light in this scene comes from above, I almost always add a white or silver reflector underneath the subject’s face to give the portrait a more glamorous look. The light from this reflector brings out more of the eye color; softens the darkness under the eyes, something all of us have; and helps to smooth the complexion. I use white when reflecting sunlight and silver when reflecting light from a shaded area. At this point we have created a salable professional portrait.

Subtractive Light Photo Booth.
Subtractive lighting is one of the simplest ways to control the lighting in an average scene. Therefore, I have used these principles to assemble a photo booth that provides perfect outdoor lighting with any outdoor background. This booth consists of the exact combination of modifiers discussed above: a 4x8-foot black panel on a rigid frame, a translucent panel on a rigid frame, a
white reflector attached to the two panels with clamps, and a white or silver reflector clamped at the level needed to provide light in the appropriate place for a head-and-shoulders pose.


This photo booth makes outdoor lighting very easy to deal with. To use it, I look for an area that has strong backlighting, usually provided by the sun. I want to have each client separated by a backlight, since the majority of them have darker hair and I instruct them to wear darker shades of clothing as well. When I can find this backlight, I use the white reflector; when working in a shaded area with little or no backlight, I use the silver reflector.


The only variable in this setup is the main light. In most scenes, the area in front of the subject will be open sky, providing a fairly good main-light source—at least with all the photo-booth’s modifiers in place. Should the area have obstructions that don’t provide a usable main-light source, you can simply add a reflector or scrim with mirrored light to produce one.

BUY THIS BOOK FROM AMAZON

Glamour Portrait Makeover

Today's post comes from the book Jerry D's Extreme Makeover Techniques for Digital Glamour Photographers by Bill Hurter. It is available from Amazon.com and other fine retailers.

Vandella is a bubbly, confident, and giving person who needed a little bit of a self-image boost. All of us experience what Vandella was feeling when she first met Jerry. She was tied up in the day-to-day routine of her life and needed to be reminded of the fact that she is special. When her portrait was delivered, she felt as if she had been given a new lease on life.

This how Vandella looked when she came to Jerry’s studio.

Makeup
Vandella’s makeup was applied using the basic principles covered in chapter 1 of this book. At the completion of this process, the image below was created. This was the starting point for postproduction enhancement.

This is the first version of Vandella’s portrait. Notice the wrinkled tulle of the background fabric and the lack of shape in the oversized shirt.

Postproduction
The first step was to reshape her body and adjust the size of her breasts. This was accomplished using Photoshop’s Liquify filter (Filter > Liquify). Liquify is essentially a separate application within Photoshop that is used to stretch or distort areas within the photograph. In the Liquify window, Jerry selected the Forward Warp tool with a brush size of 516, a density setting of 50, a brush pressure of 80, and a turbulent jitter setting of 50 (this scrambles the reformatted pixels). With this tool, Jerry proceeded to adjust her shape by pushing the pixels into the desired positions. The image below shows Vandella after the Liquify process. In the upper right quadrant of the image, you can see that Jerry used the Clone Stamp tool to copy new fabric into the areas that were vacated by the Liquify filter. Note, too, the reshaped torso of Vandella.


Vandella’s torso was reshaped using the Liquify filter. After reshaping, Jerry used the Clone Stamp tool to repair areas of the background that became obviously distorted.

Jerry used the Clone tool to reshape Vandella’s hips, waist and arms (image below). The tool was set to 100 opacity and flow with a brush hardness of 80.

The torso was then reshaped using the Clone Stamp tool.

Next, a duplicate background layer was created. To this, Jerry applied the Gaussian Blur filter (Filter > Blur > Gaussian Blur) at a radius setting of 20 pixels. Working on the Gaussian Blur layer, Jerry then made two passes with the Eraser tool set at 30 percent opacity, restoring soft detail. Finally, he made another pass with the Eraser tool set at 80 percent opacity to bring out sharp image details (below).

After applying the Gaussian Blur filter on a duplicate background layer, sharpness was restored using the Eraser tool.

Jerry next applied the Burn tool as shown in the next image. This was adjusted to a 14 percent exposure setting. This technique creates shadows, which gives the illusion of depth. With each pass, the tonal values become deeper until the final effect is achieved.

The Burn tool was applied to add shape-revealing shadows.

Then, Jerry adjusted the contrast using the Brightness/Contrast function (Image > Adjustments > Brightness/Contrast). His objective was to deepen the blacks and lighten the whites, producing better overall contrast (below).

The contrast was enhanced to deepen the blacks and lighten the whites.

The final step was to use the Dodge tool, at an exposure setting of 25 percent, around the edges of the body. This cleaned up all of the distracting details and gave the background a cleaner look. This image shows Vandella’s final portrait.

The completed image of Vandella.

Posing- The Head and the Face

Today's post comes from the book Jeff Smith's guide to Head and Shoulders Portrait Photography. It is available from Amazon.com and other fine retailers.

One of the biggest misconceptions about head and shoulders portraits is that very little posing is needed to create a beautiful, salable portrait. In fact, you must select a pose that coordinates with the lighting, background, and clothing to produce a look that will fulfill the client’s needs and desires. On top of that, your posing must hide (or at least lessen) the obvious flaws that your client wouldn’t want to see. Before we get into corrective posing, however, we’ll review the basic components that go into a flattering pose.

Posing is a study of the human form that never ends, because it is a study that is always changing. From my experience, the photographers who have the hardest time creating poses that meet clients’ expectations are the young photographers and the older, “well seasoned” photographers. Both tend to pose a client to meet their own expectations and not the client’s. If you pose clients in this way, they will never be as happy as they could be, and you will never profit as much as you could by learning to pose for the client and not yourself.

The Head and Face
The Face Turned Toward the Main Light. I work with a lighting ratio that is approximately 2:1 or 3:1 without diffusion, and 4:1 with diffusion. This means that if the face is turned away from the main light, the shadow on the side of the nose will increase, making the
nose appear larger.

If, instead, you turn the face toward the main-light source, whether in the studio or outdoors, you light the mask of the face without increasing shadowing in areas of the face where it shouldn’t be. An added bonus is that turning the head also stretches out the neck and reduces the appearance of a double chin, if the subject has one. (Note: Decreasing the lighting ratio also reduces unflattering shadows, but it produces a flat look in the portrait. I call this “mall lighting,” because the inexperienced photographers employed by most national and mall photography studios tend to use this very flat lighting to avoid shadows if the face isn’t posed properly.)

Lower the Chin, Lose the Catchlights. Lowering the chin produces a more attractive angle of the face, but also requires lowering the main light to compensate. If you don’t, you’ll lose the catchlights—the single most important aspect of a portrait (from a lighting standpoint). I suggest you elevate the main light to a point where it is obviously too high (with no apparent catchlight) and then slowly lower it until the proper lighting effect is achieved. This forces you to adjust the light with each pose.

The Position of the Eyes. There are two ways to control the position of the eyes in a portrait. First, you can change the pose of the eyes by turning the subject’s face. Second, you can have the subject change the direction of their eyes to look higher, lower, or to one side of the camera.

Typically, the center of the eye is positioned toward the corner of the eye opening. This enlarges the appearance of the eye and gives the eye more impact. This is achieved by turning the face toward the main light while the eyes come back to the camera. This works well for all shapes of eyes, except for people with bulging eyes. When this is done on bulging eyes, too much of the white will show and draw attention to the problem.

The center of the eye is positioned toward the corner of the eye opening to enlarge itsappearance and give the eye more impact.

The point at which you ask the subject to focus their gaze in respect to the position of the camera’s lens also, in essence, poses the eye. As I’ve already mentioned, the subject should always be looking at someone, not something. To do this, I put my face where I want their eyes to be. There is a certain spark that the eyes have when they look into someone else’s eyes that they don’t have when they are looking at a spot on the wall or a camera lens.

Usually, I position my face directly over the camera. This puts the eyes in a slightly upward position, increasing the appearance of the catchlights. If the camera position is too high to make this possible, I position my face on the main-light side of the camera, never beneath it and never to the shadow side of it. Both would decrease the catchlights.

When the subject looks toward the lens, they seem to make eye contact with the viewer.

With my face directly to the side of the camera, the eyes appear to be looking directly into the lens, even though the subject is actually looking at me. When looking from the side of the camera, a common mistake that my new photographers make is getting their face too far from the camera. This makes the eyes of the subject appear to be looking off-camera—which is fine if that is the intention and not a mistake.

Subjects looking off camera have a more reflective appearance.

When the eyes of the subject look into the lens (or very close to it), the portrait seems to make eye contact with the viewer. This type of portrait typically sells better than portraits that have the subject looking off-camera in a more reflective pose. Reflective posing does, however, work in a storytelling portrait—a bride glancing out a window as if waiting for her groom, a senior glancing over the top of a book and thinking of the future, new parents looking down at their baby and thinking of how many diapers they are going to have to change before that kid is potty trained. Well, maybe not that last one—but you get the picture.

If the eyes are to look away from the camera, there a few rules that need to be followed. They are really simple rules, but ones that I see broken often. First, the eyes should follow the same line as that of the nose. It looks ridiculous to have the eyes looking in a different direction than the nose is pointing. This goes for poses with the subject looking just off-camera, as well as for complete profiles. Second, as you turn the face away from the camera, there comes a point where the bridge of the nose starts to obscure the eye farthest from the camera. At this point, you have gone too far. Either you go into a complete profile, that so many photographers leave school doing so badly. I have seen everything from young ladies who look completely awkward, to guys who look like they were just involved in a car crash that broke their neck.


The Tilt of the Head. How I wish that every college teaching photography would just avoid this one subject. I have never seen one aspect of photography that so many photographers leave school doing so badly. I have seen everything from young ladies who look completely awkward, to guys who look like they were just involved in a car crash that broke their neck.

Which direction and how far to tilt the head must be decided on an individual basis.

The Traditional Rules. While many college students will accept that there are different ways to light, pose, and photograph a subject, a lot of them are convinced that there is only one way to tilt the head of each gender—and it’s precisely the way their teacher told them! I have had some truly talented photographers work for me, and that is the one obstacle I have had to overcome with almost every one of them.


The only difference between these two portraits is the tilt of the subject’s head—but what a difference it makes!


Which of the above photographs do you like better? If you are like all the people I showed these photographs to, you would say the one on the right. Well, there goes the classic theory of posing shot right in the keister! According to that theory, a woman is always supposed to tilt her head toward her higher shoulder. In this case, tilting the head toward the higher shoulder made her look as though she just sat on a very sharp object and is waiting until we take the picture to get the heck off of it. By tilting the head into what traditionalists consider a “man’s” pose, we made her look confident, beautiful, and nothing like a man.

The Real Rule. Now that I have had a little fun, I can continue. The real rule of tilting the head is that there is no rule. You don’t always do anything in photography. If you are photographing a woman, you don’t tilt toward the high shoulder and you don’t tilt toward the low shoulder, you tilt toward the shoulder that looks good.


Long Hair. When photographing a woman with long hair, I look to the hair and not the gender to decide the direction the head will be tilted and the direction in which the body will be placed. Long hair is beautiful, and there must be an empty space to put it. A woman’s hair is usually thicker on one side of her head than the other. The tilt will go to the fuller side of the hair and the pose will create a void on the same side for it to drape into. This means she will sometimes be tilting toward the lower shoulder.


For the Guys. Guys typically aren’t gender benders when it comes to posing; they usually do look better tilting the head toward the lower shoulder or not tilting at all. Again, the pose and the circumstance dictate the direction the head is tilted or whether it is tilted at all.

The easiest way to learn about the head tilt is to first pose the body. Then, turn the face to achieve the perfect lighting and look. Then stop. If the person looks great (as about 80 percent of clients do), take the image. If the subject is very uncomfortable and starts tilting their head in an awkward direction, correct it. It’s that simple.

A variety of poses can be used to obscure the neck and the under-chin area.

The Neck. The neck really isn’t posed and it really isn’t part of the face, but there are a few points that should be shared about this area. First of all, the neck is the first to show weight gain and age. In many clients, as you turn the face toward the light, the little cord-like tendons pop out, making the subject look like Jim Carrey doing his FireMarshall Bob routine on In Living Color (if you don’t happen to be familiar with the character, then trust me—it’s not an appealing or flattering look). The best way to handle the neck area is to cover it up with clothing. If this isn’t possible, use a pose that obscures this area from view. (These same neck-hiding poses—several are seen on the previous page—will also conceal a double chin, which can be very helpful.)

BUY THIS BOOK FROM AMAZON