 Today's post comes from the book Jerry D's Extreme Makeover Techniques for Digital Glamour Photographers by Bill Hurter. It is available from Amazon.com and other fine retailers.
Vandella is a bubbly, confident, and giving person who needed a little bit of a self-image boost. All of us experience what Vandella was feeling when she first met Jerry. She was tied up in the day-to-day routine of her life and needed to be reminded of the fact that she is special. When her portrait was delivered, she felt as if she had been given a new lease on life.
Makeup
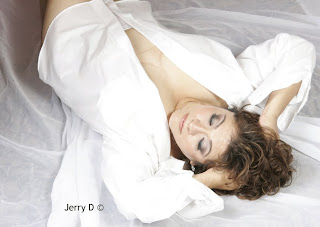
Vandella’s makeup was applied using the basic principles covered in chapter 1 of this book. At the completion of this process, the image below was created. This was the starting point for postproduction enhancement.
 This is the first version of Vandella’s portrait. Notice the wrinkled tulle of the background fabric and the lack of shape in the oversized shirt.
Postproduction
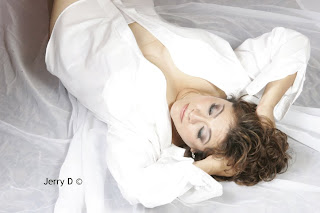
The first step was to reshape her body and adjust the size of her breasts. This was accomplished using Photoshop’s Liquify filter (Filter > Liquify). Liquify is essentially a separate application within Photoshop that is used to stretch or distort areas within the photograph. In the Liquify window, Jerry selected the Forward Warp tool with a brush size of 516, a density setting of 50, a brush pressure of 80, and a turbulent jitter setting of 50 (this scrambles the reformatted pixels). With this tool, Jerry proceeded to adjust her shape by pushing the pixels into the desired positions. The image below shows Vandella after the Liquify process. In the upper right quadrant of the image, you can see that Jerry used the Clone Stamp tool to copy new fabric into the areas that were vacated by the Liquify filter. Note, too, the reshaped torso of Vandella.
 Vandella’s torso was reshaped using the Liquify filter. After reshaping, Jerry used the Clone Stamp tool to repair areas of the background that became obviously distorted.
 Jerry used the Clone tool to reshape Vandella’s hips, waist and arms (image below). The tool was set to 100 opacity and flow with a brush hardness of 80.
Next, a duplicate background layer was created. To this, Jerry applied the Gaussian Blur filter (Filter > Blur > Gaussian Blur) at a radius setting of 20 pixels. Working on the Gaussian Blur layer, Jerry then made two passes with the Eraser tool set at 30 percent opacity, restoring soft detail. Finally, he made another pass with the Eraser tool set at 80 percent opacity to bring out sharp image details (below).
 After applying the Gaussian Blur filter on a duplicate background layer, sharpness was restored using the Eraser tool.
Jerry next applied the Burn tool as shown in the next image. This was adjusted to a 14 percent exposure setting. This technique creates shadows, which gives the illusion of depth. With each pass, the tonal values become deeper until the final effect is achieved.
Then, Jerry adjusted the contrast using the Brightness/Contrast function (Image > Adjustments > Brightness/Contrast). His objective was to deepen the blacks and lighten the whites, producing better overall contrast (below).
The final step was to use the Dodge tool, at an exposure setting of 25 percent, around the edges of the body. This cleaned up all of the distracting details and gave the background a cleaner look. This image shows Vandella’s final portrait.


I think every thing what we get must to be with glamour, the elegance and the style always going to give a great image to every one.
ReplyDeleteActually i went to a hotel with my boyfriend, he usually buy viagra so his sexual development is wonderful, but i was impressive for the glamour of the place, absolutely beautiful.