 Today's post comes from the book Portrait Lighting for Digital Photographers: The Basics and Beyond by Stephen Dantzig. It is available from Amazon.com and other fine retailers.
We are going to turn one strobe into a hair/rim, main, and fill light in this lesson. We know that light falls off quickly but that the exposure stays more consistent when the light is farther away from your subject. We are going to exploit these facts to make this lighting scheme work.
The first thing we are going to do is place our model about eight feet from the backdrop and position a strobe with a 40 degree grid right by the backdrop, pointed toward the model. The 40 degree grid will narrow the beam of light to keep it within a controlled area—we don’t want a lot of uncontrolled light blasting back toward the camera, but we do want enough spread to effectively bounce light off of the reflector.
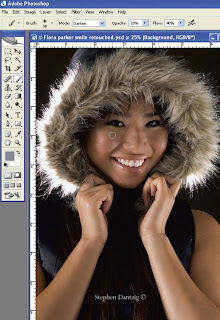 The highlights from the reflectors were brighter than I expected, so I used the Brush tool in Photoshop to tone down some of the hot spots. I set my brush opacity to about 20% and the brush flow to about 40%and set the blending mode to Darken. I used a sample of the darker tones around the hot spots to select my paint color (use the Eyedropper tool and alt/click the spot that you want to sample). The image shown on the left is a screen capture of the photograph after the hot spots were toned down, but it shows the brush settings and an approximate place that I would sample for one paint color. I then simply make as many passes with the Brush tool as I want, with each stroke adding a little more paint
 Next, we are going to place a large silver card 2 feet in front of our model. The light from the gridspot travels 2 feet past the model to strike the reflector (traveling a total of 10 feet), then bounces off the reflector and travels 2 feet more. The falloff from that point won’t be too great because the light hitting the reflector is only traveling 2 feet to reach Flora. The spotlight is now the hair light, and the reflector is the main light. We actually want the light to fall off somewhat because we want the hair/rim light to be a bit “hotter” than our main light. The exposure at the back of Flora’s hood was f/11 and 7/10. The exposure at her cheek (from the reflected light) was f/8 and 3/10.
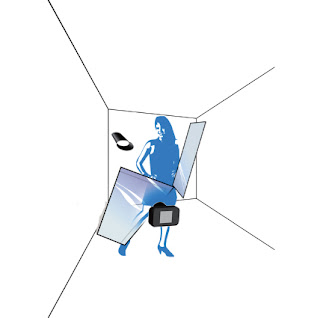
Here are a diagram of the setup used to create the shot and the image after some basic retouching and a simple Curves adjustment layer for color correction.
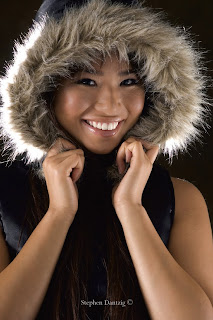
We completed the setup by adding a second reflector opposite the main light (the first reflector) to catch and bounce any light that passed our model. Here’s how it worked: The light from the gridspot directly lit Flora’s hair and acted as a hair light. The light that passed her hit the first large reflector, which was positioned to catch the overflow and light her face. The angle of the reflector ensured that some light would pass Flora and hit a second reflector. The light off of the second reflector provided a soft fill.
Flora’s arms and hood were still a little too bright for me, so I added a second Curves adjustment layer to darken the image.
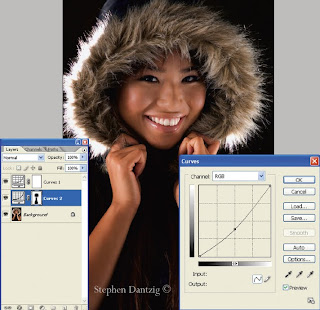 I simply added a new Curves adjustment layer and pulled the center point of the curve down a little. The screen capture shows that the adjustment layer comes with a mask. I selected black paint and painted over the mask to let the original tones of Flora’s face and hair show through.
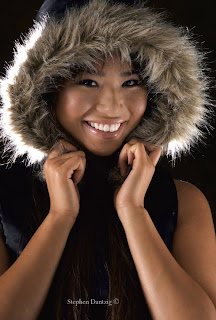 The second Curves adjustment layer darkens the areas around Flora’s face and draws your eye to her pretty smile.
 I wanted Flora’s skin to glow in this image, and I discovered a really cool skin softening technique! It comes to us from Dave Cross at www.photoshopuser.com. He got it from David Ziser—so from David, to Dave, to me, to you! The best part is that this effect is adjustable. I wrote an action for this because I might be using it a lot from now on! Here it is:
1. Duplicate your main retouched layer.
2. Change the blending mode to Overlay.
3. Apply the High Pass filter (hidden in the “Other” filter section). I kept the default of 10 pixels.
4. Inverse the effect by hitting ctrl/cmd + I.
5. Lower the opacity of this layer to what you like (I use 40% as a starting point); you can always adjust it later.
6. Apply a layer mask.
7. Select the Brush tool and set the foreground color to black.
8. Stop recording if you are recording an action.
9. Paint in the details in the eyes, eyelids, mouth, and hair.
10. Check/adjust the opacity of the filtered layer.
We are almost finished with the image, but I want to add a little more emphasis to Flora’s face. A third Curves adjustment layer will do the trick!
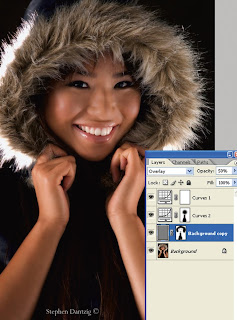 The screen capture shows the layers after running the softening action. Notice that I set the opacity of the softened layer to 50%.
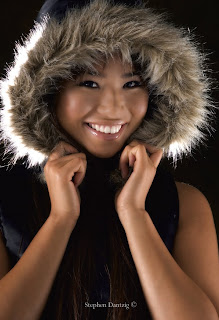 The softening effect produces a nice smooth finish to Flora’s skin that helps create a more glamorous feel to the image.
 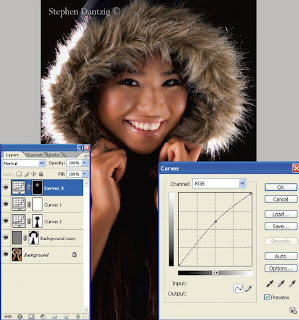 I added a final Curves adjustment layer, this time pulling up on the center dot to lighten the overall image. I used the Paint Bucket tool with black paint and clicked on the layer mask. This filled the mask with black and hid the effect I had just created. I then switched the foreground color to white, selected the Brush tool, and painted over Flora’s face at a low opacity to slowly lighten the area until I had what I wanted.
 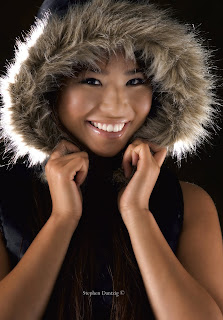 We created a fun and glamorous look for Flora with one light, two reflectors, and some basic Photoshop techniques. You can too!
BUY THIS BOOK FROM AMAZON

No comments:
Post a Comment