
 Today's post comes from the book Off-Camera Flash: Creative Techniques for Digital Photographers by Rod and Robin Deutschmann. It is available from Amazon.com and other fine retailers.
Off-camera flash photography and on-location portraiture go together like peanut butter and jelly. The options and rewards of creating light while in the field are as limitless as your imagination.
PORTRAIT PHOTOGRAPHY IS CHANGING
The leash has been cut. The use of off-camera flash brings with it the freedom to take our message-building skills outside—away from the stale props and overused reflectors of yesterday. Finally, our creative voice can shine unhindered as the world becomes our well-lit backdrop and our vision grows as the scenery changes.


Off-camera flash photography has brought the studio outdoors—and with it all of the options, advantages, and challenges of unrestrained light. You can now seize upon nature’s gifts or capitalize on man-made alternatives. With the aid of family and friends, even the most problematic of shoots are quickly reined in. When shooting in the city, it’s wise to stay away from the use of tripods or anything else that can impede traffic. Not only is it dangerous, but chances are that the city will require permits. Avoid the hassle and enlist some help.
A NEW TRUTH
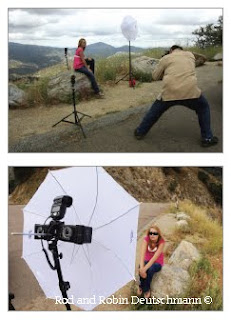
As portrait photographers using off-camera flash, each new outdoor location brings with it amazing possibilities and a chance to test our skill, knowledge, and competence. Gear choice will be a testament to our adventurous side. Do we take one light connected with a cord or several and use wireless options? Do we ask friends or family to hold the gear or do we employ light stands, hand-held booms, or beanbags? Will we visit an exotic locale for the ambiance, or do we tackle the hustle and bustle of downtown? Are we up for a trip to the mountains, hauling sandbags to keep light stands from blowing away? Or do we head to the beach, wrapping each flash in its own plastic bag to protect the gear from sea spray? Creativity, as you might have guessed, may just lie in our answers to these questions.


WHAT TO EXPECT
If you’re new to the idea of using off-camera flash for your on-location portraits then be prepared for something very special: the lights change everything. Every rule that you thought you knew now doesn’t apply. Every weather condition—rain, sunshine, muggy, cloudy, even a tropical storm— brings new opportunities and new “looks” for your message. There is no need to ever worry about having the “right” light; you’re going to be bringing it with you.With enough flashes and modification devices, you can easily replace the sun as your main light source when it’s just not cooperating, creating sunsets and mood anywhere, at any time you want. Plus, you’ll still maintain complete control over your lighting, depth of field and perspective—something that’s nearly impossible if you’re only using one on-camera flash.

A FRESH APPROACH
Keep things extraordinarily simple at first.Master the use of one light. Learn what it takes to support it, to modify it, and how to trigger it. Use the flash both indoors and out. Demand as much from it as you do from your camera and subjects. Practice shooting with the flash set at full power, then modify it. Don’t accept a poor image. Review each shot as it is taken—and if you don’t like it, fix it right then. Each bad photo now affords you experience, so get as much of it as you can. Learn from your mistakes and make them work for you.
DOUBLE YOUR FUN
Two lights will always offer more options. The placement, height, angle, and power output can be adjusted independently—and you can add separate filters, gels, and modifiers. Once you’ve moved on to two flashes you will need to think about using some kind of light stand. Keep in mind that, when it comes to support, you get what you pay for. Choose a cheap stand or an inexpensive tripod and you can expect trouble. It’s best to go with a quality product rather than an inexpensive one that will break or, worse yet, fall over.


TAKING IT TO THE NEXT LEVEL
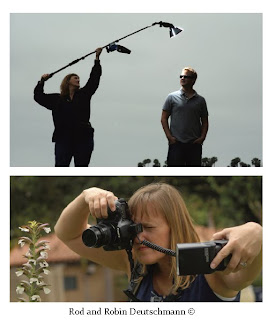
Creativity in portrait photography really kicks in when you start adding several off-camera lights. You’ll eventually search out tools and accessories to make the job of holding them even easier. Get creative with your support systems. Call in favors from family and friends, ask your kids, your wife, or your husband for help. Use tools you already have, such as tripods, monopods, and beanbags. Combine your modification tools; use a snoot on one flash and a softbox on another. Change the ways you introduce light to the scene. Drag out some of that old studio equipment and modify it to suit your new outdoor needs.
Don’t be afraid to challenge the norm. If a support tool or modification contraption that you need can’t be purchased, then make one. You would be surprised at how far a few strips of Velcro, a pair of scissors, and some black foam will get you.
 Light stands, sync-cords, extending handles, softboxes, snoots, reflectors, and more await. Get creative with your tools—but, more importantly, get to know them before you go out and shoot.
DEALING WITH GLARE: A “POLARIZED” REMINDER
If you’re unaware of how powerful a polarizer is when using flash photography, then you haven’t been using one correctly. For the best results, place your lights 90 degrees from your lens to remove any glare they produce. If you mistakenly add light from the wrong direction, you will create more of a problem than any polarizer can handle. Remember, you’ll still need to turn the polarizer (no matter the type) to make it work. If you don’t, then your off-camera flash photography will always be lacking the punch that other photographers’ images have. (Note: If you’re shooting in any automatic mode, you’ll need to purchase a circular polarizer. If you’re a manual shooter who uses manual focus, either a circular or linear polarizer will work just fine.)
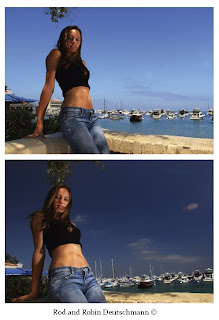 The top image was created with one unmodified off-camera flash placed to the right of the model. A polarizer was attached to the lens but was rotated incorrectly. In the bottom image, the exact same camera settings were used, and the same flash was fired, but the polarizer was now rotated correctly for maximum effect.
BUY THIS BOOK FROM AMAZON
As portrait photographers using off-camera flash, each new outdoor location brings with it amazing possibilities and a chance to test our skill, knowledge, and competence. Gear choice will be a testament to our adventurous side. Do we take one light connected with a cord or several and use wireless options? Do we ask friends or family to hold the gear or do we employ light stands, hand-held booms, or beanbags? Will we visit an exotic locale for the ambiance, or do we tackle the hustle and bustle of downtown? Are we up for a trip to the mountains, hauling sandbags to keep light stands from blowing away? Or do we head to the beach, wrapping each flash in its own plastic bag to protect the gear from sea spray? Creativity, as you might have guessed, may just lie in our answers to these questions.

One large softboxed flash was used to illuminate our model’s face. It was held by an assistant slightly off camera. The background, with its beautiful shapes, lines, and color, needed to be in crisp focus, so a very small aperture (f/16) was chosen. A redder-than-normal white balance was incorporated to add drama and draw attention to the model more quickly.

WHAT TO EXPECT
If you’re new to the idea of using off-camera flash for your on-location portraits then be prepared for something very special: the lights change everything. Every rule that you thought you knew now doesn’t apply. Every weather condition—rain, sunshine, muggy, cloudy, even a tropical storm— brings new opportunities and new “looks” for your message. There is no need to ever worry about having the “right” light; you’re going to be bringing it with you.With enough flashes and modification devices, you can easily replace the sun as your main light source when it’s just not cooperating, creating sunsets and mood anywhere, at any time you want. Plus, you’ll still maintain complete control over your lighting, depth of field and perspective—something that’s nearly impossible if you’re only using one on-camera flash.

Challenge yourself and your equipment whenever you shoot outdoors. If you’re comfortable using one off-camera flash, then push yourself to use two. If you use indoor studio lights, create a set for outdoors. Don’t settle for the ordinary.

A FRESH APPROACH
Keep things extraordinarily simple at first.Master the use of one light. Learn what it takes to support it, to modify it, and how to trigger it. Use the flash both indoors and out. Demand as much from it as you do from your camera and subjects. Practice shooting with the flash set at full power, then modify it. Don’t accept a poor image. Review each shot as it is taken—and if you don’t like it, fix it right then. Each bad photo now affords you experience, so get as much of it as you can. Learn from your mistakes and make them work for you.
DOUBLE YOUR FUN
Two lights will always offer more options. The placement, height, angle, and power output can be adjusted independently—and you can add separate filters, gels, and modifiers. Once you’ve moved on to two flashes you will need to think about using some kind of light stand. Keep in mind that, when it comes to support, you get what you pay for. Choose a cheap stand or an inexpensive tripod and you can expect trouble. It’s best to go with a quality product rather than an inexpensive one that will break or, worse yet, fall over.

Two lights with no modification were placed at opposite sides of our model for this series of images. In the first image the lights were turned off. In the second image, the left light was turned on. In the last image both lights were fired. The differences are obvious—and very important.

TAKING IT TO THE NEXT LEVEL
Creativity in portrait photography really kicks in when you start adding several off-camera lights. You’ll eventually search out tools and accessories to make the job of holding them even easier. Get creative with your support systems. Call in favors from family and friends, ask your kids, your wife, or your husband for help. Use tools you already have, such as tripods, monopods, and beanbags. Combine your modification tools; use a snoot on one flash and a softbox on another. Change the ways you introduce light to the scene. Drag out some of that old studio equipment and modify it to suit your new outdoor needs.
Don’t be afraid to challenge the norm. If a support tool or modification contraption that you need can’t be purchased, then make one. You would be surprised at how far a few strips of Velcro, a pair of scissors, and some black foam will get you.
 Light stands, sync-cords, extending handles, softboxes, snoots, reflectors, and more await. Get creative with your tools—but, more importantly, get to know them before you go out and shoot.
 DEALING WITH GLARE: A “POLARIZED” REMINDER
If you’re unaware of how powerful a polarizer is when using flash photography, then you haven’t been using one correctly. For the best results, place your lights 90 degrees from your lens to remove any glare they produce. If you mistakenly add light from the wrong direction, you will create more of a problem than any polarizer can handle. Remember, you’ll still need to turn the polarizer (no matter the type) to make it work. If you don’t, then your off-camera flash photography will always be lacking the punch that other photographers’ images have. (Note: If you’re shooting in any automatic mode, you’ll need to purchase a circular polarizer. If you’re a manual shooter who uses manual focus, either a circular or linear polarizer will work just fine.)
 The top image was created with one unmodified off-camera flash placed to the right of the model. A polarizer was attached to the lens but was rotated incorrectly. In the bottom image, the exact same camera settings were used, and the same flash was fired, but the polarizer was now rotated correctly for maximum effect.
 Polarizers
Want the most from your polarizer? Then learn to shoot in manual. Unfortunately, polarizers can’t work at 100 percent if the camera is in any automatic setting. The camera, in its attempt to capture average images, will actually fight the desirable effects the polarizer produces.
Want the most from your polarizer? Then learn to shoot in manual. Unfortunately, polarizers can’t work at 100 percent if the camera is in any automatic setting. The camera, in its attempt to capture average images, will actually fight the desirable effects the polarizer produces.
BUY THIS BOOK FROM AMAZON
No comments:
Post a Comment