Common Problems and Solutions.

Today's post features a few of the many tips available in Jeff Smith's Guide to Head and Shoulders Portrait Photography. It is available from Amazon.com and other fine retailers.

While there are many problems to correct, even in a head and shoulders style portrait, the following are the major ones. Basically, you’ll need to adapt your poses to cover, disguise, or cast a shadow on the areas of the body and face that are problems. You will find that many of the more relaxed poses already hide some of the most annoying problems your clients have.

Double Chin. A double chin (or the entire neck area) is easily hidden by resting the chin on the hands, arms, or shoulders. Be careful that the subject barely touches his or her chin down on the supporting element. Resting on it too heavily will alter the jawline.


Another way to make a double chin and loose skin on the neck easier on your client’s eyes is to stretch the area, pulling it tighter. To do this, turn the body away from the light, then turn the face back toward the light. This will stretch out the double chin so that it will not be as noticeable.


In poses like these, the neck and chin area is concealed. This is helpful for hiding the area if it’s a
problem—but the poses also look great for trim subjects.


When a traditional head and shoulders pose is needed (for a yearbook, business publication, etc.), it is sometimes impossible to use the hands or arms to hide this problem area. Posing the body to make the neck stretch can only do so much to hide a large double chin. In a case like this, you do what some photographers call the “turkey neck.” To do this, have the subject extend their chin directly toward the camera, which stretches out the double chin. Then have them bring down their face to the proper angle. Most of the time, this eliminates the double chin from view. This technique is especially helpful when photographing a man who is wearing a shirt and tie. Men who have large double chins often also have tight collars, which push up the double chin and make it even more noticeable.


Here seen from the side, the “turkey neck” pose helps stretch out the area under the chin for a more flattering appearance.


Wide or Narrow Faces.
If the subject has a wider face, you can slim it by increasing the angle of the face to the main light. This creates more shadowing on the face. Conversely, if the subject has a very narrow face, you can make it look fuller by decreasing the angle of the face to the main light. In both cases, however, note that this change will result in other lighting changes on the face, such as the nose becoming more prominent as the face is turned away from the main light to slim it.

Ears. Corrective posing is the best way to combat the problem of ears that stick out too far. Ladies who have a problem with their ears usually wear their hair over them. In this case, make sure that the subject’s hair isn’t tucked behind her ear, as this will make the ears stand out. Larger ears can also stick out through the hair, making them appear really large.

Without hair to conceal them, the best way to reduce the appearance of the ears is to turn the face toward the main light until the ear on the main-light side of the face is obscured from the camera’s view. Then, move the fill source farther from the subject to increase the shadow on the visible ear, or move the main light more to the side of the subject to create a shadow over the ear. Reducing the separation between the subject and the background in this area will also make the outline of the ear less visible. Overhead hair lights should be turned off to avoid highlighting the top of the ear.


Turn the face toward the main light to conceal the far ear, then reduce the fill light on the shadow side to obscure the other ear.


In a situation where the ears are so large that they can’t be hidden in this manner, you have two choices: either let the ears be seen or highlight only the “mask” of the face, letting both sides of the face fall into shadow.


BUY THIS BOOK FROM AMAZON

Available Light

Today's post comes from the book Available Light: Photographic Techniques for Using Existing Light Sources by Don Marr. It is available from Amazon.com and other fine retailers.

These shots were created in an alcove near the parking lot at a all—glamorous, I know. The sun bounced off the pavement to the right of the camera. To the left of the camera was a dark doorway. The light on her face was coming strongly from the side and below. This is the first type of open-shade light: open shade side lighting. You really can’t lose with this kind of light. It’s soft and directional and provides flattering results for most subjects. There is a nice light ratio (difference in exposure) from the light side of her face to the shadow side.


Here, we see open-shade side lighting. The warm-colored walls helped maintain a nice skin color on the shadow side of her face.

Here is an important aspect to keep in mind: The open-shade area you choose to shoot in will have an effect on the color temperature of the shot, especially in the shadow areas. By setting your white balance to the shade setting on your digital camera, you will be able to correct the cool color temperature of open shade to a more neutral color. The camera will correct for the light, but it won’t correct for the environment that your subject is standing in. In this shot, the warm-colored walls helped to keep the shadow side of her face warmly colored. If these walls had been blue, however, the shadow side of her face would have had a definite cool color cast.

For the next shot, the model faced the dark doorway with her back to the sunlit pavement. This created the second type of open shade light: open-shade backlighting. This type of light creates a nice wrap of light around the edge of the subject. It can be difficult to meter this type of light, though.


Strong backlighting fools the in-camera light meter. It tries to average out the exposure, resulting in underexposure on the subject’s face.

This strongly backlit situation, with all of the sunlight bouncing off the pavement behind her, fooled the camera’s meter. It chose an average exposure to try to tone down all of that bright light, which resulted in underexposure on the model’s face. To correct for the underexposure on her face, I set my camera’s metering mode to spot metering. I took a few test shots to assure that this technique gave me a correct exposure on her face, noted the exposure, then turned the camera to the manual mode and shot at the noted exposure. This way, if I composed a shot where the subject was not completely centered, I could still be assured of a good exposure on her face.

In backlit situations, use spot metering, initially, to meter your subject’s face, but shoot in the manual mode. Then you can step back and choose the composition you want without worrying about the backlight affecting your exposure. You can be assured of a correct exposure on your subject’s face even if you decide to off-center them in your composition.

For the final shot, the subject’s face is correctly exposed and the background is overexposed to white. The white light from behind wrapped around her face to frame it nicely. There was another feature in this glamorous mall alcove: a recessed light in the ceiling. I had her stand under this light. This lit her hair on top and helped fill in the light on her face a bit.

This is open-shade backlighting. The subject's face was correctly exposed using spot metering.

BUY THIS BOOK FROM AMAZON

Posing for Children's Portrait Photography

Today's post comes from the books The Art of Children's Portrait Photography by Tamara Lackey. It is available from Amazon.com and other fine retailers.

In contemporary photography, the word “posing” is sometimes used with a negative onnotation. A lot of people say they want to avoid “posed” photographs when they really mean that they want more expressive imagery. However, posing is not a bad thing. Ideally, a lot of what posing is about is setting up an individual in a manner that is most flattering to them and photographing them from an angle and at a focal length that best showcases their attributes.

Even if you never place a child in an exact pose and put her finger exactly like this and sweep her chin to the side exactly like that, it doesn’t mean that you won’t know a heck of a lot more about how to best flatter your subject by learning the basic rules of posing.


Start with poses that kids normally adopt in their everyday life, then go from there.


Some Simple Rules. The following are some simple rules to consider when looking for the best pose in a subject.

1. When posing multiple subjects, consider the physical distance between them. What may be a comfortable space between two subjects in everyday life may look pronounced in a photograph. Consider moving them closer together for an intimate and affectionate look.

Look for ways to show curves, rather than straight lines, in your subjects’ poses.

2. Think about what looks comfortable and start there. Leaning against a wall, a tree, or a window; hugging knees to the chest; laying on their back with their head turned to the side; hands in pockets; arms crossed naturally; “self hugs;” laying belly-down with legs kicked up in the air—these are natural poses for children in their day-to-day life. Start with what looks normal and easy, then let it evolve from there.


3. When photographing a parent with their child, remind them to pay attention to positioning their chin a bit more out and down to avoid an unnecessary double chin. It’s a natural response to laugh and throw your head back and shoulders up, but this can create the illusion of more girth around the neck and chin area. You can easily avoid this by offering a few quick tips to the subject(s) before the shoot even begins.

4. Consider showcasing the beautiful S-curve of your subjects. A completely straight body facing the camera head-on can tend to look stocky. Creating some turns in the form, on the other hand, creates a look that is more fluid, graceful, and attractive. Simply turning an individual to the left or right can create this S-curve quite easily.


With a bit of subtle coaching, you can get a variety of natural poses and expressions.

5. With children, you typically want to get down to their level, but sometimes shooting from above—with their gaze cast upward toward the camera—can really accentuate their striking eyes.


A high camera angle can be used to accentuate a subject’s striking eyes.


BUY THIS BOOK FROM AMAZON

Photographing Models with Natural Light

Today's post comes from the book Lighting Techniques for Photographing Model Portfolios by Billy Pegram. It is available from Amazon.com and other fine retailers.

Natural vs. Artificial Light
There are two sources of light: natural (which includes sunlight, moonlight, and reflected light from either the sun or moon), and artificial (which includes sources like tungsten lights, fluorescent lights, electronic flash, and studio flash). Natural light is not limited to the outdoors, nor is artificial light exclusively indoors. Many times, I use flash to fill in shadows while shooting outdoors. I have also effectively used filtered window light for an indoor shot with natural light.

As you’ll see, sunlight is a great option for photography. It’s natural, often very flattering to your subjects, and widely abundant (and you can’t beat the price!). However, it does present certain challenges when it comes to control—and, unless you can shoot near a window, it’s not always an option for images shot indoors. In many cases, you’ll also find that you need more precise control than you can easily exercise over natural light. That is why photographers also need to be adept at creating effective lighting setups using artificial light sources.

As a photographer, both of these forms of light are at your disposal. It’s up to you to learn how to use them effectively in all their many incarnations.

Sunlight
Generally, the average photographer is most concerned with daylight. But saying “daylight” is just the beginning of the story—there are countless variations of just this one light source.

1. The high contrast in this scene, shot in bright sunlight, wasn’t captured optimally using the camera’s autoexposure mode.

Bright Sunlight. There are several problems inherent in working with bright sunlight. These problems intensify when shooting against a brightly lit background such as a light-colored wall, a beach, or snow. In these cases, the overall light tones in the image can trick the in-camera meter and lead to incorrect exposures. When shooting against a predominately dark background, you may find that your film or image sensor can’t handle the very high contrast of the scene—you’ll either have blown-out highlights (white with no detail) or blocked up shadows (black with no detail). Fortunately, with a digital camera, it is easy to shoot a few images and then preview them. Working in the manual mode (for total control), pay attention to the exposure settings as you are shooting, review your results, then adjust the aperture, shutter speed, and ISO as needed. For the most accurate results, it’s advisable to use an incident light meter and monitor the amount of light that is actually striking your subject, then set your camera accordingly. You also bracket your exposures (shoot some above and below the meter’s recommended exposure setting) to ensure you capture all the critical details.

2. Switching to the manual mode allowed the scene to be recorded more appealingly.

Cloudy Skies. Some beginning photographers hide when clouds cover the sun. The seasoned professional, however, realizes how beneficial this lighting can be. It is as if the sky has become a huge softbox, softening the hard light. Film and digital imaging equipment have a difficult time recording the high contrast scenes created by bright sunlight. When cloud cover softens this light, however, the range of contrast between shadow and highlight is lowered. Color is more vibrant and shadows are not as overpowering. The softer light is also easier on the model’s eyes. If desired, the images captured on a cloudy day can be warmed up either with an on-camera filter, by adjusting the white-balance setting, or after the shoot in Photoshop.

Practical Example: Bright Sunlight. Sunlight is the major source of light for photography—in fact, we’re usually only imitating it when we use studio lights. Therefore, photographers must learn to work with the variety and quality of light given by the sun on any particular date and time.

3. Sunlight through a thin layer of clouds produced soft, even lighting.

For this demonstration, I will address five varieties of sunlight and the advantages and disadvantages of each. The photographs in this series are unedited, allowing you to fully appreciate the differences in quality between them. All of the images were shot at 1/200 second at f/11—except for image 3; because of the low intensity of the light, this image was shot at 1/60 second at f/8.

For photograph 3, the sun was diffused by a thin layer of clouds, which provided beautiful, even lighting that was soft and virtually shadow-free. Notice how the exposure is consistent throughout the entire image. Also, notice how the colors in the jeans are true to life. This is like having a huge softbox covering the model. It is no wonder that this is the preferred light for most photographers. Very little modification needs to be done to create beautiful photographs of models or landscape scenes under this light. When shooting models, however, it is usually best if you direct the model to turn her face away from the sun to prevent squinting.

4. When the clouds moved out, the model was left in direct sun. Even with the addition of a reflector, the shadows are very pronounced.

In photograph 4, the clouds had moved from the scene and the model was in full afternoon sun. Although a silver reflector was placed next to the fence, bouncing the sunlight back to the model, the shadows are still very prevalent. There’s a significant difference in quality between this image and the previous one; the image sensor can no longer handle the large difference in exposure between the bright sunlight and the heavy shadows. Notice, particularly, the heavy shadows on the background. There is an advantage to using this style light, though: it allows you to enhance the curves of the model’s body. Notice the shadowing on the model’s chest and how it accentuates the contours of the legs. Be careful, however, that you put sufficient fill light on the model’s face. Otherwise, you will create unwanted contours on her face, as well! Because the reflected light in a situation like this can be very bright, you may need to have the model close her eyes and open them for the exposure on a set count.

5. Removing the reflector results in an image that is not appealing.

Photograph 5 was shot without the use of a reflector. Notice how hard the light is on the model’s face and how every little imperfection is magnified. The shirt has also lost some of the detail. Overall, it is not a very pleasing photograph.

6. Hard light is common in fashion photography because it emphasizes the texture of the clothing.

Bright sunlight coming over your shoulder can be acceptable with landscapes. It can also work with models, provided that the face is not the primary area of interest in the image, as shown in photograph 6. Many high-fashion images are actually shot this way because of the way the harder light enhances the texture of the clothing. In this situation, it is best to have the model look away from the sun or at least down. Generally speaking, if a photograph calls for bright light with contrast, it is best to schedule the shoot for the golden hour.

7. Adding fill flash allows you to create a more flattering effect.

Photograph 7 shows what, when given the choice, is my favorite solution to this lighting situation. This is a combination of sunlight with fill flash. It is the most technically challenging to accomplish and make look natural, but it provides the photographer with the most control. The principle is this: the sunlight exposes the majority of the image; therefore, you set your exposure for the sunlight. Then, you add an auxiliary flash to fill in (lighten) the shadows to whatever degree you desire. You let the sunlight contour the model’s body and use the flash to reduce the negative effects of sunlight on imperfections. This also allows the model to look away from the sun, eliminating squinting.

8. Here, cloud-covered skies paired with flash create a good lighting scenario.

Photograph 8 was shot under an overcast sky with the use of a flash. This combination gives the photographer the softness of the cloud-covered sunlight and the control of using a flash. Notice the detail in the jeans, the vibrant color, and the lack of heavy shadows. Many photographers prefer this lighting combination for shooting models, because you have the beautiful light covering the model’s face and figure—but, by controlling the output of the flash, you can also quickly change the look and feel of the image.

BUY THIS BOOK FROM AMAZON

Corrective Techniques

Today's post comes from the book Portrait Photographer's Handbook by Bill Hurter. It is available from Amazon.com and other fine retailers.

The art of good portraiture is found in the photographer’s ability to idealize a subject. This demands that the photographer know practical methods of correcting the subject’s physical flaws and irregularities.

It’s important to understand that people don’t see themselves the way they actually appear. Subconsciously, they shorten their noses, imagine they have more hair than they really do, and in short, pretend they are better looking than they really are. A good portrait photographer knows this and acts on it the instant a subject arrives for a session. As a matter of procedure, the photographer analyzes the face and body and makes mental notes as to how best to light, pose, and compose the subject to produce a flattering likeness.

CORRECTING SPECIFIC PROBLEMS
This section deals with methods to correct specific physical traits you will encounter with everyday people. Be tactful about making any corrective suggestions.

Overweight Subjects. Have an overweight subject dress in dark clothing, which will make him or her appear ten to fifteen pounds slimmer. Use a pose that has the subject turned at a 45-degree angle to the camera. Never photograph a larger person head-on—unless you are trying to accentuate their size.

Use a low-key lighting pattern and use short lighting so that most of the subject is in shadow. The higher lighting ratio that produces low-key lighting will make your subject appear slimmer. Use a dark-colored background and if possible, merging the tone of the background with the subject’s clothes. To do this, minimize or eliminate the background light and any kickers you might otherwise use to highlight the shadow-side edge of the subject.

Standing poses are more flattering. Seated, excess weight accumulates around the waistline. A dark vignette at the bottom of the portrait is another trick to minimize the appearance of extra weight.

If the overweight person has excess skin under their chin, keep the light off the neck, or use a gobo, a lightblocking card placed between light and subject, to keep light off this area.


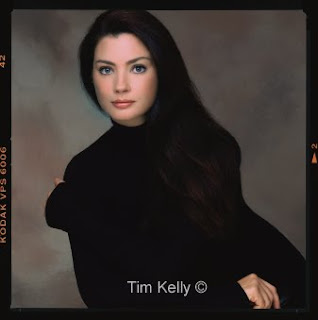
Sometimes great portraiture is not about minimizing flaws, but maximizing great features. Here, Tim Kelly eliminated just about everything about this girl except her nearly perfectly shaped face. He used black everywhere to defocus attention, photographing her in a black sweater in a black chair. Tim had her lean forward in the chair, so you can’t even relate to the type of pose in use. These are all intentional techniques to focus your attention on her face.

Thin or Underweight Subjects. A thin person is much easier to photograph than an overweight person. Have the person wear light- colored clothing and use a high-key lighting ratio and light-colored background. When posing a thin person, have him or her face the camera more to provide more width. A seven-eighths angle is ideal for people on the thin side.

If the person is extremely thin, do not allow him or her to wear sleeveless shirts or blouses. For a man, a light-colored sports coat will help fill him out; for a woman, fluffy dresses or blouses will disguise thin arms.

For a thin face, use broad lighting and a lighting ratio in the 2:1 or 3:1 range. Since the side of the face turned toward the camera is highlighted, it will appear wider than if short lighting is used. The general rule is, the broader the person’s face, the more of it should be kept in shadow; the more narrow the face, the more of it should be highlighted—the basic differences between broad and short lighting.

Slender subjects can be photographed head-on with no angle to the shoulder axis. A very broad, highlight area and the pose enhance this girl’s natural beauty. Photograph by Tony Corbell.

Elderly Subjects. The older the subject, the more wrinkles he or she will have. It is best to use some type of diffusion, but do not soften the image to the point that none of the wrinkles are visible. Men, especially, should not be overly softened as their wrinkles are often considered “character lines.”

Use a frontal type of lighting so that there are no deep shadows in the wrinkles and deep furrows of the face. Use a softer, diffused type of lighting, such as umbrella light. Soft lighting will de-emphasize wrinkles.

A smaller image size is also called for in photographing elderly people. Even when making a head-and-shoulders portrait, the image size should be about 10–15 percent smaller, so that the signs of age are not as noticeable.

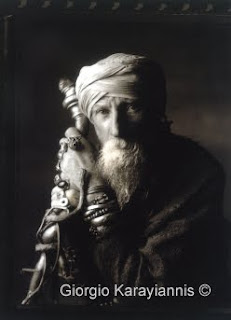
This wonderful portrait by Giorgio Karayiannis says more in what it omits than what is visible. Giorgio used a very strong lighting ratio to omit large portions of the image—a technique that is often used to minimize the visible areas of a large person. The light, a square softbox, was moved back from the subject to increase its specularity. With no fill-in, much of the portrait is black. The deep blacks and dark areas lend mystery to the portrait.

Eyeglasses. The best way to photograph eyeglasses is to use blanks (frames without lenses), obtained from the sitter’s optometrist. If the portrait is scheduled far enough in advance, arrangements can usually be made with the optometrist for a set of loaner frames. If blanks are not available, have the person slide his glasses down on his or her nose slightly. This changes the angle of incidence and helps to eliminate unwanted reflections.

When photographing a subject wearing eyeglasses, the key light should be diffused so that the frames do not cast a shadow that darkens the eyes. Place the key light even with or just higher than the subject’s head height, then move it out to the side so that its reflection is not visible in the eyeglasses as seen from the camera. This produces a split or 45-degree lighting pattern. The fill light should also be adjusted laterally away from the camera until its reflection disappears. If you cannot eliminate the fill light’s reflection, try bouncing the fill light off the ceiling or the back wall of the studio.

When your subject is wearing thick glasses, it is not unusual for the eyes to be darker than the rest of the face. This is because the thickness of the glass reduces the intensity of light being transmitted to the eyes. If this happens, there is nothing you can do about it during the shooting session, but the area can be dodged digitally or during printing to restore the same print density as in the rest of the face.

If your subject wears “photo-gray” or any other type of self-adjusting, light-sensitive lenses, have him keep his glasses in his pocket until you are ready to shoot. This will keep the lenses from getting dark prematurely from the shooting lights. Of course, once the light strikes them they will darken, so you might want to encourage your subject to remove his or her glasses for the portrait.

One Eye Smaller than the Other. Most people have one eye smaller than the other. This should be one of the first things you observe about your subject. If you want both eyes to look the same size in the portrait, pose the subject in a seven-eighths to three-quarters view, and seat the person so that the smaller eye is closest to the camera. Because objects farther from the camera look smaller, and nearer objects look larger, both eyes should appear to be about the same size.

Baldness. If your subject is bald, lower the camera height so less of the top of his head is visible. Use a gobo between the main light and the subject to shield the bald part of his head from light. Another trick is to feather the main light so that the light falls off rapidly on the top and back of his head. The darker in tone the bald area is, the less noticeable it will be. Do not use a hair light, and employ only minimal background light. If possible, try to blend the tone of the background with the top of your subject’s head.

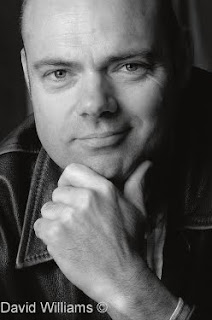
Baldness, or a pronounced receding hairline, can sometimes be handled by judicious cropping—as in the case of this portrait by David Williams. Notice how the hand is brought into the composition as a major element and how its strong posing helps to add character and flavor to the portrait.

Double Chins. To reduce the view of the area beneath the chin, raise the camera height so that area is less prominent. Tilt the chin upward and raise the main light so that much of the area under the chin is in shadow.

Wide Faces. To slim a wide face, pose the person in a three-quarters view, and use short lighting so that most of the face is in shadow. The wider the face, the higher the lighting ratio should be. If the face is extremely wide, even a 5:1 ratio would be suitable.

Thin Faces. To widen a thin face, the solution is to highlight as much of the face as possible. This means using broad lighting, where the side of the face most visible to the camera is highlighted. You should use a frontal pose, such as a seven-eighths view, and keep the lighting ratio on the low side—in the 2:1 to 3:1 range. Kickers and hair lights will add depth and dimension to the portrait, and further widen a thin face. A smiling pose will also widen the cheek and mouth area.

Broad Foreheads. To diminish a wide or high forehead, lower the camera height and tilt the person’s chin upward slightly. Remember, the closer the camera is to the subject, the more noticeable these corrective measures will be. If you find that by lowering the camera and raising the chin, the forehead is only marginally smaller, move the camera in closer and observe the effect again—but watch out for other distortions.

Deep-Set Eyes and Protruding Eyes. To correct deep-set eyes, keep the main light low to fill the eye sockets with light. Keep the lighting ratio low so there is as much fill light as possible to lighten the eyes. Raising the chin will also help diminish the look of deep-set eyes. To correct protruding eyes, raise the main light and have the person look down so that more of the eyelid is showing.

Large Ears. To scale down large ears, the best thing to do is to hide the far ear by placing the person in a three-quarters view, making sure that the far ear is out of view or in shadow (either by using a gobo to block the light from the ear or by feathering the main light). If the subject’s ears are very large, examine the person in a profile pose. A profile pose will totally eliminate the problem.

Very Dark Skin Tones. Unusually dark skin tones must be compensated for in exposure if you are to obtain a full tonal range in the portrait. For the darkest skin tones, open up a full f-stop over the indicated incident meter reading. For moderately dark subjects, like deeply suntanned people, open up one-half stop over the indicated exposure.

Uneven Mouths. If your subject has an uneven mouth (one side higher than the other, for example) or a crooked smile, turn his or her head so that the higher side of the mouth is closest to the camera, or tilt the subject’s head so that the line of the mouth is more or less even.

Long Noses and Pug Noses. To reduce the appearance of a long nose, lower the camera and tilt the chin upward slightly. Lower the key light so that, if you have to shoot from much below nose height, there are no deep shadows under the nose. You should use a frontal pose, either a full-face or seven-eighths view, to disguise the length of your subject’s nose.

For a pug nose or short nose, raise the camera height to give a longer line to the nose. Have the subject look downward slightly and try to place a specular highlight along the ridge of the nose. The highlight tends to lengthen a short nose.

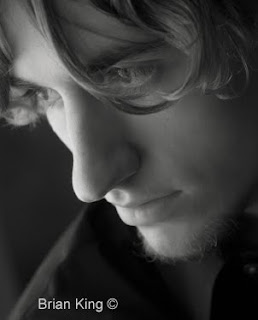
This is the type of portrait one might not attempt with a teenage subject a few years ago because the retouching might have been extensive. Now with the many retouching techniques available in Photoshop, it is easy to smooth the entire complexion in a matter of minutes. Photo by Brian King.

Long Necks and Short Necks. While a long neck can be considered sophisticated, it can also appear unnatural—especially in a head-and-shoulders portrait. By raising the camera height, lowering the chin, keeping the neck partially in shadow, and pulling up the shirt or coat-collar, you will shorten an overly long neck. If you see the subject’s neck as graceful and elegant, back up and make a three-quarter- or full-length portrait and emphasize the graceful line of the neck in the composition.

For short or stubby necks, place light from the key light on the neck. This is accomplished by lowering the key light, or feathering it downward. Increase the fill light on the neck so there is more light on the shadow side of the neck. Lowering the camera height and suggesting a V-neck collar will also lengthen the appearance of a short neck.

Wide Mouths and Narrow Mouths. To reduce an overly wide mouth, photograph the person in three-quarters view and with no smile. For a narrow or small mouth, photograph the person in a more frontal pose and have him or her smile broadly.

Long Chins and Stubby Chins. Choose a higher camera angle and turn the face to the side to correct a long chin. For a stubby chin, use a lower camera angle and photograph the person in a frontal pose.

Oily Skin. Excessively oily skin looks shiny in a portrait. If you combine oily skin with sharp, undiffused lighting, the effect will be unappealing. Always keep a powder puff and a tin of face powder on hand to pat down oily areas. The areas to watch are the frontal planes of the face—the center of the forehead and chin, and the cheekbones. The appearance of oily skin can also be minimized by using a diffused main light, such as umbrella or softbox lighting.

Dry Skin. Excessively dry skin looks dull and lifeless in a portrait. To give dry skin dimension, use a sharp, undiffused main light. If the skin still looks dull and without texture, have the person use a little hand lotion or body oil on their face to create small specular highlights in the skin. Don’t overdo it with the lotion or oil, or you will have the reverse problem—oily skin.

Skin Defects. Facial imperfections like scars and discoloration are best disguised by placing them in shadow, using a short lighting setup and a strong lighting ratio. Many of these issues can now also be addressed using digital retouching. Always get clearance from the subject before removing such features; they may have acclimated to them and not want them removed.

BE DISCRIMINATING
Here’s a problem you may not have thought of: what if the person is proud of the trait you consider a difficulty? Or what should you do when you encounter more than one problem?

The first question is best settled in a brief conversation with your subject. You can comment on his or her features by saying something like, “You have large eyes, and the line of your nose is quite elegant.” If the person is at all self-conscious about either one of these traits, he or she will usually say something like, “Oh, my nose is too long, I wish I could change it.” Then you will know that the person is unhappy with his nose, but happy with his eyes, and you’ll know how to proceed.

The second question is a little more difficult. It takes experience before you can discern which of the problems is the more serious one, and most in need of correction. Generally, by handholding the camera and moving into the corrective positions (i.e., a higher or lower camera angle) you can see how the physical characteristics are altered. By experimenting with various lighting, poses, and camera angles, you should be able to come up with the best posing strategy. Another good trick is to show them a few frames on the camera’s LCD. If they are at all selfconscious,
they will comment on their looks.

More than good lighting, posing, and composition techniques, the successful portrait photographer knows how to deal with the irregularities of the human face. All of the great portrait photographers know that their success lies in being able to make ordinary people look absolutely extraordinary.

BUY THIS BOOK FROM AMAZON
Today's post comes from the book Jeff Smith's Posing Techniques for Location Portrait Photography by Jeff Smith. it is available from Amazon.com and other fine retailers.

Many photographers have a difficult time learning how to pose group portraits. The challenge, of course, is that you must apply all of the techniques used to pose a single person—but on multiple subjects and simultaneously. Additionally, you must ensure that the assembled group, as a whole, looks both cohesive and appealing. A final consideration is that the portrait must reflect the relationship between the subjects—whether they are business partners, members of a family, or school friends.

DETERMINE WHO WILL BE IN THE PORTRAIT
The first question when posing a single person is the end use for the portrait. The first question to ask when photographing a group session is who will be in the portrait. If your session invoice simply states that there will be two people meeting you at the park, you don’t have much to go on. They could be an older couple, folks who might have a hard time getting into poses on location. They could be sisters, in which case you would want to show the closeness between them—but that would be a different kind of closeness than you’d want in a portrait of a young couple in love. It would also be different than if you were photographing a mother and baby. The individuals in the portrait and their relationship will determine how you pose them and at what height or position (standing, sitting, or on the ground).


CLOTHING SELECTION
The coordination of color and tone between the subject and the scene, as well as between the people within the group, increases in importance with the number of people in the group. It is possible to create an appealing portrait with two people wearing contrasting tones or colors, but it is impossible to do this with a group of ten or twelve people. With the reduced facial size, the viewer’s eyes will be drawn to the contrasts in clothing tones or colors, and not to the subjects’ faces.

Clothing selection is important. In this image, all but one subject wore green. The mismatched shirt had to be retouched to create the image seen here. Remember to advise your clients that ignoring your advice about clothing suggestions may result in additional retouching fees.

It is best to talk with the principal female in the group and explain how important color and tone coordination is. Typically, they will help make sure everyone dresses similarly, and often buy matching clothing for the group. While color and tone are important, so is the style of the clothing. You can’t have everyone in sweaters and one person in a t-shirt or shirt and tie. The style needs to be similar and should be coordinated to the style of scene, pairing casual styles of clothing with typical outdoor scenes and dressier clothing with more formal locations.

The one time that contrasting clothing is appropriate is when very small children or babies are to be photographed with full-grown people. In this case, having them dressed in contrasting color or tones helps draw the viewer’s eyes to these very small people in a very large world. Without contrasting colors or tones, the family members (especially the mothers) often feel like the babies are lost in the overall grouping.


Here, the two girls are posed for a three-quarter-length portrait.


Creating a head-and- shoulders image of the same subjects requires more than just zooming in. The young ladies had to be re-posed in order to bring their heads closer together.

POSING
Before planning the poses for the group, you need to decide how the portrait will be composed. Will it be a waist-up shot? A head-and-shoulders? A full-length? In a portrait of a single person you can easily go from a head-and-shoulders to a full-length image without changing the pose; you just change the focal length of the lens. This isn’t usually possible with larger numbers of people, so you’ll need to have your goal in mind before you start arranging the group.

Choose a Basic Structure. I see many group photos that look more like a mob of people waiting for tickets to go on sale than a close, loving family. To combat this, you need to start with some kind of structure while building your compositions for groups. You can then modify the structure once the basic composition has been achieved. This is much better than having no
composition at all.


A basic pyramid composition, with the tallest person in the center and the heads gently sloping down to either side, is a simple starting place for groups. To modify that basic structure and achieve a more interesting look, break the straight line of the downward angles by posing some of the heads below or above the distinct downward lines of the pyramid. This gives the composition the basic pyramid structure without the “old school” look.

If I am going for structure with a linear composition, I actually like using diagonal compositions more than pyramids. In these compositions, the heads are arranged so that they create a line that slopes across the frame. This is very effective in small groups like sisters, brothers, or small families.

In this pose, there is a slight diagonal created by the natural heights of the subjects.


Here is a more interesting variation. Mom and Dad are in the center, flanked by their sons. From left to right, the pose has three faces in a downward-sloping diagonal line. The last face, however, is brought back up almost to the level of the face on the far left. This creates a mirrored effect that is very engaging.

Ground the Pose. I like to see groups with at least some of the members on or near the ground. This softens the look of a more traditional portrait and doesn’t give the stuffy and stiff look of everyone standing in a basic pyramid. Even when the clothing and setting are more elegant, I generally don’t like to see everyone standing in order of height or on stairs. I want to break up the straight line with people in seated poses to lower their heads.


My favorite way to arrange a group is to start out on the ground and build the composition up person by person. This gives me the creative freedom to pose each person effectively as an individual, but also to come up with interesting compositions that don’t follow the pyramid lines.

Getting at least one member of the family down to ground level helps make the image look more relaxed.

Head Height and Proximity. The correct facial height and proximity depends on the number of people in the group and how large of an area you want to use for a background. When posing a couple or small group, if I decide to compose the portrait closer up (showing from the waist up for each member of the group), I position the eyes of one person at about the mouth level of the next person as I am building the composition. With larger groups, it is often impossible to put each face at a different level. Instead, you will simply create some basic posing structures (lines, pyramids, etc.) with some modifications and variations here and there to add some style.

In a typical portrait of a couple or group, the subjects are touching—usually with their bodies overlapping a bit. If, however, a family group wants to show their home, horses, cars, tractor, or the ocean in the background, you may need to have several feet between each family member to create an effective composition.Whether the individuals are closely packed or spread out,
however, the key is that they should all be approximately the same distance from each other. If one person is visually farther from the group than the others, it will look like he doesn’t belong.

BUY THIS BOOK FROM AMAZON

Photographing Women

Today's post comes from the book Lighting and Posing Techniques for Photographing Women by Norman Phillips. In this book Phillips profiles 15 of the leading professional photographers working today to find out what techniques they use when photographing women. This book is available from Amazon.com and other fine retailers.

Klarke is essentially a photojournalist, and her style is innovative and contemporary. The images in this chapter challenge many of the norms, but Klarke makes no apologies if her images shock the purists. It is all about capturing the moment. Her assignments are wide ranging; Klarke shoots corporate, PR, travel, fashion, and wedding images.


The first image is the result of cross processing color film. The provocative pose shows a lot of attitude. Posing the subject in profile and having her turn her head toward the camera will always provide interesting expressions with a little encouragement. To complete the pose, the subject positioned her fingers on the far side of her hat. The use of a black background made for a striking image.


A 48-inch softbox was placed slightly to the left of the camera for a flat lighting effect. Two large reflectors, one each side of the subject, provided additional definition and modeling. See diagram above.


In the photo above, the subject rested her elbows on a railing to create a relaxed composition. Klarke allowed her model to be comfortable and did not tweak the position of her arms and hand, so the resulting portrait has a casual look.

Note that the subject was turned slightly away from the camera, with the lens positioned slightly above her forehead. The angle of view caused her to raise her eyes to the camera with a quizzical expression.

Strong sunlight from camera left was the primarylight source for this image. Flash was used to camera right to eliminate deep eye sockets and harsh shadows. The flat lighting, which is used often in glamour portraits, eliminated almost all the shadows and skin imperfections.


In this photo, Klarke had her subject shake her hair around to provide a natural and spontaneous pose and one that is likely to be attractive for the younger subject or fashion-conscious client. It is very effective when the subject has long, cascading hair. This subject had hair just long enough to make it work. We see this technique used on TV advertising hair products.


The main light was a small softbox placed to camera left and a little higher than her head. A domed reflector was placed below the subject’s face. A background light was used to create a slight haloed effect. See diagram above.


The above photo is another image that has the glamour treatment. The relatively static pose has impact due to the use of the red metallic dress. The subject’s head was slightly tipped to our right, breaking the vertical line of her torso. The position of her arms is one we frequently see, with matching lines created by the arms. The impression could be dramatically changed with her head tipped a little to our left. Another change that would create a different impression would be to have her extend her elbow toward her right knee.

A standard high-key background was used and a light was placed at each side of the camera to create the flat, glamour-style lighting.This next is a provocative image with sex appeal. The subject is attired in black lingerie, challenging us to respond to her presentation. For those interested in boudoir and glamour photography this is a good starting pose. The placement of her hand on her right hip is suggestive, and the raised knee created an attractive, boldly feminine impression. The raised knee also reduced the view of the black top, which provided another feminine element to the composition.


The lighting was mainly from a window to our right and her face was lit with a tungsten spot from a low angle to our left. See diagram below. The high-key set elements, black garments, and black props produced a dynamic fashion image with a glamour edge.


In the next photo, the subject was positioned in a casual leaning pose against a window, which created a high-key background and also eliminated a lot of detail in her hair. The front of the image was illuminated with a little flash and a reflector. The facial rendering is different from any we have so far seen and is in some ways reminiscent of what we see in everyday lighting situations.


Teenaged subjects often prefer a passive, almost disinterested expression as shown here. To bring another type of client to our studio it is a good idea to show some different impressions such as this, a portrait not unlike those we see in the windows of hair and beauty salons.

The pose shown below is almost a conventional three-quarter face. However, it was shot from a lower angle than we would expect to see. This caused the subject to look a little downward at the camera, thereby evoking an interesting expression. The slight tilt of her head to our right is what makes this portrait work so well.


The subject was photographed against a high-key background. The primary light for the image came from a skylight. Fill flash was used from the left, and an array of silver reflectors was used to open up all the shadow areas for a flat-lighting glamour style look.

In these images Klarke has challenged our conventional concepts in both posing and lighting and shown that there is a lighting style for all purposes and needs, providing we want to explore different techniques.

AVAILABLE FROM AMAZON

*excerpted from the book Lighting and Posing Techniques for Photographing Women